Interaction with jobs on remote kube cluster

This demo is made on a windows 10 computer. It shows how to interact with a Kube cluster in python and start a simple job on it and wait for the job to end and get its status/logs. The tricky part is to get the logs since the job object do not directly contains the info and thus, we need to get the pod associated with the job and get the pod logs. 

Kube setup (server) 

I use the Kube functionality of Docker for windows. Start Kubernetes which is part of Docker for windows 

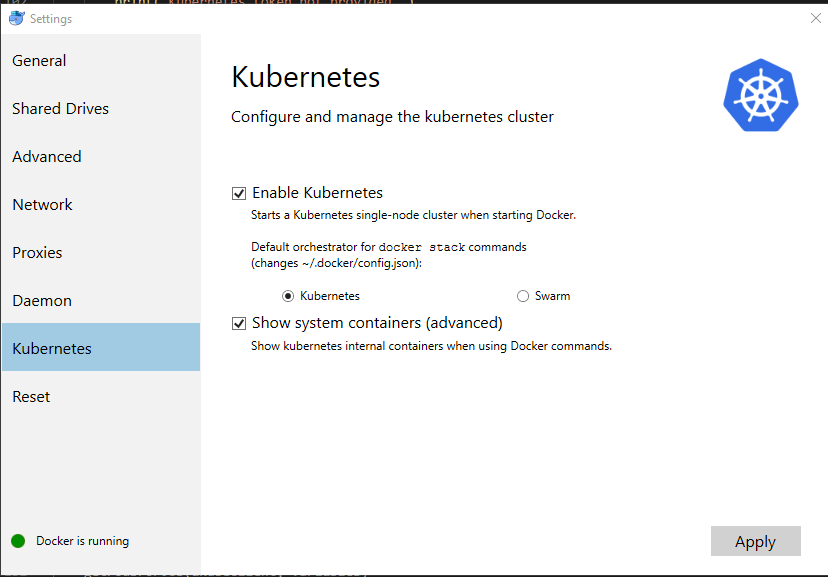
Once the kube cluster is up and running you can interact with it from a terminal (I use PowerShell) that we will call T1 and will be use for the kube server-side interaction. 

Create service account 

PS C:\Users\charl> kubectl create serviceaccount jobdemo 
serviceaccount "jobdemo" created 

Get full permission to the SA (not clean but not the goal here) 

PS C:\Users\charl> kubectl create clusterrolebinding cluster-admin-binding --clusterrole cluster-admin --serviceaccount default:jobdemo 
clusterrolebinding.rbac.authorization.k8s.io "cluster-admin-binding" created 

Get secret token of the SA (from the secrets) 

PS C:\Users\charl> kubectl get secret jobdemo-token-jk59q -o json 

… 
"token": "ZXlKaGJHY2lPaUpTVXpJMU5pSXNJbXRwWkNJNklpSjkuZXlKcGMzTWlPaUpyZFdK...F6bDlKUUFGSF94Q3BvMVE=" 
… 

It s base64…decode it in a string and save it.

Python script setup (client) 

Start a new powershell terminal (let’s call it T2) to work on this part. Build the container from the dockerfile included in the repo 

PS C:\Code\kubejobs> docker build -t quicktest . 

Start the container and mount the repo in the container (not mandatory but allow to edit code in windows) 

PS C:\Code\kubejobs> docker run -it -v C:\Code\kubejobs:/mountfolder quicktest 

Export the token (the decode version of the base64 token we retrieved previously) 

[root@54a8362da7d1 mountfolder]# export KUBE_TOKEN=eyJhbGciOiJSUzI1NiIsImtpZCI...Es5howDOSTWqzl9JQAFH_xCpo1Q 

Start the python script 

[root@54a8362da7d1 mountfolder]# python3.6 kubeJobsDemo.py 
Starting 
Starting job 
Checking job status 
Job is still running. Sleep 1s 
Checking job status 
Job is still running. Sleep 1s 
Checking job status 
Job is still running. Sleep 1s 
Checking job status 
Job is still running. Sleep 1s 
Checking job status 
Job is still running. Sleep 1s 
Checking job status 
Job is still running. Sleep 1s 
Checking job status 
Job is still running. Sleep 1s 
Checking job status 
Job is over 
getting job pods 
Checking job status 
getting job logs 
Job is over without error. Here are the logs:  3.141592653589793 
Cleaning up the job 
Ending 
[root@54a8362da7d1 mountfolder]# 

You can also chech the job creation when the python script is running (but not after because job is deleted at the end) from the T1 terminal used before. 

PS C:\Users\charl> kubectl get jobs 
NAME      DESIRED   SUCCESSFUL   AGE 
pi        1         0            3s 

As you can see, we also print the logs of the job. I use this python script daily when I spawn jobs on a remote Kube cluster from a Jenkins server (my Jenkins jobs are just spawning Kube job on remote cluster and waiting for them to be over). I’m sharing it hoping it can help some ppl. 

The code is quite simple and the only tricky part is to get the pod associated to the job so that we can get the logs (BTW this may not works in case the job spawn several pods). 

The link Job-Pod is done with the use of selector since it was the recommended methode when I done the script (https://github.com/kubernetes/kubernetes/issues/24709) 

Full code is here: https://bitbucket.org/charly37/kubejobs/src/master/

My favorite way to work with linux container on windows10

Often i need to write code for Linux server on a win10 ENV. Before I was using VM (virtualbox/vagrant) but here is my new way to do it.

Create windows folder that will be mount: C:\Code\dockermount
Start the docker image and mount the folder in /mountfolder

docker run -it ubuntu:18.04 -v C:\Code\dockermount\:/mountfolder

You can now work on windows with your preferred editor and run the code in the linux ubuntu container

HTTPS with let’s encrypt

If you want to try the new facebook bot capability you could come across the need of an HTTPS webserver for the callback URL:

securecallback

Anyway….since https is becoming the standard (http://trends.builtwith.com/ssl/SSL-by-Default, https://security.googleblog.com/2014/08/https-as-ranking-signal_6.html) it could be interesting to learn more about it and give it a try…

Want to know more about https? Google!

Next step… you need a certificate. It needs to be provided by a certificate authority and it will cost you some money (depending on the authority and certificate type but once again…..google). You could buy one on rapidSSL for hundred dollars (https://www.rapidssl.com/) but since few weeks there is a new player in town provided free certificates: let’s encrypt.

“Let’s Encrypt is a free, automated, and open certificate authority (CA), run for the public’s benefit. Let’s Encrypt is a service provided by the Internet Security Research Group (ISRG).”

The service went out of beta in April 2016 with some limitation but the initiative is promising so I decided to try it.

The documentation is pretty good :

First you retrieved the client with

wget https://dl.eff.org/certbot-auto
chmod a+x ./certbot-auto

then you check the options

$ ./certbot-auto --help
Usage: certbot-auto [OPTIONS]
A self-updating wrapper script for the Certbot ACME client. When run, updates
to both this script and certbot will be downloaded and installed. After
ensuring you have the latest versions installed, certbot will be invoked with
all arguments you have provided.
Help for certbot itself cannot be provided until it is installed.
  --debug                                   attempt experimental installation
  -h, --help                                print this help
  -n, --non-interactive, --noninteractive   run without asking for user input
  --no-self-upgrade                         do not download updates
  --os-packages-only                        install OS dependencies and exit
  -v, --verbose                             provide more output

You need to find the plugin to use depending on your webserver (more info HERE). I used the standalone plugin since there is nothing for nodejs. With this plugin the client will use the port 443 to act as a webserver to handle some challenge to prove that its own the domain.

./certbot-auto certonly --standalone --email charles.walker.37@gmail.com -ddjynet.xyz

The output will give you information about where the certificat/key have been generated so you can use them :

Congratulations! Your certificate and chain have been saved at
   /etc/letsencrypt/live/djynet.xyz/fullchain.pem......

Then we can try it with a simple page served by nodejs.

Here is a very simple https nodejs server (from the official doc : https://nodejs.org/api/https.html)

var fs = require('fs');
 var https = require('https');
 var options = {
 key: fs.readFileSync('/etc/letsencrypt/live/djynet.xyz/privkey.pem'),
 cert: fs.readFileSync('/etc/letsencrypt/live/djynet.xyz/cert.pem')
 };
 https.createServer(options, function (req, res) {
 console.log(new Date()+' '+
 req.connection.remoteAddress+' '+
 req.method+' '+req.url);
 res.writeHead(200);
 res.end("hello world\n");
 }).listen(443,"0.0.0.0");

Let’s run it with

$ sudo node main.js
 Fri Jun 03 2016 02:41:57 GMT+0000 (UTC) 73.68.66.138 GET /
 Fri Jun 03 2016 02:41:57 GMT+0000 (UTC) 73.68.66.138 GET /favicon.ico

And check the result

sslResult

Nice green lock… we’re safe !

Warning!

I discover few days after that it was node 100% working. The nodejs server does not provide the chain of certificate. See my follow up article to fix it HERE.

Determine file system type

It will avoid me to stackoverflow it every time…

[myuser@myserver ~]$ df -T
Filesystem     Type     1K-blocks    Used Available Use% Mounted on
/dev/sda1      xfs       10473900 2185416   8288484  21% /
...
/dev/sdb1      xfs      209611780  315256 209296524   1% /ephemeral

Works fine unless the FS is not yet mounted…. Otherwise use “file”:

[myuser@myserver ~]$ sudo file -sL /dev/sdb1
/dev/sdb1: SGI XFS filesystem data (blksz 4096, inosz 256, v2 dirs)

SSL tunneling Raspbery Pi

on commence par installer le package stunnel4 :

sudo apt-get install stunnel4

Ensuite il faut l activer sinon on aura cette erreur en essayant de le lancer :

pi@raspberrypi ~ $ sudo /etc/init.d/stunnel4 start
SSL tunnels disabled, see /etc/default/stunnel4

donc pour éviter ca on édite le fichier de conf :

sudo vi /etc/default/stunnel4

et on remplace

ENABLED=0

par

ENABLED=1

ensuite on configure stunnel en créant son fichier de conf qui n existe pas par défaut :

sudo vi /etc/stunnel/stunnel.conf

dont voici le contenu

chroot = /var/lib/stunnel4/
setuid = stunnel4
setgid = stunnel4
; PID is created inside the chroot jail
pid = /stunnel4.pid

client=no
cert=/etc/stunnel/stunnel.pem
debug=3
sslVersion = all
output=/var/log/stunnel4/stunnel.log
[sslssh]
accept=443
connect=localhost:22

ensuite il faut une clé sinon on aura cette erreur au démarrage :

sudo /etc/init.d/stunnel4 start

pour créer la clé :

pi@raspberrypi ~ $ cd /etc/stunnel
pi@raspberrypi /etc/stunnel $ sudo openssl req -new -x509 -days 365 -nodes -out stunnel.pem -keyout stunnel.pem

et enfin on peut le starter

pi@raspberrypi /etc/stunnel $ sudo /etc/init.d/stunnel4 start

et vérifier qu il est bien lance avec

pi@raspberrypi /etc/stunnel $ ps -aux | grep tun
warning: bad ps syntax, perhaps a bogus '-'?
See http://gitorious.org/procps/procps/blobs/master/Documentation/FAQ
stunnel4 20179  0.0  0.3   4400   604 pts/0    S    07:54   0:00 /usr/bin/stunnel4 /etc/stunnel/stunnel.conf
stunnel4 20180  0.0  0.3   4400   604 pts/0    S    07:54   0:00 /usr/bin/stunnel4 /etc/stunnel/stunnel.conf
stunnel4 20181  0.0  0.3   4400   604 pts/0    S    07:54   0:00 /usr/bin/stunnel4 /etc/stunnel/stunnel.conf
stunnel4 20182  0.0  0.3   4400   604 pts/0    S    07:54   0:00 /usr/bin/stunnel4 /etc/stunnel/stunnel.conf
stunnel4 20183  0.0  0.3   4400   604 pts/0    S    07:54   0:00 /usr/bin/stunnel4 /etc/stunnel/stunnel.conf
stunnel4 20184  0.0  0.3   4400   748 ?        Ss   07:54   0:00 /usr/bin/stunnel4 /etc/stunnel/stunnel.conf

Ensuite il faut penser a garder sa clé “stunnel.pem” avec soit pour pouvoir la copier sur le client

Pour configurer le client il faut télécharger putty et stunnel pour Windows. Ensuite in faut installer stunnel et dans le répertoire d installation il faut remplacer la clé “stunnel.pem” par notre clé.

Une fois que la clé est installe il reste plus qu a démarrer stunnel et changer sa config en la remplaçant par :

client = yes
 delay = yes
 [sshtunnel]
 accept = 127.0.0.1:22
 connect = <adresse IP serveur qu on a configurer avant>:443

et on peux ensuite utiliser putty en se connectant a l adresse stunnel : 127.0.0.1:22 et on atterrira sur le serveur distant

Pour AWS EC2 AMI instance

[ec2-user@domU-12-31-39-09-EE-BA stunnel]$ cat stunnel.conf
root = /var/lib/stunnel4/
setuid = stunnel4
setgid = stunnel4
; PID is created inside the chroot jail
pid = /stunnel4.pid

client=no
cert=/etc/stunnel/stunnel.pem
debug=3
sslVersion = all
output=/var/log/stunnel4/stunnel.log
[sslssh]
accept=443
connect=localhost:22

puis

[ec2-user@domU-12-31-39-09-EE-BA stunnel]$ sudo stunnel stunnel.conf


Protection site web par password ET/OU IP

Pour restreindre l’accès aux commandes de mon framework domotique j’utilisai une protection par mot de passe avec lighttpd. J’avais mis cette protection en place en utilisant le tuto disponible ICI.

Le probleme est que l’on doit taper le mot de passe a chaque fois et si je le change je dois le communiquer a mon coloc…. J’ai donc fouiller un peu la doc de lighttpd et je me suis rendu compte qu on pouvait egalement filtrer les acces par adresse IP. Encore plus fort….on peux combiner les 2 solutions !!

Voila donc la nouvelle conf d’acces lighttpd pour proteger la partie admin du framework ou je ne demande pas le mot de passe pour les adresse de mon reseau local (je fais confience au gens qui viennent chez moi 😉 ) et je demande un password pour les acces depuis internet :

$HTTP["remoteip"] !~ "192.168.0.*" {
auth.require = ( "/Sender/" =>
(
"method" => "basic",
"realm" => "Password protected area",
"require" => "user=charles"
)
)
}

ensuite il faut penser a reloader la config avec

/etc/init.d/lighttpd restart

Installation Android Studio Ubuntu

1/JDK

La premiere etape est l’installation du JDK disponible ici. Il faut choisir la version Linux x64 : jdk-7u21-linux-x64.tar.gz.Une fois que la version est DL il faut le decompresser et le copier :

tar xzvf ~/Downloads/jdk-7u21-linux-x64.tar.gz
mv jdk1.7.0_21/ /usr/lib/jvm/

finalement il reste juste a mettre a jour l environement avec au choix des “export dans le wshenv/profile” ou alors avec “update alternative” :

sudo update-alternatives --install /usr/bin/java java /usr/lib/jvm/jdk1.7.0_21/bin/java 1
sudo update-alternatives --install /usr/bin/javac javac /usr/lib/jvm/jdk1.7.0_21/bin/javac 1
sudo update-alternatives --install /usr/bin/javaws javaws /usr/lib/jvm/jdk1.7.0_21/bin/javaws 1
sudo update-alternatives --config java
sudo update-alternatives --config javaws
On peux verifier que tout a ete installe correctement avec :

charles@charles-Fixe:~/Téléchargements$ java -version
java version "1.7.0_21"
Java(TM) SE Runtime Environment (build 1.7.0_21-b11)
Java HotSpot(TM) 64-Bit Server VM (build 23.21-b01, mixed mode)
2/ Android studio
Comme pour le SDK….on commence par le DL ici. Ensuite on le decompresse
tar xvzf android-studio-bundle-130.677228-linux.tgz
et on peux le lancer
cd android-studio/bin
charles@charles-Fixe:~/DEV/android-studio/bin$ ./studio.sh
Capture du 2013-05-26 21:55:24

Shutdown a distance depuis un PC linux (raspbery Pi)

Il y a qq temps j’ai mis en place une solution de WOL pour démarrer mon PC Windows 7 depuis le Raspberry Pi (le but étant que mon système domotique le démarre automatiquement quand je rentre du travail le soir).

Cela fonctionne bien et j’ai récemment découvert que le shutdown à distance été aussi possible et que sa mise en place n’est pas si difficile que ça….. Tout cela grâce au blog de Michael http://michael.venez.fr/ qui contient toutes les étapes nécessaires.

Pour résumer il faut bien penser à installer les packages nécessaire sur le Raspberry Pi (samba + samba common ). Ensuite il faut activer le RPC sur windows 7 (désactive par défaut pour des raisons de sécurité) grâce a la procédure décrite ici http://www.howtogeek.com/howto/windows-vista/enable-mapping-to-hostnamec-share-on-windows-vista/

Une fois que tout ceci est mis en place on peut arrêter le PC windows 7 à distance avec :

net rpc shutdown -f -I 192.168.0.7 -U user%user_password

Merci encore Michael pour le tuto sur son site.

Wake up by LAN using Raspberry Pi

J’ai décidé d’ajouter une fonctionnalité à mon ensemble domotique pour pouvoir allumer mon PC fixe depuis mon site web (hébergé sur mon raspberry Pi).

Rien de plus simple car il suffit d’utiliser le binaire linux etherwake disponible sur Raspbian

sudo apt-get install etherwake

puis :

/usr/sbin/etherwake 20:cf:30:ca:8a:50 (avec l'adresse MAC de la carte réseau du PC fixe).

Il faut aussi penser à bien configurer le BIOS du PC fixe pour supporter le WOL. Pour la partie WEB j’ai simplement ajouté un cas dans la passerelle :

case "CMD_WOL" :
            $aCommandToExecute = 'sudo /usr/sbin/etherwake 20:cf:30:ca:8a:50';
            echo exec($aCommandToExecute);
            break;

et ajouté un bouton :

et la callback :

$("#Bopen").click(function() 
        {
            $.ajax(
            {
                type: "POST",
                   url: "http://82.227.228.35/Sender/XbeeWrapper.php",
                   data: ({iCmdType : "CMD_WOL"}),
                   cache: false,
                   dataType: "text",
                   success: onSuccess
            });
        });
...
<input id="Bopen" type="button" name="open" value="Wake up PC"/>

Installation de Sqlite3

J’ai décidé d’ajouter une base de données à mon site web de domotique pour conserver des informations sur les différents éléments. Je voulais utilise mongoDb au début mais comme il n’existe pas de paquet pour Rasbpian j’ai fallbacke sur SQLite3.

Voici comment ajouter SQLite3 a mon installation (voir ici pour l’installation de lighttpd et php).

sudo apt-get install sqlite3
sudo apt-get install php5-sqlite
sudo service lighttpd restart

Sqlite est maintenant utilisable sur notre serveur lighttpd 😉