The idea is to create a bot to detect cheap option that may have high volatility and thus generate some gain. The financial data (stocks/options/earnings) are retrieve from IEX API https://iexcloud.io/ (I had to pay to get to options data).
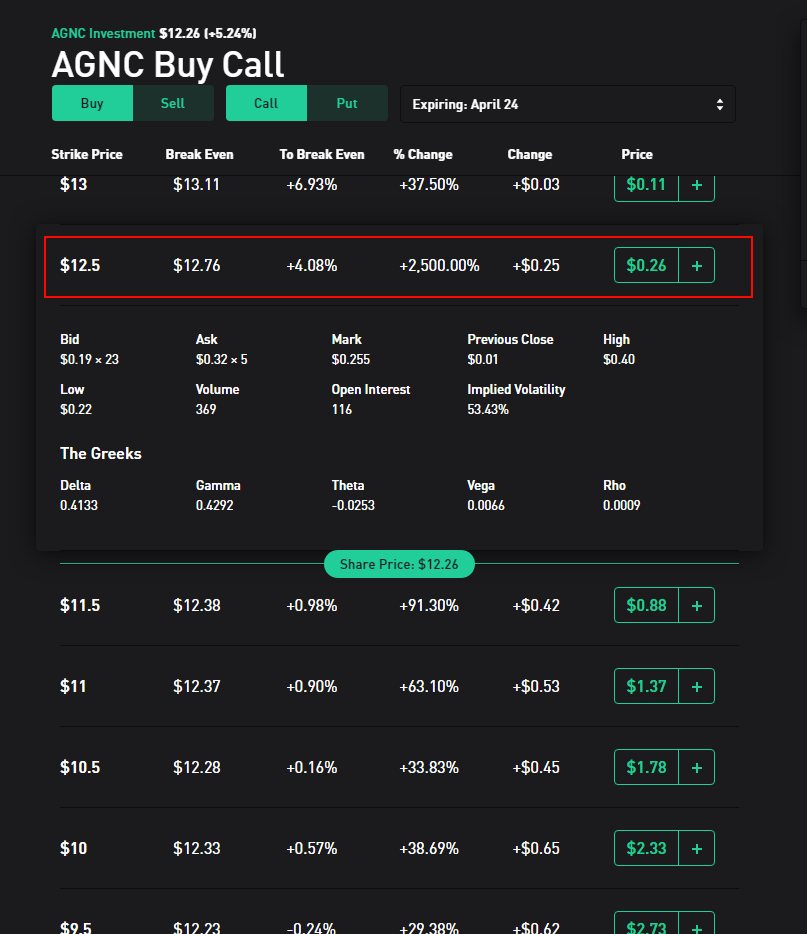
For example, the following call for AGNC (which already had a significant value increase) is only 30$ (more or less) and may pay off after the earnings
I want option that may have some high volatility and to achieve that I decided to look at the stocks that will report earnings and trade the options that expire few days after that. I hope that earning report may have a significant impact on the options and thus generate gain.
I use this endpoint to get the companies that report earnings in the next 7 days and then filter by company market cap to only work on the 50 biggest stocks. I do that to ensure that the options are liquid enough and that there will be plenty of them.
aPotentialCompanyToCheck = getNextWeekEarning()
logging.info(f"We have {len(aPotentialCompanyToCheck)} potential Earnings before filtering")
aStates['nbCompanyEarningsUnfilter']=len(aPotentialCompanyToCheck)
# We keep the biggest companies only to have lot of options (thus data)
aPotentialCompanyToCheck = __filterPotentialEarning(aPotentialCompanyToCheck)
logging.info(f"We have {len(aPotentialCompanyToCheck)} potential Earnings before filtering: ")
aStates['nbCompanyEarningsFilter']=len(aPotentialCompanyToCheck)
prettyprintEarningCandidates(aPotentialCompanyToCheck)
Options finder
The next step of the process is to find all options in the next 7 days after the earnings and filter the one with a strike price in the 10% range of the actual stock value (so they have some chance to happen). For those options we keep the one that are less than 20$ since i don t want to gamble more than that 😉
Past earnings
The program will also get the stock prices for the last 2 earnings so that i can see if the stock is usually volatile around its earning to determine if our option have a change to gain. For example if we have a cheap option with a strike price which is +5% of the actual stock price but in the past the stock never move more than 3% after its earning….we know there are very few chances that our option will be in the money. On the opposite if we have another case with a company that was very volatile in its past earnings with move around 10% then we know that it has some chance to happen again.
To the end we get the stock prices on a 10 days range starting 3 days before earning. The value will be display.
Stock value
The last information the script will extract is the actual stock price of the company to see its trend and help me choose a good option.
Display
All the information retrieved are presented to the user on a website. The graphics are made with plotly library that i strongly recommend https://plotly.com/
Result
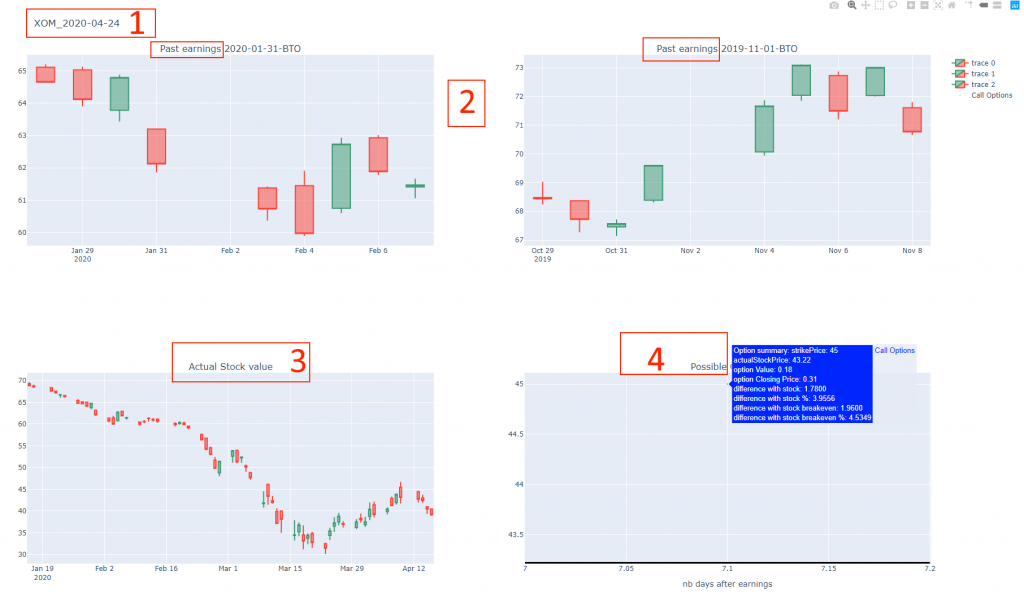
Here is the page for one stock
It shows the different data gather by the script: 1 – Stock ticker and earning date 2 – Past earnings for the last 6 months 3 – Actual stock value for the last months 4 – Possible cheap option with their detail
In this example we could buy a call which need to gain 4.9% to generate gain and only costs around 20/30 $.
Conclusion
I tried it for 3 weeks but did not make a gain. There were too many lost to compensate with the winner and end up losing around 10$.
In addition to the Neural network solution I explain in the previous article I also tried other algorithms like Decision Tree and Random Forest.
Algorithm
Accuracy
Neural Network
96.63%
Random Forest
96.96%
Decision Tree
96.76%
Refined Decision Tree
97.64%
Refine decision tree?
One of the conclusions of all my tests with ML from the previous article is the complexity to choose the parameters needed by each model. Hopefully a friend suggests me a solution “GridSearchCV” which allows to test various parameter for an algorithm and find the best ones.
The algorithm I called “refined decision tree” is a decision tree based on the best parameters “GridSearchCv” found.
#Now let s try to refine the Decision tree by trying several parameters
aGridSearchParams = {'max_features': [None, 'sqrt'],'max_depth' : [3, 5, 10, None],'min_samples_leaf': [1, 2, 3, 5, 10],'min_samples_split': [2, 4, 8, 16],'max_leaf_nodes': [10, 20, 50, 100, 500, 1000]}  # instantiate the grid   aGridSearchResult = GridSearchCV(DecisionTreeClassifier(), aGridSearchParams, cv=5, )   # fit the grid with data   aGridSearchResult.fit(atrainDataX, atrainDataY)
#let s see how good it is
aDecisionTreeRefinedPrediction = aGridSearchResult.best_estimator_.predict(atestDataX)
I used the Neural Network and the “refined decision tree” in the application to compare them and notice that the neural network was slightly better. For example
root - INFO - Checking if group should be refresh by calling ML with: [1, 47, 10, 0]
root - INFO - We found 1 new message and the ML probability were NN: [[0.11245716]], DT[[1. 0.]]
When trying to predict if a group with characteristics:
Latest refresh done 1 days ago
47 users in the chat room
Latest message in the group was posted 10 days ago
0 messages posted in the last week in the chatroom
The Neural network predict a probability of 11% of new messages while the “refined decision tree” predicted 0% chance. We found new messages in the room leading for a false positive for the “refined decision tree” which we want to avoid at all cast. I just stick to the neural network for now.
Optimizer change on NN
When training the Neural Network, I sometime end up with very poor results. The model seems stuck and always predict the same output:
NN atestDataYPredictedKeras: [0.05339569 0.05339569 0.05339569 ... 0.05339573 0.05339573 0.05339573]
Even if the test case is composed of around 1500 lines.
NN len(atestDataYPredictedKeras): 1484
This happen from time to time and it usually get away if I retrain the model nevertheless it makes the final results very bad if I did not check the training results every time.
Luckily, I’m not the only one in this case ? according to this github ticket.
I tried some of the suggestions proposed on the page and one that seems to be the best was to modified the optimizer from SGD to Adam. After some reading, I decided to go with it since Adam seems to be a good choice according to the ML community. This youtube video explain some of the possible optimizer algorithm and also suggest adam as default choice. Nevertheless, like all topic/parameters in ML you can always find arguments about the opposite like this article:
“We construct an illustrative binary classification problem where the data is linearly separable, GD and SGD achieve zero test error, and AdaGrad, Adam, and RMSProp attain test errors arbitrarily close to half.”
I will still stick to Adam for now since it fixes my original issue with the same accuracy and smaller loss:
I have a bot part of several (around 250) chat groups (think discord rooms). The bots connect everyday with an undocumented API to get for each room the new messages. Since the API is not fully documented I’m not sure it was designed to be used for robotic access. I thus decided to try to predict if a room will have new messages and reduce the number of calls. That was a fun opportunity to try to do ML.
Features
First, I need to find some “features” that will be used to predict the output (there are new messages to get or not). I tried several versions and the actual features are
number of days since the last refresh
integer to indicate how many days have passed since the latest time we call the API to refresh messages. For example, if we are the 7 JAN when we are doing a refresh and the latest was done 1 JAN this field value will be 7 – 1 = 6 days.
number of users in the chat group
integer which indicates the number of users in the group for which we call the API to refresh messages.
number of days since the latest message was posted in this group
integer to indicate the number of days has passed since the latest message was posted in the group (compared to the date of the refresh) For example, if we last refresh for this chat room was done the 7 JAN and we old message in the chat group at this time was 1 JAN the value of this field will be 7 – 1 = 6 days.
number of messages in the latest 7 days
integer to indicate the number of messages in the chat room in the latest 7 days
I logged the values for each of these features when calling the API for few days as well as the result of the call: were there new messages in the group or not. I write the results in 2 files which will be used to train and test the MN.
Examples
0;1;8;555;0
One day we call the refresh API on a chat room to get new messages and did not get anything. At this time the number of days since the latest refresh was 1 (we checked the day before) and the number of users in the chat room was 8. We also know that the most recent message is 555 days old and there were 0 message in the latest week.
1;1;10;4;2
One day we call the refresh API on a chat room to get new messages and found some. At this time the number of days since the latest refresh was 1 (we checked the day before) and the number of users in the chat room was 10. We also know that the most recent message is 4 days old and there were 2 messages in the latest week.
This is still a work in progress and I’m getting feedback from other people I’m working with so I share the file and feature explanation on a dedicated google drive folder. You should rather check it to get more info and the latest feature used.
ML
I decided to use Keras since it has good review. It works on top of various ML engines and allow fast experimentation “Keras is a high-level API capable of running on top of TensorFlow, CNTK, Theano, or MXNet (or as tf.contrib within TensorFlow). Since its initial release in March 2015, it has gained favor for its ease of use and syntactic simplicity, facilitating fast development. It’s supported by Google.”
Data
I split the data in 2 files with the 80/20% proportion. The data are csv files formatted as explained in the previous section. Latest data and info are available on the following folder.
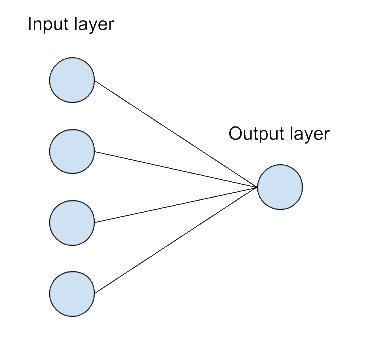
I decided to use a Neural network with 4 input (since we have 4 features) in the input layer connected to a single neuron as output layer.
It’s the most basic design I could imagine. I saw some article where people suggest to add a hidden layer but I was not sure how to decide. The “design” of the neural network was the first challenge I face. I will do a dedicated post on this point later.
There are several other parameters like the activation functions for each layer. I choose “relu” for the first layer and “sigmoid” for the output after some quick reading but I’m clearly not sure it’s the best choice. There are so many possibilities and no clear real explanations on which to choose.
One of the reason I choose Keras was the simplicity to get results “developed with a focus on enabling fast experimentation” (https://keras.io/). Training is a simple call to the “fit” function
The model is train with the training data and I choose a random value of 100 epochs which seems to be a good value from what I read from other article (especially for the small amount of data I have).
When call the python code will output the results of each epoch
At the end of the training the model has a 95% rate success in its prediction. The next step is to evaluate the model with unknown new cases from the testing set.
Testing
Once the model has been trained with the training data (as a reminder I split my data 80% train / 20% test) we can evaluate how good it predicts with the test data. This is done with the evaluate method of Keras:
NN algorithm results: [0.14495629791642295, 0.9595687389373779] for folowwing metrics : ['loss', 'accuracy']
We achieve good results too on the testing set with 96% accuracy.
Threshold
The neural network output a percentage as prediction:
root - INFO - Checking if group should be refresh by calling ML with: [4, 123, 560, 0]
root - INFO - We found 0 new message and the ML probability were NN: [0.01339133]
…
root - INFO - Checking if group should be refresh by calling ML with: [4, 16, 0, 9]
root - INFO - We found 1 new message and the ML probability were NN: [0.75237719]
Since I want to be sure to never miss a possible message I decided to take a very low threshold at 2% which means we are probably calling some time and not find anything. I will review it after the ML results are compare to the reality for a few days. Nevertheless, if you never heard the term “confusion matrix” you may want to have a look at it now since we will use it later to review our threshold. There are some explanations about it here.
Results
I saved the model with
aKerasNnModel.save("model.h5")
And then used it in my real-life application. I logged the prediction of the model but still called the API to get the new messages from the chat rooms so I can log a confusion matrix.
As explain previously I choose a very low threshold to ensure to avoid any false negative even if it means having few false positive because I do not want to miss any messages. At the end we reduce our number of calls to the API from 273 to only 35 and did not lost any messages. The threshold seems good enough for now.
Conclusion
I’m glad I had a project where I could have some fun discovering ML with a real-life application. As a non-expert and first-time user of Neural network I find it quite complicated and easy at the same time. It s easy since I manage to get good results very quickly without too much efforts but… It’s hard because there are lot of unknow variables like the network shape or the different function (activation, loss, optimizer). For most of these parameters I did not find any good documentation on which one to choose (and the articles sometimes contradicts each other).
This article is just a short sum up of my work on this project since I did not discuss of the other machine learning algorithms I tried (and compare to NN): Decision tree and Random Forest. I also did not discuss an issue I had when training the network and get stuck with a model which always answer the same prediction. I plan to do a follow up to develop these issues later.
This is the first board based on the Nrf52840 and thus there is no existing Arduino core for this board which means they would face some challenge to have Arduino running on it. They went for a smart solution by deciding to run Arduino Core on top of MBED OS to be able to use all the works already done by MBEDOS to integrate the nrf52840 chip. This is explain on their blog if you are curious: https://blog.arduino.cc/2019/07/31/why-we-chose-to-build-the-arduino-nano-33-ble-core-on-mbed-os/
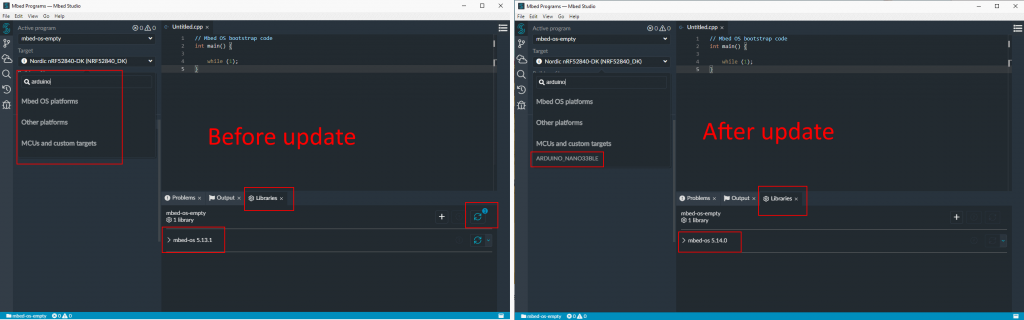
The only “difficulty” is to use a mbed version recent enough (>=5.14) to have the adruino nano 33 in the list of target.
I ve done a very simple program that will blink 3 times a LED on pin
#include "mbed.h"
#include "ble/BLE.h"

DigitalOut led1(p47);

// main() runs in its own thread in the OS
int main()
{
    //Pattern is 3 blink and wait
    while (true) {
        // Turn led on
        led1 = 1;
        wait_ms(200);
        led1 = 0;
        wait_ms(200);
        led1 = 1;
        wait_ms(200);
        led1 = 0;
        wait_ms(200);
        led1 = 1;
        wait_ms(200);
        led1 = 0;
        wait_ms(3000);
    }
}
Also in the folder of your project you should have a /mbed-os/targets/targets.json with the NANO33 definition.
I added 2 parameters “”OUTPUT_EXT”: “bin”” to generate a bin file instead of an hex file (the uploader use bin files)
The second change is “”mbed_app_start”: “0x10000″” so that the toolchain know my program will be located in memory at address 0x10000. This info is part of the arduino bootlaoder code and was explain to me here: https://github.com/arduino/ArduinoCore-nRF528x-mbedos/issues/19 The arduino bootloader will call the code at this address after it boot.
After you compile the code with MBED studio you will have the result binary here “C:\Users\charl\Mbed Programs\mbed-os-example-blinky\BUILD\ARDUINO_NANO33BLE\ARMC6” that can be uploaded to the board
upload
This part is tricky since my original goal is to use the arduino bootloader to upload my code to the board without any other tools. It took me some time to understand how to do it but hopefuly i got some help here https://github.com/arduino/ArduinoCore-nRF528x-mbedos/issues/19 and so i decided to use BOSSAC which is the same tools used by the arduino IDE. You can see it in the logs if you activate the extra logs in the IDE.
I re-use the bossac binary that is shipped with the arduino IDE and added an option to upload at address 0x10000. You need to press twice the reset button on the board to force the bootloader to run forever before starting the upload command.
Seems to be working… nevertheless the LED do not blink 🙁
In the meantime I bought a programmer for the chip since the manufacturer has a “education/hobbyist” version for only 20$… https://www.segger.com/products/debug-probes/j-link/models/j-link-edu-mini/ I was not aware that i could had a official programmer for such low price….which made my original idea to reuse the Arduino bootloader to upload to avoid buying one useless…
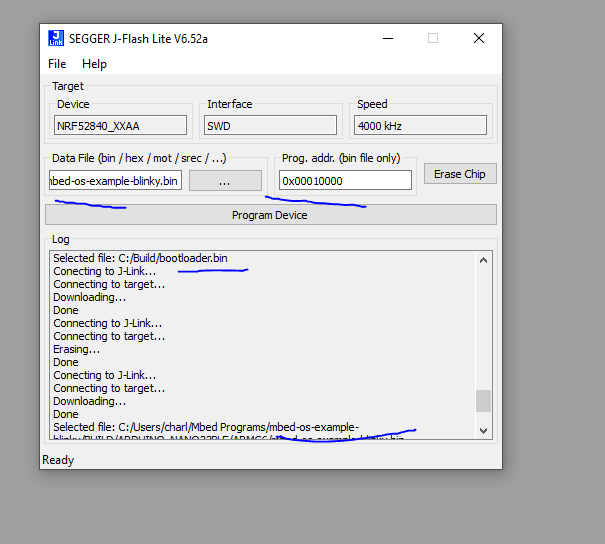
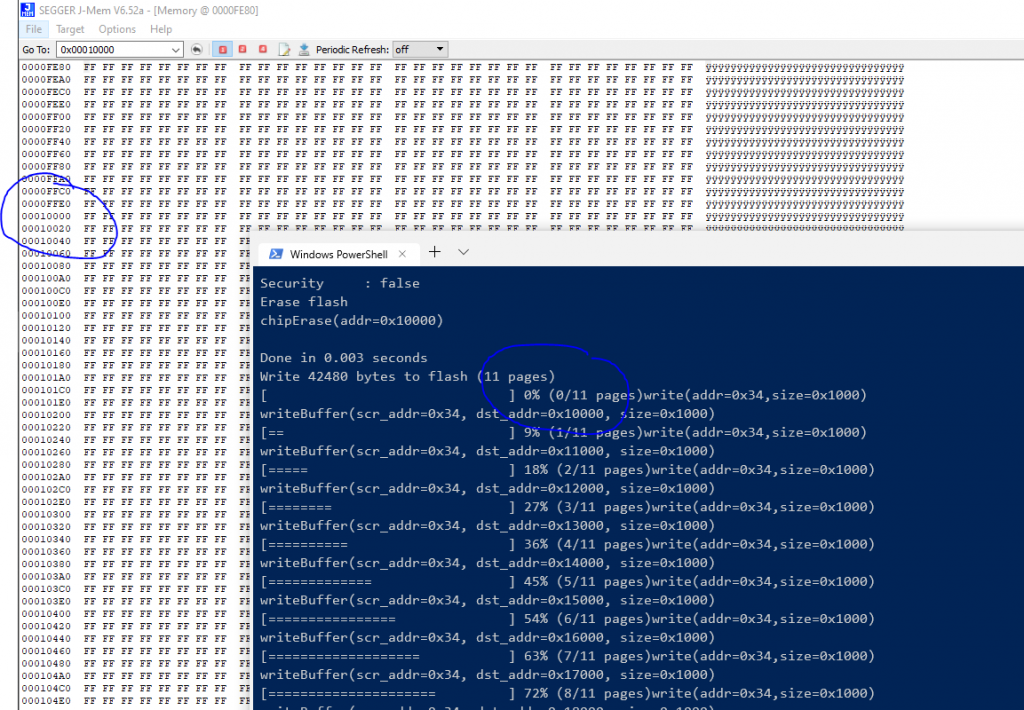
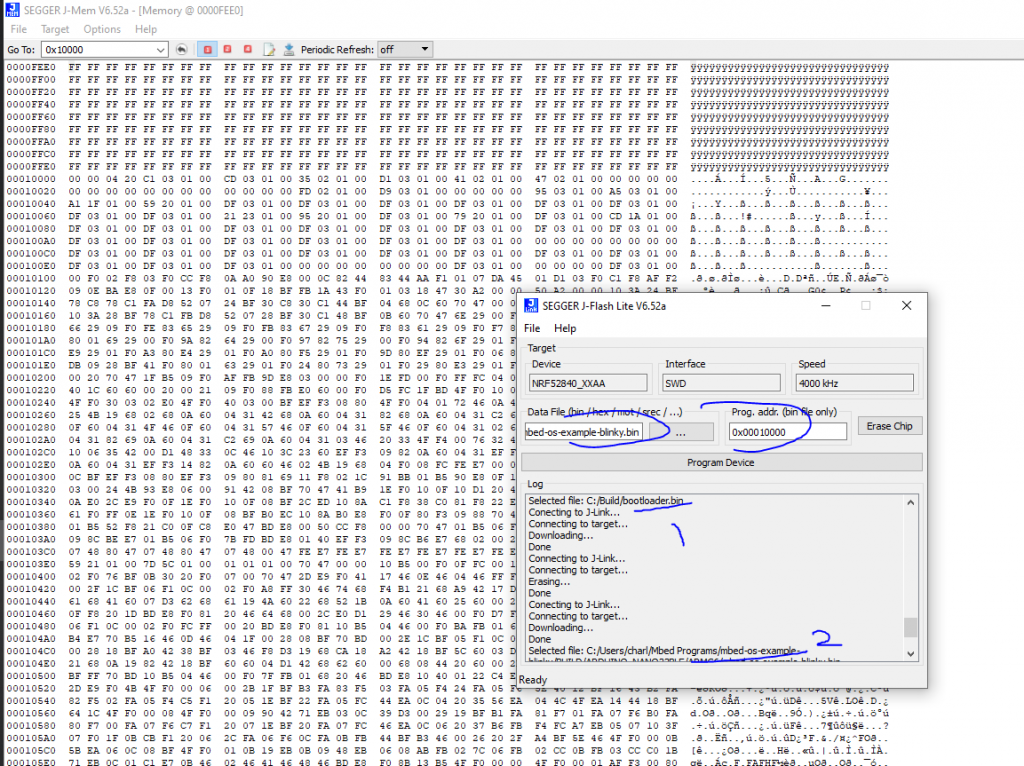
Now that I have my hand on a programmer i decided to try to understand why my program was not running….is it my code or the upload failed or something else. I modify my code to remove the offset and start at address 0x0 and I upload it directly on the chip and the LED start blinking. The code is thus good and the issue seems located in the upload process… I decided to do another test and put back my offset 0x10000 in my program, erase the board, upload the Arduino bootloader in the board, and finally upload my program at address 0x10000 but not with BOSSAC but using the J-Link tool. The LED start blinking !
I compare the memory at address 0x10000 for both cases. First the test where i upload with BOSSAC at address 0x10000 and my program do not works
and when I upload with J-Link
It seems the upload with BOSSAC do not works which seems to confirms what i thought.
Conclusion
I stop here since I now have a programmer to directly program the chip and so I can move on with my Bluetooth MESH tests.
Thx to https://github.com/facchinm for helping me understand more about Arduino bootloader and Thx to https://www.segger.com/ for selling a powerful programmer for hobbyist at a very reasonable price.
If you want to try MBED OS you should take a board compatible offering a DAP-Link for USB upload “Arm Mbed DAPLink is an open-source software project that enables programming and debugging application software on running on Arm Cortex CPUs. Commonly referred to as interface firmware, DAPLink runs on a secondary MCU that is attached to the SWD or JTAG port of the application MCU. This configuration is found on nearly all development boards. It creates a bridge between your development computer and the CPU debug access port. DAPLink enables developers with drag-and-drop programming, a serial port and CMSIS-DAP based debugging.” I would suggest this one for the Nrf52840 chip >> https://os.mbed.com/platforms/Nordic-nRF52840-DK/
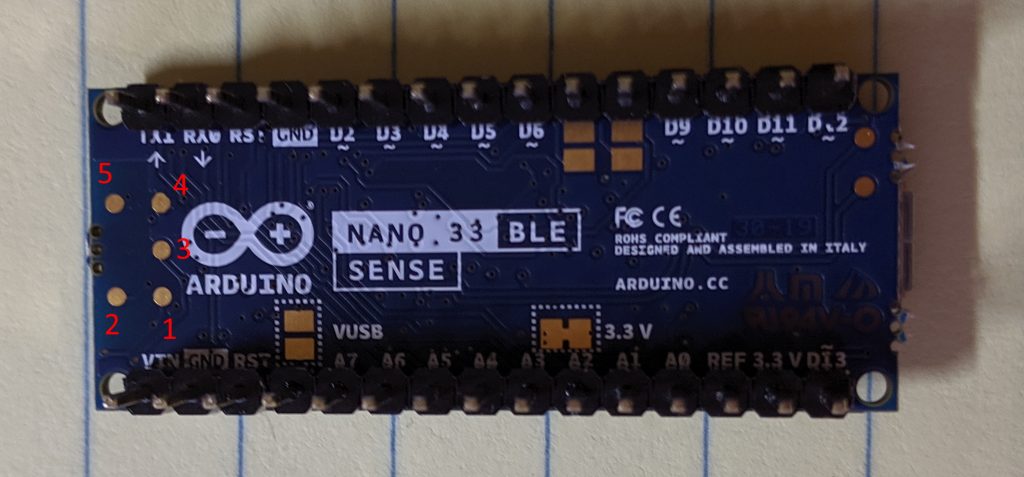
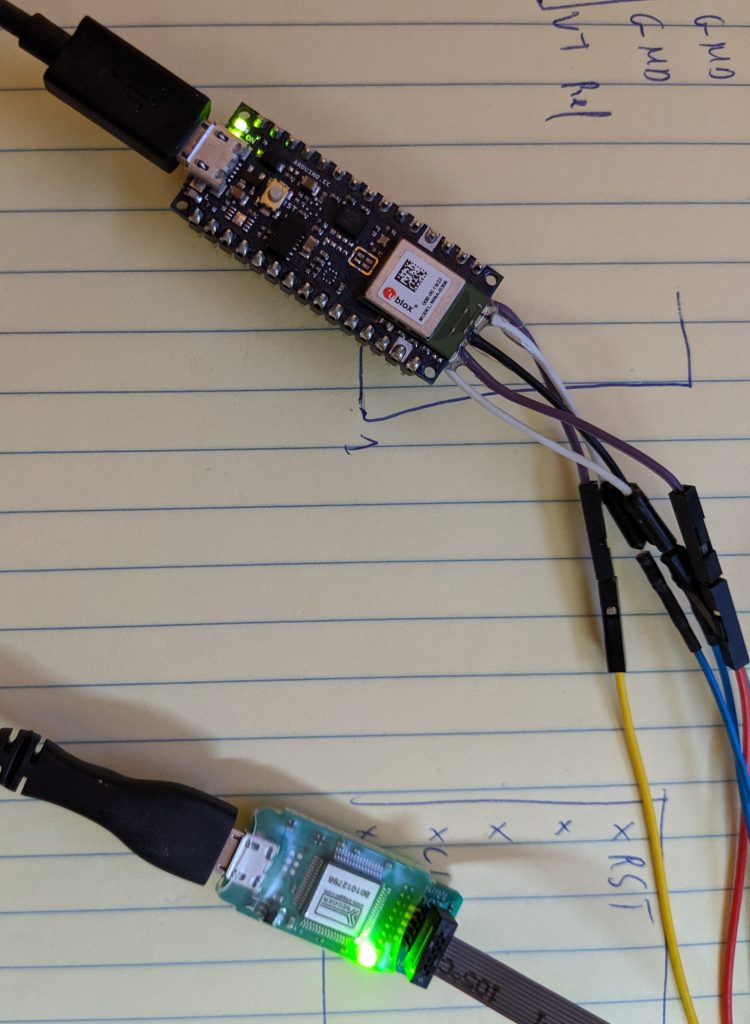
There are 5 cables to connect between the Arduino nano 33 BLE and the J-Link programmer but first let’s locate the Probe on the Nano 33 BLE (I used another nano 33 BLE sense board in pic but it is the same as the Nano 33 BLE).
The tricky part will be to solder the cable because all the points are small and close to each other (I wish they expose them with a more practical way but we are lucky to have access to them already;) )
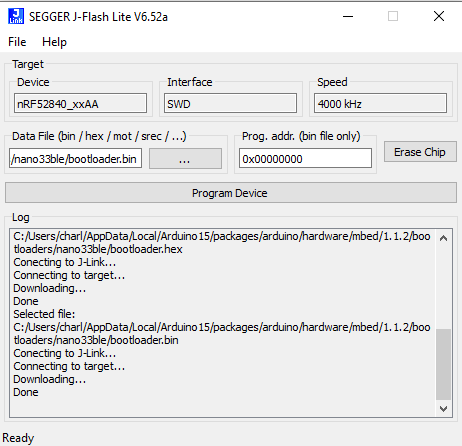
You need to full J-link package (which is free) that you can download on Nordic website here: https://www.segger.com/downloads/jlink/ We are going to use J-Flash lite to be specific but better install the whole package 😉
Turn on the 2 board (don t forget to plug tha nano 33 or Vref will be 0V and J-Link will fails to connect to the Arduino board).
We need to locate the Arduino Bootloader of the nano 33 BLE file that we are going to upload with J-Flash lite….. It is located here C:\Users\charl\AppData\Local\Arduino15\packages\arduino\hardware\mbed\1.1.2\bootloaders\nano33ble (of course you need to adapt) and contains 3 files
We are going to use the bin one (should works with hex one too) and give this path in J-Flasher. Be sure to choose nrf52840 in the list of device (the rest of parameters can stay with their default value) and then click “Program Device”.
You should had some logs similar to these one and then the board should have back its original Arduino bootloader and should be usable again in the Arduino UI 😉
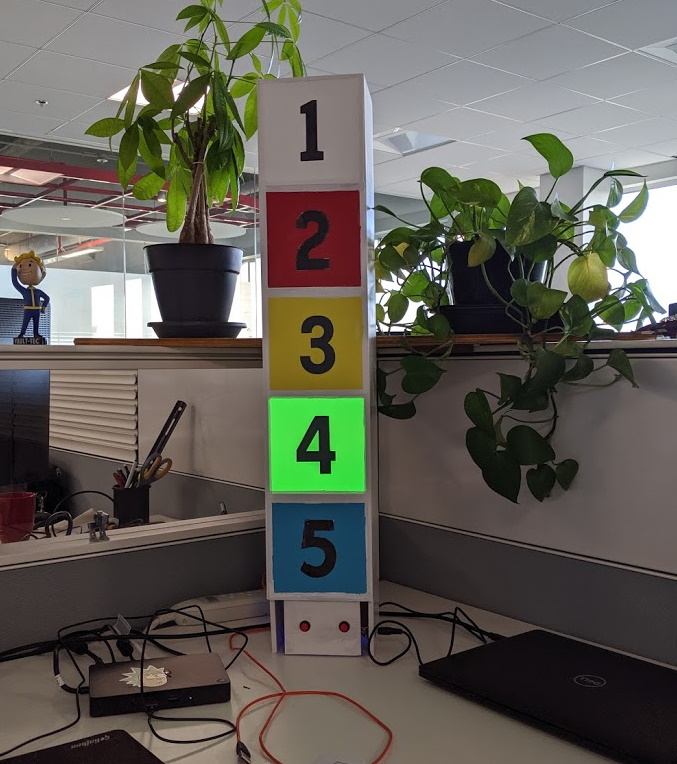
The DEFCON system was developed by the Joint Chiefs of Staff (JCS) and unified and specified combatant commands.[2] It prescribes five graduated levels of readiness (or states of alert) for the U.S. military. It increases in severity from DEFCON 5 (least severe) to DEFCON 1 (most severe) to match varying military situations.
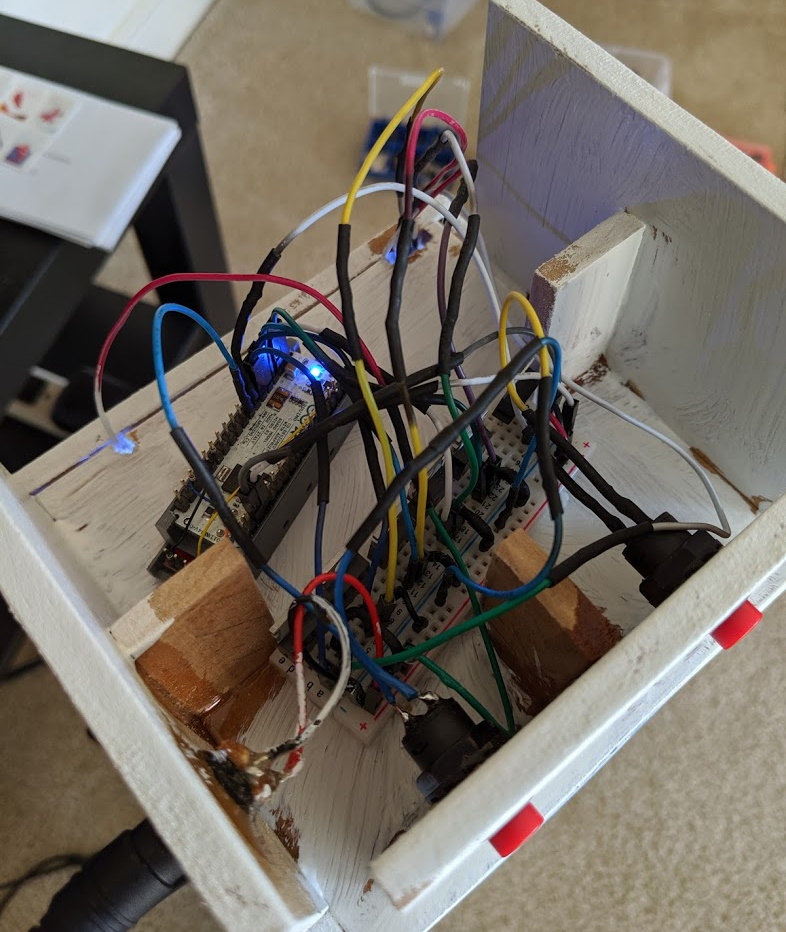
and a picture of the final result to better understand how it look like
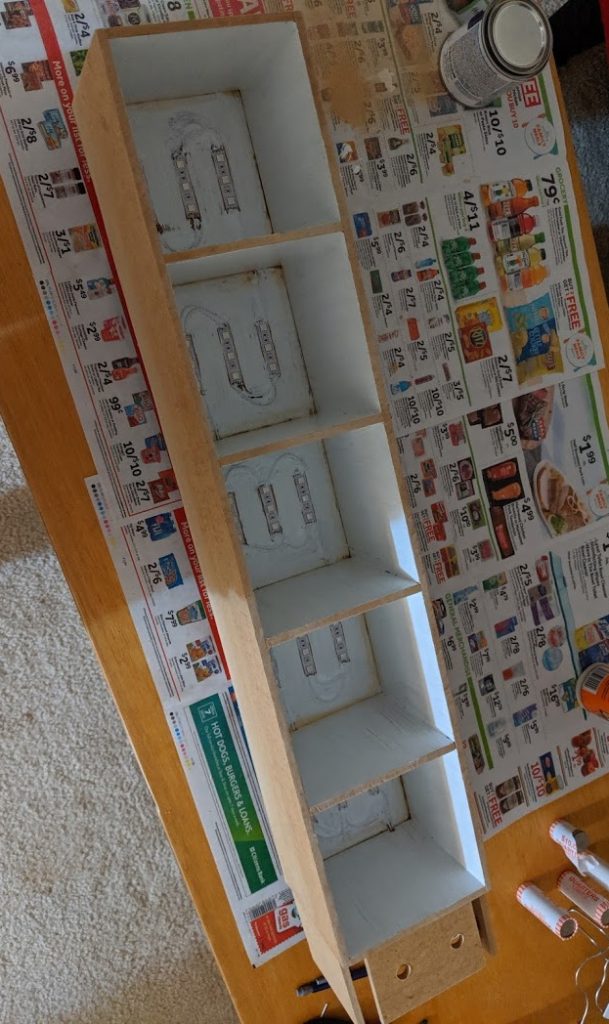
Hardware
The scale is made in wood with 9 LEDs behind each level/number
The logic of the scale comes from an arduino Micro with a BLE sparkfun BLE module “SparkFun Bluetooth Mate Silver – https://www.sparkfun.com/products/12576 ” (which is not used for now). The Arduino is powered by 9V regulated from the 12V main power (used for LED). Each number back light is control by a MOSFET (P30N06LE) driven by the Arduino. There are also 2 buttons for tests to increase/decrease the level.
Software
Arduino
The arduino micro communicate with a computer using USB to receive the level it should set on the scale. It will do that buy driving 5 MOSFET to light the proper panel. It also listen to press on 2 buttons to raise/decrease the level (for test purpose). The code is quite simple.
PC
The scale communicate with a computer to receive its level it should set. The level is computed from my work company issue tracking tool. The computation part code interface with some of my company API and is thus not part of the code…. You will have to code your logic in the python code in the function “getSeverity” which should return an integer between 5 (low level) and 1 (critical level) as the DEFCON standard 😉
The python part should be put in a crontab to regularly update the scale 😉
More picture of the project HERE and the code is HERE.
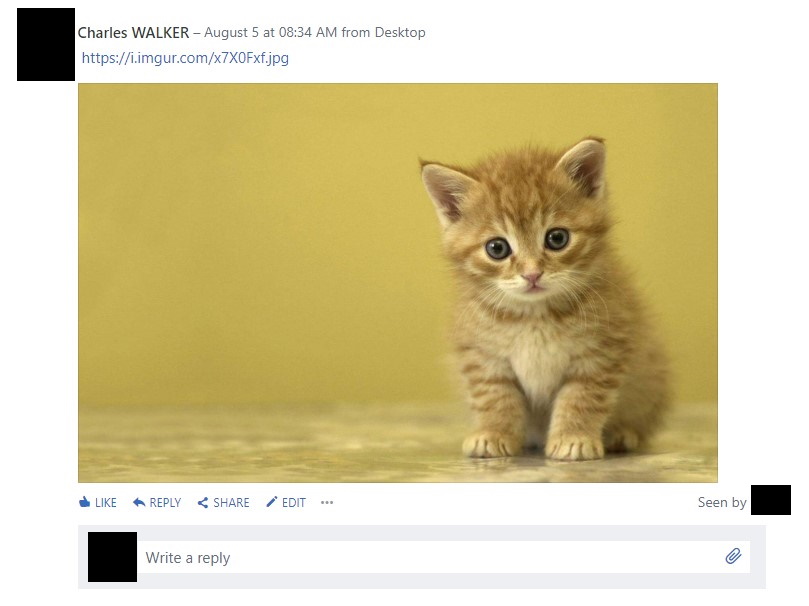
The goal is still to create a process which get a random cat picture and post it on a yammer group daily. Last week I tried with the Yammer connector available in MS flow but it does not support posting image as I explain in https://djynet.net/?p=945 . This time I decided to go one level deeper and us the Yammer REST API which support it.
Yammer REST API
We want to use the /messages POST REST call describe in the official REST API doc here: https://developer.yammer.com/docs/messages-json-post which mention the support of attachments “Yammer provides two methods to associate attachments with a message. Both make use of multi-part HTTP upload (see RFC1867)”.
To be able to post we need to Authentify our self with the yammer Oauth2 flow describe here: https://developer.yammer.com/docs/oauth-2. I don t want to detail it too much since it’s pretty standard but basically our server offers and /login route which redirect to yammer.com.
 app.get('/login', (req, res) => {
    var aLoginUri = "https://www.yammer.com/oauth2/authorize?client_id=CN737QnN3TCu2ooY7U2rbA&response_type=code&redirect_uri=https://djynet.xyz/callback";
    res.send(aLoginUri);
    console.log('Sent login URI response');
});
Then yammer.com call redirect back the user to our server on /callback route with a user token we can use from our server when querying the yammer.com API to post messages.
// OAuth2 endpoint (callback)
app.get('/callback', (req, res) => {
res.end()
console.log('Received Oauth login callback with code ' + req.url);
//Calling Oauth to authenticate the APPvar aUriAuthent = "https://www.yammer.com/oauth2/access_token?client_id=CN737QnN3TCu2ooY7U2rbA&client_secret=" + aClientSecret + "&code=" + req.query.code + "&grant_type=authorization_code";
axios.post(aUriAuthent)
.then((res) => {
//console.log("Dumping response for debuging: " +res)//console.log("Dumping data from response for Debug: ", res.data)
aAUthTest2 = res.data;
})
.catch((error) => {
console.error(error)
})
});
Getting random cat picture
Of course there is an API for that ? https://thecatapi.com/ The API is free but you need to register to get a API KEY that you specify in your header when calling with ‘x-api-key’. The endpoint we need is https://api.thecatapi.com/v1/images/search that we call without any parameters and will give us a random cat url.
One note here is the use of async/await for us to “wait” the response of catApi before we can proceed and post our picture in the yammer room. I will not detail await/asynch….so many good doc already (google it)
Posting the image
We now have a token and a cat picture URL that we can use to post our message. This is the only complicated part of this whole project due to “Both make use of multi-part HTTP upload (see RFC1867)”. I find this NPM module which should make this process easier: https://www.npmjs.com/package/form-data that we can use to create the “multipart/form-data” and then give to another module to send it to Yammer API. Here is the form part
var formData = new FormData();
formData.append('attachment1', Request(aCatUrl));
Which is quite straightforward as explain in their readme. Then we pass the form to another node module to send
Axios
The first module I tried to use to post the REST call is AXIOS: https://www.npmjs.com/package/axios which we use to get the random cat picture. Nevertheless, the documentation of form-data to use AXIOS has a bug which I was unable to understand so I open a bug report and switch to another library than Axios. The bug has now been fixed by a documentation change: https://github.com/form-data/form-data/issues/439
// Patch header to add the keyvar aHeader = formData.getHeaders();
aHeader['Authorization'] = "Bearer " + aAUthTest2.access_token.token;
var request = https.request({
method: 'post',
host: 'www.yammer.com',
//very dirty.... did not find a way to pass param otherwise :(
path: '/api/v1/messages.json?body=Cat%20of%20the%20day%20&group_id=7799980032',
headers: aHeader
});
//send it
formData.pipe(request);
Final touch
I added a secret key in the postcat route to ensure nobody else will use it to spam the room with cat
 if (req.query.key !== aPostCatSecretKey) {
        console.log("Invalid key: ",req.query.key," - send back 401")
        res.sendStatus(401);
    }
And then I added a crontab to call our API everyday
The goal is to create a MS office 365 Flow which will call a homemade connector to get a random cat picture and post it on a yammer group.
Yammer connector
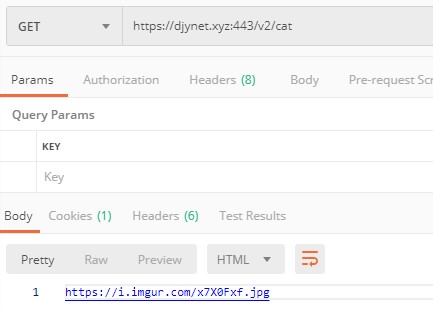
The first thing to do is check if there is a MS Office365 connector that can get use a random cat picture (who know…. Maybe someone already done one). After checking https://flow.microsoft.com/en-us/connectors/ it seems it s not the case. So we have to create one.
I will not go too much in the details since the MS doc is quite good https://docs.microsoft.com/en-us/connectors/custom-connectors/define-openapi-definition. One interesting point was the fact it needs to be HTTPS so I played with Let’s encrypt and their docker version of certbot…. Nothing fancy apart that…. classical NodeJS server with only one endpoint with an hardcode to start with
Now that the connector is publish on your Office365 space you can create a flow using it. I copy past and existing template “Post an update to my company’s Yammer page” that I customize with an extra step to call my connector and post the response of the connector into the yammer room
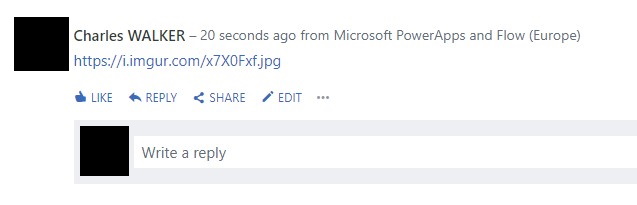
Then you can test it and see that the result is not exactly what we excepted….
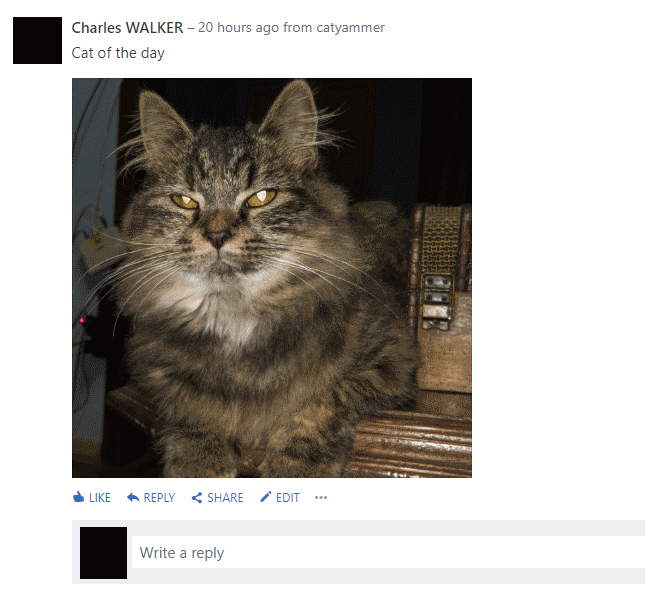
I was hoping to have the picture posted on yammer like it is the case when I post the URL myself on the UI like
I will wait until MS implement that like I done for the JS function in Excel online ? and in the meantime I will try to do a REST call directly to Yammer API to see if I can post an image directly (without going throw flow).
This demo is made on a windows 10 computer. It shows how to interact with a Kube cluster in python and start a simple job on it and wait for the job to end and get its status/logs. The tricky part is to get the logs since the job object do not directly contains the info and thus, we need to get the pod associated with the job and get the pod logs.
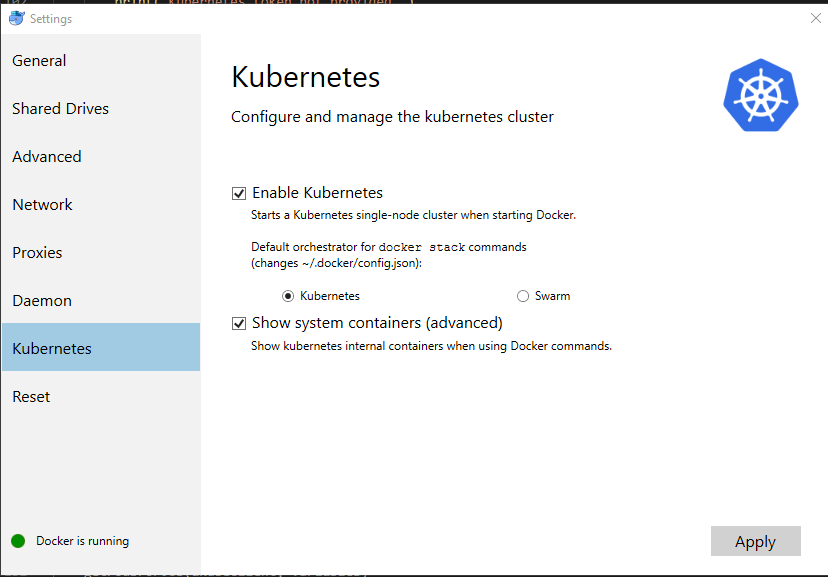
Kube setup (server)
I use the Kube functionality of Docker for windows. Start Kubernetes which is part of Docker for windows
Once the kube cluster is up and running you can interact with it from a terminal (I use PowerShell) that we will call T1 and will be use for the kube server-side interaction.
Create service account
PS C:\Users\charl> kubectl create serviceaccount jobdemo
serviceaccount "jobdemo" created
Get full permission to the SA (not clean but not the goal here)
[root@54a8362da7d1 mountfolder]# python3.6 kubeJobsDemo.py
Starting
Starting job
Checking job status
Job is still running. Sleep 1s
Checking job status
Job is still running. Sleep 1s
Checking job status
Job is still running. Sleep 1s
Checking job status
Job is still running. Sleep 1s
Checking job status
Job is still running. Sleep 1s
Checking job status
Job is still running. Sleep 1s
Checking job status
Job is still running. Sleep 1s
Checking job status
Job is over
getting job pods
Checking job status
getting job logs
Job is over without error. Here are the logs:  3.141592653589793
Cleaning up the job
Ending
[root@54a8362da7d1 mountfolder]#
You can also chech the job creation when the python script is running (but not after because job is deleted at the end) from the T1 terminal used before.
PS C:\Users\charl> kubectl get jobs
NAME      DESIRED   SUCCESSFUL   AGE
pi        1         0            3s
As you can see, we also print the logs of the job. I use this python script daily when I spawn jobs on a remote Kube cluster from a Jenkins server (my Jenkins jobs are just spawning Kube job on remote cluster and waiting for them to be over). I’m sharing it hoping it can help some ppl.
The code is quite simple and the only tricky part is to get the pod associated to the job so that we can get the logs (BTW this may not works in case the job spawn several pods).
The link Job-Pod is done with the use of selector since it was the recommended methode when I done the script (https://github.com/kubernetes/kubernetes/issues/24709)