The idea is to create a bot to detect cheap option that may have high volatility and thus generate some gain. The financial data (stocks/options/earnings) are retrieve from IEX API https://iexcloud.io/ (I had to pay to get to options data).
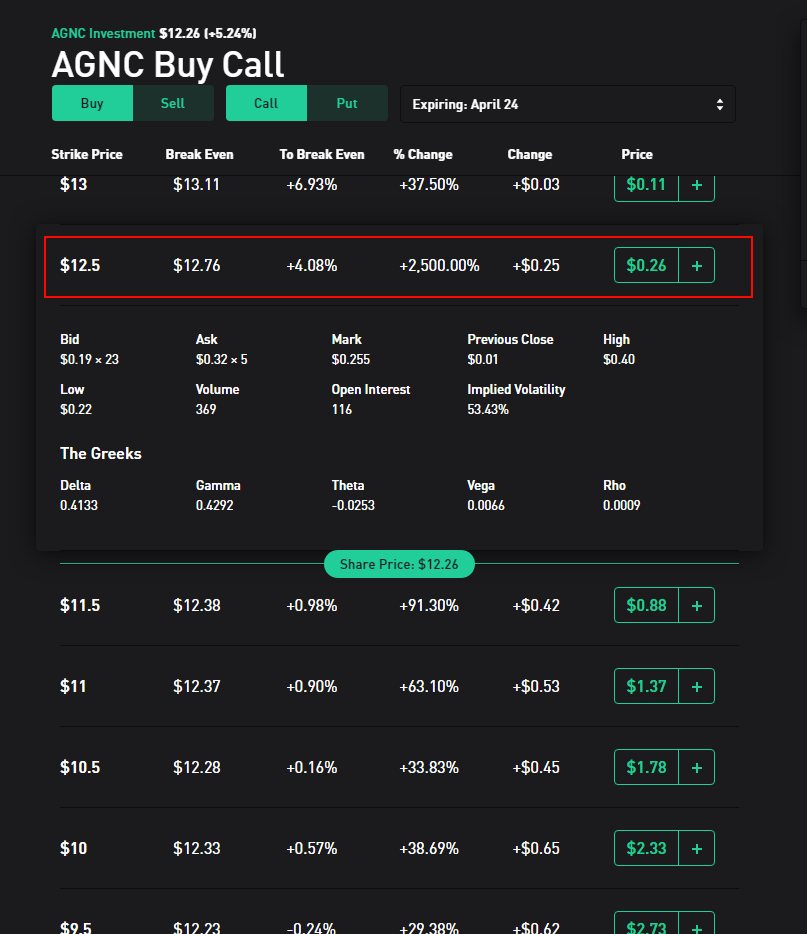
For example, the following call for AGNC (which already had a significant value increase) is only 30$ (more or less) and may pay off after the earnings
I want option that may have some high volatility and to achieve that I decided to look at the stocks that will report earnings and trade the options that expire few days after that. I hope that earning report may have a significant impact on the options and thus generate gain.
I use this endpoint to get the companies that report earnings in the next 7 days and then filter by company market cap to only work on the 50 biggest stocks. I do that to ensure that the options are liquid enough and that there will be plenty of them.
aPotentialCompanyToCheck = getNextWeekEarning()
logging.info(f"We have {len(aPotentialCompanyToCheck)} potential Earnings before filtering")
aStates['nbCompanyEarningsUnfilter']=len(aPotentialCompanyToCheck)
# We keep the biggest companies only to have lot of options (thus data)
aPotentialCompanyToCheck = __filterPotentialEarning(aPotentialCompanyToCheck)
logging.info(f"We have {len(aPotentialCompanyToCheck)} potential Earnings before filtering: ")
aStates['nbCompanyEarningsFilter']=len(aPotentialCompanyToCheck)
prettyprintEarningCandidates(aPotentialCompanyToCheck)
Options finder
The next step of the process is to find all options in the next 7 days after the earnings and filter the one with a strike price in the 10% range of the actual stock value (so they have some chance to happen). For those options we keep the one that are less than 20$ since i don t want to gamble more than that 😉
Past earnings
The program will also get the stock prices for the last 2 earnings so that i can see if the stock is usually volatile around its earning to determine if our option have a change to gain. For example if we have a cheap option with a strike price which is +5% of the actual stock price but in the past the stock never move more than 3% after its earning….we know there are very few chances that our option will be in the money. On the opposite if we have another case with a company that was very volatile in its past earnings with move around 10% then we know that it has some chance to happen again.
To the end we get the stock prices on a 10 days range starting 3 days before earning. The value will be display.
Stock value
The last information the script will extract is the actual stock price of the company to see its trend and help me choose a good option.
Display
All the information retrieved are presented to the user on a website. The graphics are made with plotly library that i strongly recommend https://plotly.com/
Result
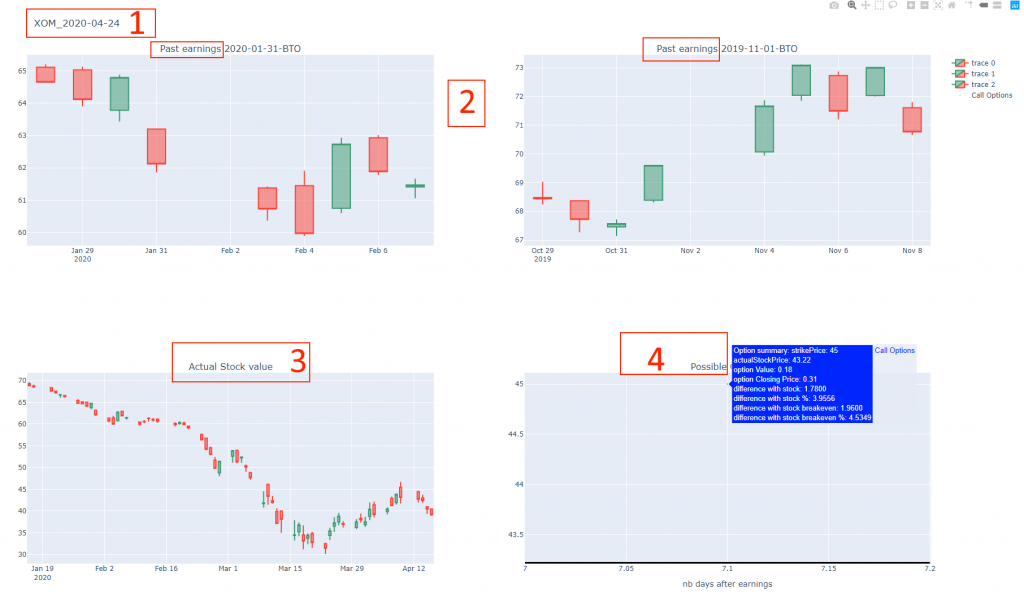
Here is the page for one stock
It shows the different data gather by the script: 1 – Stock ticker and earning date 2 – Past earnings for the last 6 months 3 – Actual stock value for the last months 4 – Possible cheap option with their detail
In this example we could buy a call which need to gain 4.9% to generate gain and only costs around 20/30 $.
Conclusion
I tried it for 3 weeks but did not make a gain. There were too many lost to compensate with the winner and end up losing around 10$.
In addition to the Neural network solution I explain in the previous article I also tried other algorithms like Decision Tree and Random Forest.
Algorithm
Accuracy
Neural Network
96.63%
Random Forest
96.96%
Decision Tree
96.76%
Refined Decision Tree
97.64%
Refine decision tree?
One of the conclusions of all my tests with ML from the previous article is the complexity to choose the parameters needed by each model. Hopefully a friend suggests me a solution “GridSearchCV” which allows to test various parameter for an algorithm and find the best ones.
The algorithm I called “refined decision tree” is a decision tree based on the best parameters “GridSearchCv” found.
#Now let s try to refine the Decision tree by trying several parameters
aGridSearchParams = {'max_features': [None, 'sqrt'],'max_depth' : [3, 5, 10, None],'min_samples_leaf': [1, 2, 3, 5, 10],'min_samples_split': [2, 4, 8, 16],'max_leaf_nodes': [10, 20, 50, 100, 500, 1000]}  # instantiate the grid   aGridSearchResult = GridSearchCV(DecisionTreeClassifier(), aGridSearchParams, cv=5, )   # fit the grid with data   aGridSearchResult.fit(atrainDataX, atrainDataY)
#let s see how good it is
aDecisionTreeRefinedPrediction = aGridSearchResult.best_estimator_.predict(atestDataX)
I used the Neural Network and the “refined decision tree” in the application to compare them and notice that the neural network was slightly better. For example
root - INFO - Checking if group should be refresh by calling ML with: [1, 47, 10, 0]
root - INFO - We found 1 new message and the ML probability were NN: [[0.11245716]], DT[[1. 0.]]
When trying to predict if a group with characteristics:
Latest refresh done 1 days ago
47 users in the chat room
Latest message in the group was posted 10 days ago
0 messages posted in the last week in the chatroom
The Neural network predict a probability of 11% of new messages while the “refined decision tree” predicted 0% chance. We found new messages in the room leading for a false positive for the “refined decision tree” which we want to avoid at all cast. I just stick to the neural network for now.
Optimizer change on NN
When training the Neural Network, I sometime end up with very poor results. The model seems stuck and always predict the same output:
NN atestDataYPredictedKeras: [0.05339569 0.05339569 0.05339569 ... 0.05339573 0.05339573 0.05339573]
Even if the test case is composed of around 1500 lines.
NN len(atestDataYPredictedKeras): 1484
This happen from time to time and it usually get away if I retrain the model nevertheless it makes the final results very bad if I did not check the training results every time.
Luckily, I’m not the only one in this case ? according to this github ticket.
I tried some of the suggestions proposed on the page and one that seems to be the best was to modified the optimizer from SGD to Adam. After some reading, I decided to go with it since Adam seems to be a good choice according to the ML community. This youtube video explain some of the possible optimizer algorithm and also suggest adam as default choice. Nevertheless, like all topic/parameters in ML you can always find arguments about the opposite like this article:
“We construct an illustrative binary classification problem where the data is linearly separable, GD and SGD achieve zero test error, and AdaGrad, Adam, and RMSProp attain test errors arbitrarily close to half.”
I will still stick to Adam for now since it fixes my original issue with the same accuracy and smaller loss:
I have a bot part of several (around 250) chat groups (think discord rooms). The bots connect everyday with an undocumented API to get for each room the new messages. Since the API is not fully documented I’m not sure it was designed to be used for robotic access. I thus decided to try to predict if a room will have new messages and reduce the number of calls. That was a fun opportunity to try to do ML.
Features
First, I need to find some “features” that will be used to predict the output (there are new messages to get or not). I tried several versions and the actual features are
number of days since the last refresh
integer to indicate how many days have passed since the latest time we call the API to refresh messages. For example, if we are the 7 JAN when we are doing a refresh and the latest was done 1 JAN this field value will be 7 – 1 = 6 days.
number of users in the chat group
integer which indicates the number of users in the group for which we call the API to refresh messages.
number of days since the latest message was posted in this group
integer to indicate the number of days has passed since the latest message was posted in the group (compared to the date of the refresh) For example, if we last refresh for this chat room was done the 7 JAN and we old message in the chat group at this time was 1 JAN the value of this field will be 7 – 1 = 6 days.
number of messages in the latest 7 days
integer to indicate the number of messages in the chat room in the latest 7 days
I logged the values for each of these features when calling the API for few days as well as the result of the call: were there new messages in the group or not. I write the results in 2 files which will be used to train and test the MN.
Examples
0;1;8;555;0
One day we call the refresh API on a chat room to get new messages and did not get anything. At this time the number of days since the latest refresh was 1 (we checked the day before) and the number of users in the chat room was 8. We also know that the most recent message is 555 days old and there were 0 message in the latest week.
1;1;10;4;2
One day we call the refresh API on a chat room to get new messages and found some. At this time the number of days since the latest refresh was 1 (we checked the day before) and the number of users in the chat room was 10. We also know that the most recent message is 4 days old and there were 2 messages in the latest week.
This is still a work in progress and I’m getting feedback from other people I’m working with so I share the file and feature explanation on a dedicated google drive folder. You should rather check it to get more info and the latest feature used.
ML
I decided to use Keras since it has good review. It works on top of various ML engines and allow fast experimentation “Keras is a high-level API capable of running on top of TensorFlow, CNTK, Theano, or MXNet (or as tf.contrib within TensorFlow). Since its initial release in March 2015, it has gained favor for its ease of use and syntactic simplicity, facilitating fast development. It’s supported by Google.”
Data
I split the data in 2 files with the 80/20% proportion. The data are csv files formatted as explained in the previous section. Latest data and info are available on the following folder.
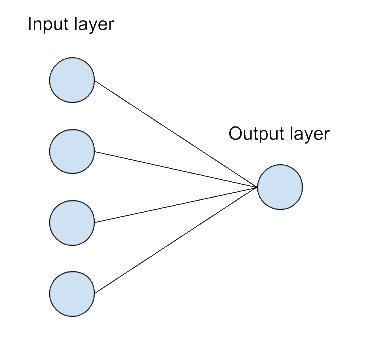
I decided to use a Neural network with 4 input (since we have 4 features) in the input layer connected to a single neuron as output layer.
It’s the most basic design I could imagine. I saw some article where people suggest to add a hidden layer but I was not sure how to decide. The “design” of the neural network was the first challenge I face. I will do a dedicated post on this point later.
There are several other parameters like the activation functions for each layer. I choose “relu” for the first layer and “sigmoid” for the output after some quick reading but I’m clearly not sure it’s the best choice. There are so many possibilities and no clear real explanations on which to choose.
One of the reason I choose Keras was the simplicity to get results “developed with a focus on enabling fast experimentation” (https://keras.io/). Training is a simple call to the “fit” function
The model is train with the training data and I choose a random value of 100 epochs which seems to be a good value from what I read from other article (especially for the small amount of data I have).
When call the python code will output the results of each epoch
At the end of the training the model has a 95% rate success in its prediction. The next step is to evaluate the model with unknown new cases from the testing set.
Testing
Once the model has been trained with the training data (as a reminder I split my data 80% train / 20% test) we can evaluate how good it predicts with the test data. This is done with the evaluate method of Keras:
NN algorithm results: [0.14495629791642295, 0.9595687389373779] for folowwing metrics : ['loss', 'accuracy']
We achieve good results too on the testing set with 96% accuracy.
Threshold
The neural network output a percentage as prediction:
root - INFO - Checking if group should be refresh by calling ML with: [4, 123, 560, 0]
root - INFO - We found 0 new message and the ML probability were NN: [0.01339133]
…
root - INFO - Checking if group should be refresh by calling ML with: [4, 16, 0, 9]
root - INFO - We found 1 new message and the ML probability were NN: [0.75237719]
Since I want to be sure to never miss a possible message I decided to take a very low threshold at 2% which means we are probably calling some time and not find anything. I will review it after the ML results are compare to the reality for a few days. Nevertheless, if you never heard the term “confusion matrix” you may want to have a look at it now since we will use it later to review our threshold. There are some explanations about it here.
Results
I saved the model with
aKerasNnModel.save("model.h5")
And then used it in my real-life application. I logged the prediction of the model but still called the API to get the new messages from the chat rooms so I can log a confusion matrix.
As explain previously I choose a very low threshold to ensure to avoid any false negative even if it means having few false positive because I do not want to miss any messages. At the end we reduce our number of calls to the API from 273 to only 35 and did not lost any messages. The threshold seems good enough for now.
Conclusion
I’m glad I had a project where I could have some fun discovering ML with a real-life application. As a non-expert and first-time user of Neural network I find it quite complicated and easy at the same time. It s easy since I manage to get good results very quickly without too much efforts but… It’s hard because there are lot of unknow variables like the network shape or the different function (activation, loss, optimizer). For most of these parameters I did not find any good documentation on which one to choose (and the articles sometimes contradicts each other).
This article is just a short sum up of my work on this project since I did not discuss of the other machine learning algorithms I tried (and compare to NN): Decision tree and Random Forest. I also did not discuss an issue I had when training the network and get stuck with a model which always answer the same prediction. I plan to do a follow up to develop these issues later.
This demo is made on a windows 10 computer. It shows how to interact with a Kube cluster in python and start a simple job on it and wait for the job to end and get its status/logs. The tricky part is to get the logs since the job object do not directly contains the info and thus, we need to get the pod associated with the job and get the pod logs.
Kube setup (server)
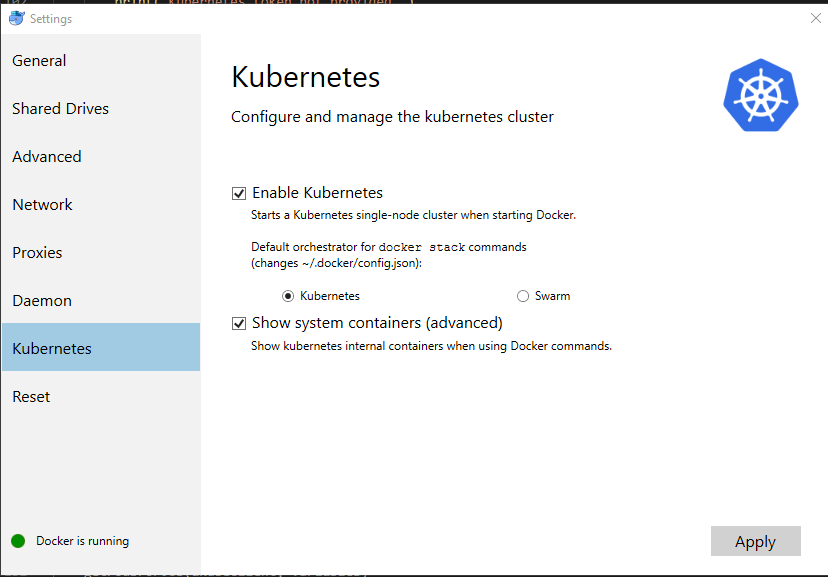
I use the Kube functionality of Docker for windows. Start Kubernetes which is part of Docker for windows
Once the kube cluster is up and running you can interact with it from a terminal (I use PowerShell) that we will call T1 and will be use for the kube server-side interaction.
Create service account
PS C:\Users\charl> kubectl create serviceaccount jobdemo
serviceaccount "jobdemo" created
Get full permission to the SA (not clean but not the goal here)
[root@54a8362da7d1 mountfolder]# python3.6 kubeJobsDemo.py
Starting
Starting job
Checking job status
Job is still running. Sleep 1s
Checking job status
Job is still running. Sleep 1s
Checking job status
Job is still running. Sleep 1s
Checking job status
Job is still running. Sleep 1s
Checking job status
Job is still running. Sleep 1s
Checking job status
Job is still running. Sleep 1s
Checking job status
Job is still running. Sleep 1s
Checking job status
Job is over
getting job pods
Checking job status
getting job logs
Job is over without error. Here are the logs:  3.141592653589793
Cleaning up the job
Ending
[root@54a8362da7d1 mountfolder]#
You can also chech the job creation when the python script is running (but not after because job is deleted at the end) from the T1 terminal used before.
PS C:\Users\charl> kubectl get jobs
NAME      DESIRED   SUCCESSFUL   AGE
pi        1         0            3s
As you can see, we also print the logs of the job. I use this python script daily when I spawn jobs on a remote Kube cluster from a Jenkins server (my Jenkins jobs are just spawning Kube job on remote cluster and waiting for them to be over). I’m sharing it hoping it can help some ppl.
The code is quite simple and the only tricky part is to get the pod associated to the job so that we can get the logs (BTW this may not works in case the job spawn several pods).
The link Job-Pod is done with the use of selector since it was the recommended methode when I done the script (https://github.com/kubernetes/kubernetes/issues/24709)
The first issue I had was to specify a remote cluster since all the example of the API used a .kubeconfig and suppose that the kube client is on the server (and usable).
There was no solution in it so I decided to dig in ?
After reading the code of the API I was only able to find the “bearer token” authentication method. There was nothing about the BASIC auth. I decided first to try the “bearer token” method to ensure the rest of my code was working fine. I submit an example of it on the ticket with the code below:
from kubernetes import client, config
#see https://kubernetes.io/docs/tasks/administer-cluster/access-cluster-api/#accessing-the-cluster-api to know how to get the token
#The command look like kubectl get secrets | grep default | cut -f1 -d ' ') | grep -E '^token' | cut -f2 -d':' | tr -d '\t' but better check the official doc link
aToken="eyJhXXXXXXXX82IKq0rod1dA"
# Configs can be set in Configuration class directly or using helper utility
configuration = client.Configuration()
configuration.host="https://XXX.XXX.XXX.XXX:443"
configuration.verify_ssl=False
configuration.debug = True
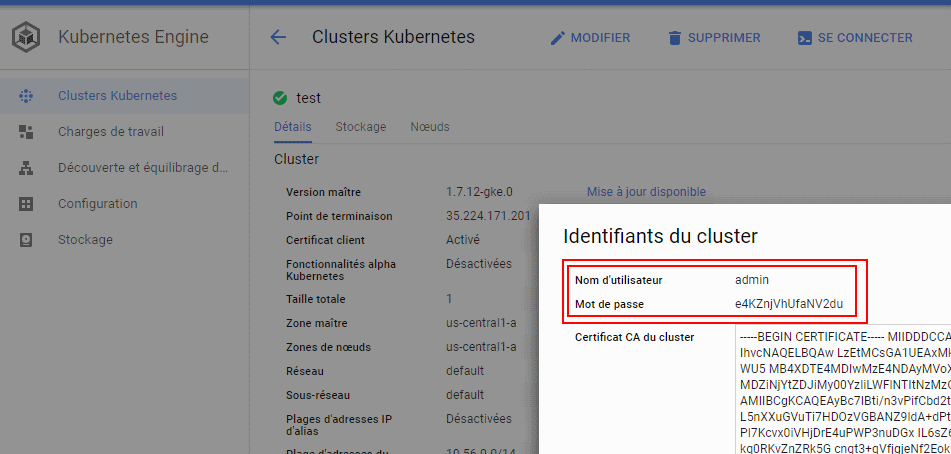
#Maybe there is a way to use these options instead of token since they are provided in Google cloud UI
#configuration.username = "admin"
#configuration.password = "XXXXXXXXXXX"
configuration.api_key={"authorization":"Bearer "+ aToken}
client.Configuration.set_default(configuration)
v1 = client.CoreV1Api()
print("Listing pods with their IPs:")
ret = v1.list_pod_for_all_namespaces(watch=False)
for i in ret.items:
print("%s\t%s\t%s" % (i.status.pod_ip, i.metadata.namespace, i.metadata.name))
It allows me to validate the “remote” cluster communication and also the token authentication nevertheless it is not my final goal.
Basic auth
Python kube API hack
I spend some time digging in the code and did not find any code related to the BASIC auth. I check in the code and the method “get_basic_auth_token” in configuration.py is never call anywhere (and it is the only one dealing with username/password field).
Then I try to “hack” a little the python code by modifying the class configuration and change its auth_setting with that
I just added the “http_basic_test” here. Then you can take any functional class like “”core_v1_api and modify the method you plan to use (list_pod_for_all_namespaces_with_http_info in my case) and modify the auth part of the code. Replace:
auth_settings = ['BearerToken']
with
auth_settings = ['http_basic_test']
and then you can use username/password to authenticate (I verified and it works)
You should have valid response and even see the basic auth info if you activate debug log (like it is done in my previous answer):
This confirms that the basic auth can be used (as the kubernetes mentioned) but is not accessible from the python API.
Clean solution
The previous hack allowed me to be sure that I could authenticate with the cluster using the user//password nevertheless we cannot keep such dirty hack.
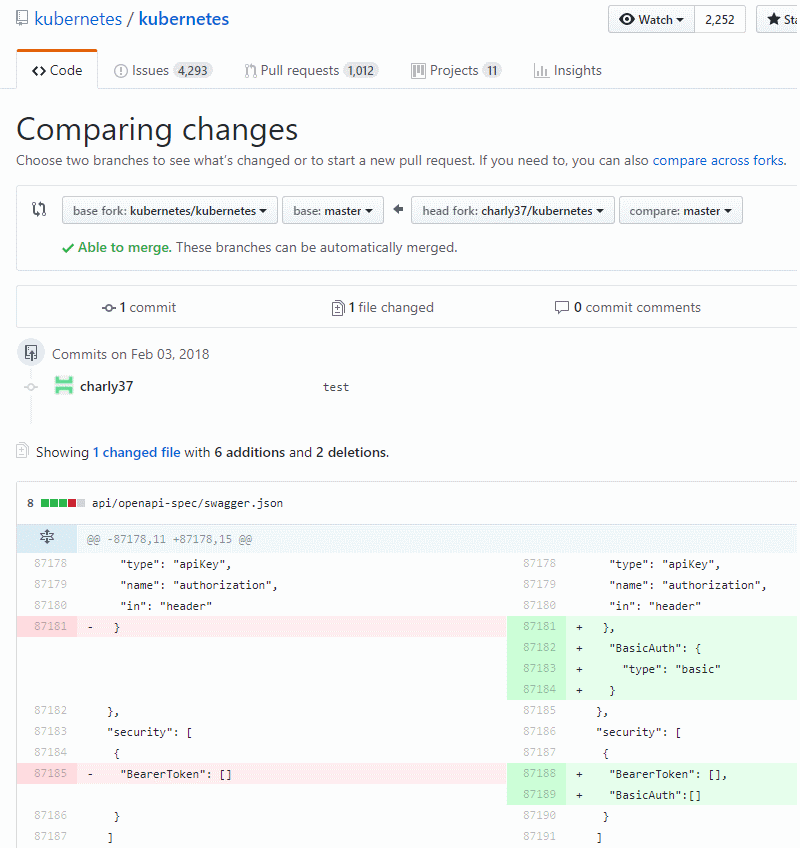
After some investigation I find out the Python kube client is generated by swagger. The generator code is located here: https://github.com/kubernetes-client/gen
This repo relies on the kubernetes swagger file located on the kubernetes repo:
So there is indeed ne reference to any BASIC authentication process here. This is strange since the official doc mention it and since we just validated it works fine.
Let’s try to generate again the python kube library after adding the BASIC auth in the swagger file ?
So I fork the kubernetes repo and modify the swagger file:
[root@kube ~]# python kubeConect.py
Listing pods with their IPs:
/usr/lib/python2.7/site-packages/urllib3-1.22-py2.7.egg/urllib3/connectionpool.py:858: InsecureRequestWarning: Unverified HTTPS request is being made. Adding certificate verification is strongly advised. See: https://urllib3.readthedocs.io/en/latest/advanced-usage.html#ssl-warnings
  InsecureRequestWarning)
10.56.0.8       kube-system     event-exporter-v0.1.7-91598863-kkzgw
10.56.0.2       kube-system     fluentd-gcp-v2.0.9-nc8th
10.56.0.10      kube-system     heapster-v1.4.3-2870825772-h9z8j
10.56.0.7       kube-system     kube-dns-3468831164-t5ggk
10.56.0.3       kube-system     kube-dns-autoscaler-244676396-r5rnm
10.128.0.2      kube-system     kube-proxy-gke-test-default-pool-477f49cb-fksp
10.56.0.4       kube-system     kubernetes-dashboard-1265873680-kzdn2
10.56.0.6       kube-system     l7-default-backend-3623108927-rkv9w
It works !! Now we know that if we update the swagger file we will be able to use the BASIC auth with the python kube client library. The last step is to talk with the rest of the community to find out why the BASIC auth is not supported on the client libs (all generated from the swagger file) even if it is activated on Kube and present in the official doc…
Which send the 3 orientation information to the Tornado python server running on the Raspberry pi of the train. First I was doing JSON REST call to send the string containing the information but it was too slow to have the camera moving in real time. This was the perfect opportunity to use websocket for more real time communication.
function onOpen(evt) {
        console.log("CONNECTED");
        doSend("Hi there!");
    }
    function onClose(evt) {
        console.log("DISCONNECTED");
    }
    function onMessage(evt) {
        console.log('message: ' + evt.data);
    }
    function onError(evt) {
        writeToScreen('error' + evt.data);
    }
    function doSend(message) {
        websocket.send(message);
    }
function testWebSocket() {
        websocket.onopen = function(evt) { onOpen(evt) };
        websocket.onclose = function(evt) { onClose(evt) };
        websocket.onmessage = function(evt) { onMessage(evt) };
        websocket.onerror = function(evt) { onError(evt) };
}


if (!'WebSocket' in window){
    console.log("Sorry, your browser doesn't support Websockets");
} else {
var wsUri = "ws://192.168.10.1:80/ws";
var websocket = new WebSocket(wsUri);
    testWebSocket();
}
Which is received on the server side and put in a variable (see the class Handler_WS) :
    def on_message(self, iMessage):
        """Methode call when the server receive a message"""
        logging.info('Receive incoming message:'+str(iMessage))
        #self.write_message("toto")
        self.aTrainRef._cellAngles=str(iMessage)
This variable is then read every 125ms by the “foo” function:
At the end the real method called is in charge of updating the turret position. The whole stuff is based on an existing framework called servoBlaster which will take care of driving the Servo.
Servo Blaster is library able to drive Servo on the Raspberry pi using software PWM. It is pretty hard to do since the Pi is not running a real-time OS. It relies on very low level interruption to ensure the timing needed to have a proper PWM are respected. You can have more info on it here:
It basically start a daemon (which I added in the crontab to be launch at boot time) on which you can interact with writing the desired position of each servo in /dev/servoblaster like:
echo 3=120 > /dev/servoblaster
I also used servo blaster to send PWM info to the motor driver to change the train speed (since this functionality was broken when I moved from Arduino to Rapsberry Pi).
Contact sensors
I replace the old contact sensor by some new sensor able to detect an incoming obstacle before impact.
They are still binary sensors that will turn high if they detect an obstacle but they have a wider range between 2 and 10 centimeters. This allows the train to detect incoming obstacle and stop before hitting it. The sensor is available on ADAfruit: https://www.adafruit.com/products/1927
Demo
I made some videos on this new version on YouTube:
Dans mon système domotique fait maison j’utilise twisted pour la partie “logique” du système et lighttpd pour la UI. Pour des raisons de simplicité j’ai décidé d’utiliser twisted pour gérer la partie Web.
Avec le déploiement du Freebox OS depuis Juin 2013 l’API pour dialoguer avec la Freebox évolue. Heureusement Free offre une très bonne documentation pour utiliser cette nouvelle API :
Cette API sera peut-être remplace par la nouvelle version et je serais donc obliger de migrer
Je veux ajouter le control du wifi sur le système domotique pour pouvoir allumer ou éteindre le wifi. Le but final étant un poil plus complexe.
Je veux créer une application android qui allume le wifi de l’appartement en même temps que le wifi de la tablette. Plus exactement l’application android devra envoyer un message au système domotique pour allumer le wifi. Le système allumera le wifi s’il n’est pas déjà en route.
Ensuite le système domotique monitor le nombre de client utilisant le wifi en temps réel. Il peut également prendre la décision de couper le wifi si aucun client est connecte depuis un certain temps. Le but de cette application est de couper le wifi quand il n’est pas utilisé pour réduire les ondes présentes dans l’appartement.
Dans un second temps je souhaite ajouter un bouton prêt de la Freebox pour pourvoir effectuer une demande d’allumage du wifi (comme le fait l’application android) pour les tablettes qui n’ont pas de connexion 3G et ne peuvent donc pas envoyer la demande d’allumage wifi par la 3G.
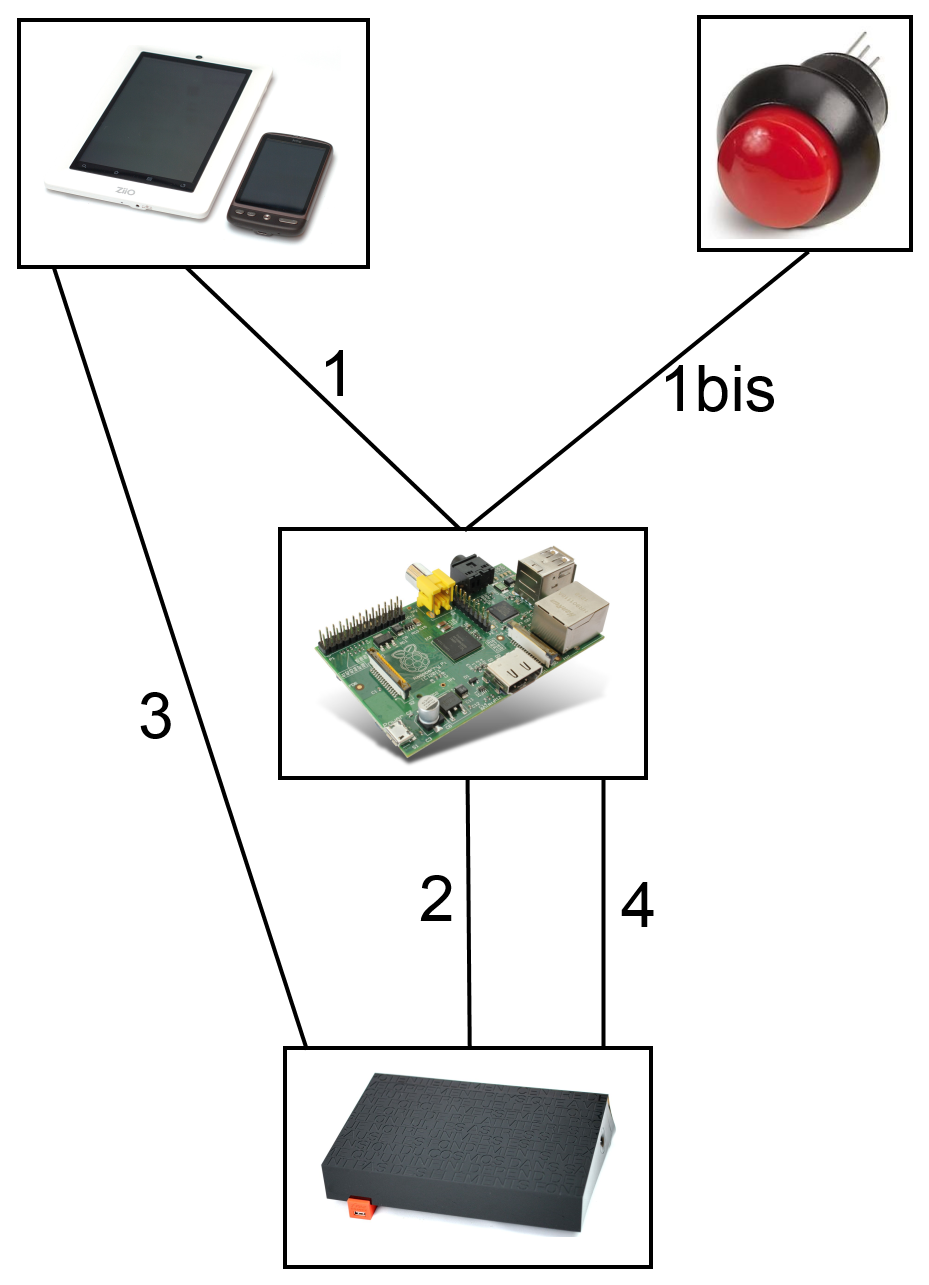
L’image ci-dessous résume le flow :
1 – L’utilisateur active le wifi sur sa tablette Wifi/3G. L’application envoie une demande d’activation Wifi au Raspberry Pi en utilisant le réseau 3G
OU
1bis – L’utilisateur appuie sur le bouton d’activation du wifi sur le Raspberry Pi
2 – Le système domotique héberge sur le Raspberry Pi envoie une demande à la Freebox d’activation du wifi si le wifi n’est pas déjà actif
3 – L’utilisateur se connecte automatiquement au wifi et peut maintenant utilise le réseau wifi pour aller sur internet
4 – Le système domotique monitor régulièrement le nombre d’utilisateur wifi. Si le nombre de device est de 0 depuis plus de X temps (1 heure par défaut) le système éteint le wifi de la Freebox en utilisant l’API.
Le système complet ne fonctionne pas encore. Pour le moment j’arrive uniquement à me logger sur la Freebox (système de challenge avec token). Je continuerai les étapes suivantes les WE prochains et j’updaterai l’article. Voila le code actuel :
#!/usr/bin/python
# -*- coding: utf-8 -*-

import requests
import logging
import time
import itertools
import json
import os
import sys

from hashlib import sha1
import hmac

class FreeboxApplication:
'''Represents an application which interact with freebox server
API doc : http://dev.freebox.fr/sdk/os/'''

def __init__(self):
#I kept the same parameter name than the one use in freebox API for more readability
self.app_id="DomosId"
self.app_name="DomosApp"
self.app_version="1"
self.device_name="DomosDeviceName"
#To know if the APP is register on freeboxOS side
self.registerIntoFreeboxServer=False
#Registration parameters
self.app_token=""
self.track_id=""
self.challenge=""
self.loadAppTokenFromFile()

def __repr__(self):
aRetString = ""
aRetString = aRetString + "self.app_id: " + str(self.app_id)
aRetString = aRetString + "self.app_name: " + str(self.app_name)
aRetString = aRetString + "self.app_version: " + str(self.app_version)
aRetString = aRetString + "self.device_name: " + str(self.device_name)
aRetString = aRetString + "self.registerIntoFreeboxServer: " + str(self.registerIntoFreeboxServer)
aRetString = aRetString + "self.app_token: " + str(self.app_token)
aRetString = aRetString + "self.track_id: " + str(self.track_id)
aRetString = aRetString + "self.challenge: " + str(self.challenge)
return aRetString

def getataForRequests(self):
return json.dumps({"app_id": self.app_id,"app_name": self.app_name,"app_version": self.app_version,"device_name": self.device_name})

def loadAppTokenFromFile(self):
#Degeu...
if (os.path.isfile("AppToken.txt")):
aAppTokenBackupFile = open("AppToken.txt", "r")
self.app_token = aAppTokenBackupFile.read()
logging.info("APP token read from file. New APP token is : " + str(self.app_token))
aAppTokenBackupFile.close()
else:
logging.info("No file for APP token - request a new one")
self.initialLogging()
#Fin Degeu

def initialLogging(self):
#only once. Register the APP on freebox side
logging.info("Starting initial registration")
aRequestUrl = "http://mafreebox.freebox.fr/api/v1/login/authorize/"
aHeaders = {'Content-type': 'application/json', 'Accept': 'application/json'}

logging.debug("URL used : " + aRequestUrl)
logging.debug("Datas used : " + str(self.getataForRequests()))

aRequestResult = requests.post(aRequestUrl, data=self.getataForRequests(), headers=aHeaders)
logging.debug("Request result : " + str(aRequestResult))
logging.debug("Request result : " + str(aRequestResult.json()))
logging.debug("Registration result : " + str(aRequestResult.json()['success']))

#if (aRequestResult.status_code != "200") or (aRequestResult.json()['success'] != True):
if (aRequestResult.status_code != requests.codes.ok) or (aRequestResult.json()['success'] != True):
logging.critical("Error during intial registration into Freebox Server")
else:
logging.debug("Please go to your Freebox. There should be a message saying that an application request access to freebox API. Please validate the request using the front display")
self.app_token = aRequestResult.json()['result']['app_token']
self.track_id = aRequestResult.json()['result']['track_id']
logging.debug("app_token : " + str(self.app_token))
logging.debug("track_id : " + str(self.track_id))
logging.info("Ending initial registration")

aLoopInd = 0
while ((self.registerIntoFreeboxServer != True) and (aLoopInd < 10)):
self.trackRegristration()
time.sleep(15) # Delay for 1 minute (60 seconds)
aLoopInd = aLoopInd + 1
if (self.registerIntoFreeboxServer != True):
logging.critical("Initial registration fails - Exiting with error")
sys.exit(1)
else:
#Degeu...
aAppTokenBackupFile = open("AppToken.txt", "w")
aAppTokenBackupFile.write(self.app_token)
aAppTokenBackupFile.close()
#Fin Degeu

def trackRegristration(self):
logging.info("Starting trackRegristration")
aRequestUrl = "http://mafreebox.freebox.fr/api/v1/login/authorize/" + str(self.track_id)
aHeaders = {'Content-type': 'application/json', 'Accept': 'application/json'}

logging.debug("URL used : " + aRequestUrl)

aRequestResult = requests.get(aRequestUrl, headers=aHeaders)
logging.debug("Request result : " + str(aRequestResult))
logging.debug("Request result : " + str(aRequestResult.json()))
if (aRequestResult.status_code != requests.codes.ok):
logging.critical("Error during trackRegristration")
else:
if (aRequestResult.json()['result']['status'] == "granted"):
logging.debug("OK during trackRegristration")
self.registerIntoFreeboxServer=True
self.challenge=aRequestResult.json()['result']['challenge']
logging.info("APP is correclty registered")
logging.info("Ending trackRegristration")

def logWithPassword(self, iPassword):
#only once. Register the APP on freebox side
logging.info("Starting logWithPassword")
aRequestUrl = "http://mafreebox.freebox.fr/api/v1/login/session/"
aHeaders = {'Content-type': 'application/json', 'Accept': 'application/json'}

logging.debug("URL used : " + aRequestUrl)

aDataToLog = json.dumps({"app_id": self.app_id,"password": iPassword})

logging.debug("Datas used : " + str(aDataToLog))

aRequestResult = requests.post(aRequestUrl, data=aDataToLog, headers=aHeaders)
logging.debug("Request result : " + str(aRequestResult))
logging.debug("Request result : " + str(aRequestResult.json()))
logging.debug("Registration result : " + str(aRequestResult.json()['success']))

#if (aRequestResult.status_code != "200") or (aRequestResult.json()['success'] != True):
if (aRequestResult.status_code != requests.codes.ok) or (aRequestResult.json()['success'] != True):
logging.critical("Error during intial registration into Freebox Server")
else:
logging.debug("You re log")
logging.info("Ending logWithPassword")

def loginProcedure(self):
logging.info("Starting loginProcedure")
aRequestUrl = "http://mafreebox.freebox.fr/api/v1/login/"
aHeaders = {'Content-type': 'application/json', 'Accept': 'application/json'}

logging.debug("URL used : " + aRequestUrl)

aRequestResult = requests.get(aRequestUrl, headers=aHeaders)
logging.debug("Request result : " + str(aRequestResult))
logging.debug("Request result : " + str(aRequestResult.json()))
if (aRequestResult.status_code != requests.codes.ok):
logging.critical("Error during loginProcedure")
else:
if (aRequestResult.json()['success'] == True):
logging.debug("OK during loginProcedure")
achallenge=aRequestResult.json()['result']['challenge']
logging.info("We have the challenge : " + str(achallenge))
return achallenge
else:
logging.critical("Error during loginProcedure")
logging.info("Ending loginProcedure")

def computePassword(self, iChallenge):
hashed = hmac.new(self.app_token, iChallenge, sha1)
logging.info("Password computed : " + str(hashed.digest().encode('hex')))
return hashed.digest().encode('hex')

def loginfull(self):
aNewChallenge = self.loginProcedure()
#password = hmac-sha1(app_token, challenge)
#voir http://stackoverflow.com/questions/8338661/implementaion-hmac-sha1-in-python
#http://stackoverflow.com/questions/13019598/python-hmac-sha1-vs-java-hmac-sha1-different-results
aPassword = self.computePassword(aNewChallenge)
self.logWithPassword(aPassword)

print ("Starting")

aLogFileToUse='WifiAutoControl.log'

#Clean previous log file
with open(aLogFileToUse, 'w'):
pass

logging.basicConfig(filename=aLogFileToUse,level=logging.DEBUG,format='%(asctime)s - %(levelname)s - %(message)s')

aMyApp = FreeboxApplication()

aMyApp.loginfull()

print ("Ending")
L’ensemble du code est dispo sur mon dépôt de domotique.
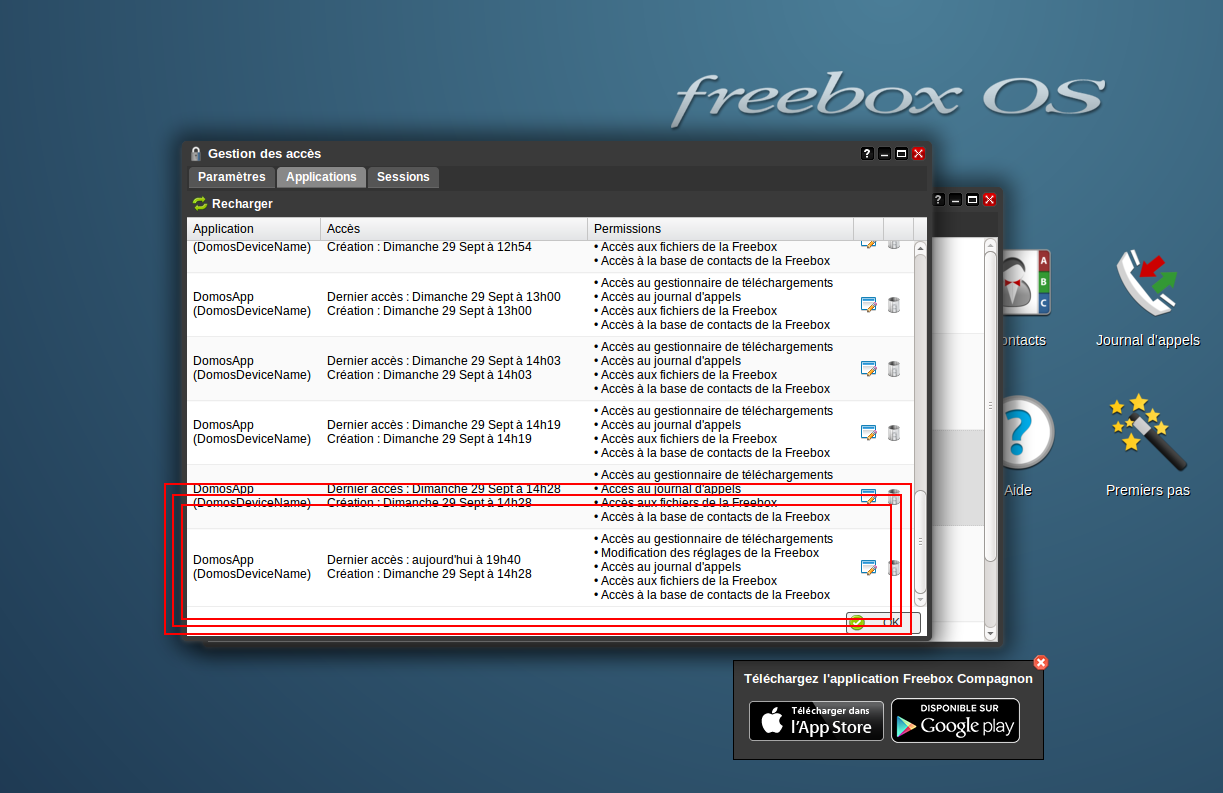
Update 3 octobre :
Une fois logger on peut utiliser l’API mais il n’y a pas bcp de permission setter a ON par défaut. Il faut mieux aller dans l OS freebox et tout autoriser avant de poursuivre les tests :
Ensuite on verifie que les permissions sont bien prise en compte. Pour cela on refait une demande de login et on regarde la reponse :
Maintenant les permissions sont toutes a True….. On peut continuer. J’ai changer le script pour récupérer la liste des appareils connecte au wifi. J’ai beaucoup de chance car il y a également des infos sur les dernières connexion et je pourrai donc faire un système un peu plus intelligent pour couper le wifi même si il y a des appareil connecte du moment qu ils n’utilisent pas réellement le wifi.
La dernière version est dispo sur mon dépôt de domotique et liste les appareils wifi connecte (et leur nombre). Elle ne coupe/active pas encore le wifi….a suivre
J’ai ajoute une webcam dans le salon qui stream en direct sur internet mais le but est de détecter les personnes pressentes dans le salon et de pouvoir créer des actions plus intelligentes que celle que j’ai aujourd’hui.
Actuellement il y a une platine Arduino avec un détecteur de présence, température, humidité dans le salon. Le système est donc capable de détecter les personnes mais il ne peut qu’ouvrir les volets pou allumer une lumière.
Ce que je veux faire maintenant est de détecter les personnes présentes dans le salon et en fonction de leur attitude le système effectuera des actions plus intelligentes. Par exemple si quelqu’un se met sur le canapé face a la télévision…..alors on allume la télévision automatiquement 😉
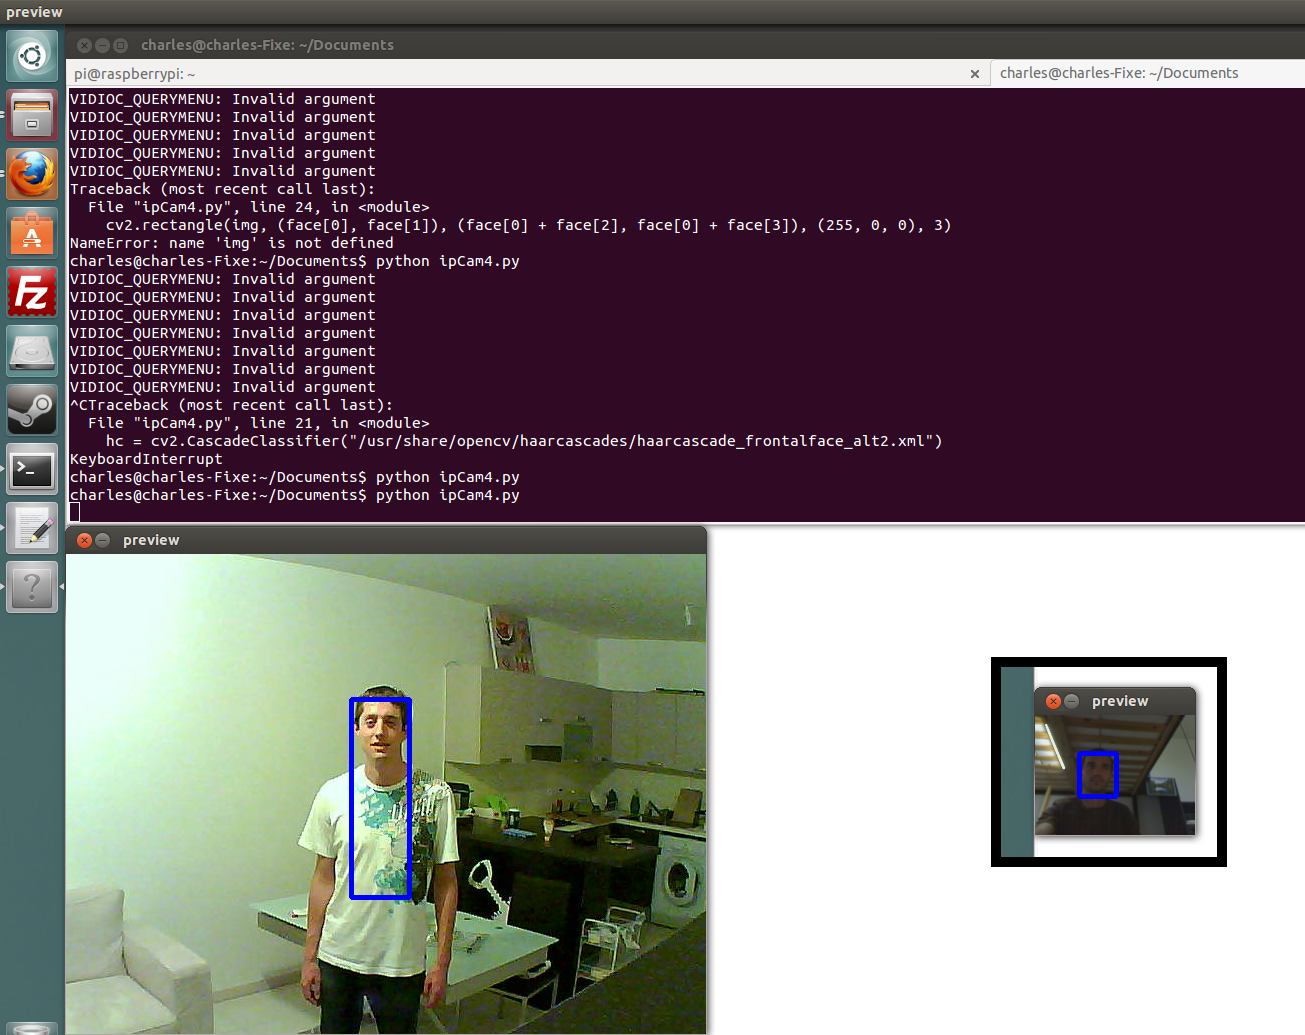
La première étape a été l achat d’une camera IP low cost. J’ai choisit ce modèle car d’après les forums que j’ai pu voir leur framework est plutôt ouvert et on peut accéder au flux de la camera facilement depuis openCV :
Ensuite… on trouve pas mal de tuto sur google pour utiliser openCV et les cameraIP (il suffit de mixer les 2 codes 😉 ). OpenCV s’installe très facilement sur Ubuntu et s’interface plutôt facilement avec python grâce a la libraire CV2 (ne pas utiliser CV).
Voila le code fonctionnel :
#!/usr/bin/env python
# -*- coding: utf-8 -*-

import cv2, math
import numpy as np

cv2.namedWindow("preview")
#vc = cv2.VideoCapture("http://192.168.0.9/videostream.asf?user=guest&pwd=guest")
vc = cv2.VideoCapture(0)

if vc.isOpened(): # try to get the first frame
    rval, frame = vc.read()
else:
    rval = False

while rval:
    cv2.imshow("preview", frame)
    rval, frame = vc.read()

    hc = cv2.CascadeClassifier("/usr/share/opencv/haarcascades/haarcascade_frontalface_alt2.xml")
    faces = hc.detectMultiScale(frame)
    for face in faces:
        cv2.rectangle(frame, (face[0], face[1]), (face[0] + face[2], face[0] + face[3]), (255, 0, 0), 3)

    key = cv2.waitKey(20)
    if key == 27: # exit on ESC
        break
Il faut juste faire attention que le fichier xml de filtre existe bien (sinon le telecharger sur internet et changer la path). Le résultat avec mon colloc 😉
Étape suivante…..porter tout ça sur Raspbian….et je sens que ça va être pénible. Ensuite il faudra être capable de dire ce que font les personnes présentes dans le salon….
Le serveur domotique hébergé sur mon RaspberryPi déclenche certaines actions en fonction d’évènements. Par exemple lorsqu’ un détecteur de présence est déclenché on allume la lumière de la même pièce. Dans cet exemple l’évènement sera reçût par le port USB du RaspberryPi (car il proviendra de l’Arduino Leonardo). Il existe d’autre évènements qui arriveront sur le RaspberryPi par d’autre moyen (TCP pour le site web de commande par exemple).
Jusqu’ a présent le serveur été code en python et attendait les évènements grâce au module python « select » qui me permettait de monitorer a la fois la liaison USB et TCP. Avec ce modèle je ne pouvais cependant pas faire du processing en arrière-plan (déclencher un évènement a une certaine heure par exemple) puisque le « select » est bloquant. J’ai donc choisit de migrer mon code vers Twisted qui correspond exactement a ce que je veux faire « Twisted is an event-driven networking engine written in Python and licensed under the open source »
Dans mon cas je veux que twisted monitor 2 « récepteurs » :
La liaison USB qui communique avec l’Arduino Leonardo est reçoit donc les messages des capteurs (capteur présence, détection incendie) qui peuvent être trigger à tout moment. Cette liaison est aussi utilisée pour envoyer des ordres aux capteurs/actionneurs du réseau (par exemple pour allumer la lumière)
La liaison TCP qui communique avec un client python fortement couple a un script PHP qui reçoit les ordres de la GUI HTML. Cette liaison est utilisée dans les 2 sens (le serveur répond au client qui affiche la réponse sur la page web).
La création de ses 2 « handlers » se fait assez facilement à condition de trouver le bon protocole duquel il faut hériter. Pour la liaison TCP il faut hériter de « twisted.internet.protocol. Protocol » (il existe déjà pas mal d’exemple pour ce cas de figure). Pour la liaison USB avec L’Arduino Leonardo on doit hériter de « twisted.protocols.basic. LineReceiver ». Ce protocole permet de recevoir les messages du port USB à condition qu’il soit bien envoyé comme une ligne complète. Il ne faut pas se tromper avec un autre protocole sinon les données seront tronquées.
Chacun de ses « handlers » a une méthode qui sera appelé lors de la réception de message : « lineReceived » pour l USB et « dataReceived » pour le TCP. Voilà à quoi ressemblent les 2 handlers
class UsbHandler(LineReceiver):
    """protocol handling class for USB """

    def __init__(self,iBrain,iRegisteredDevice):
        self.brain = iBrain
        self.registeredDevices = iRegisteredDevice

    def lineReceived(self, line):
        logging.info("USB Handler created to process : " + str(line))
        self.brain.HandleUsbInput(line,self.registeredDevices)

class TcpHandler(Protocol):
    """protocol handling class for TCP """

    def __init__(self,iBrain,iRegisteredDevice):
        self.brain = iBrain
        self.registeredDevices = iRegisteredDevice

    def dataReceived(self, data):
        logging.info("Tcp Handler created to process : " + str(data))
        if "READ" in str(data):
            logging.info("READ command")
            aRest = aBrain.ReadDeviceStatus2(data,aRegisterDevices)
            logging.info("READ command res " + str(aRest))
            self.transport.write(str(aRest))
        elif str(data) == "STOP":
            logging.info("STOP command")
            aBrain.stop()
            reactor.stop()
        else:
            logging.info("Write command")
            aBrain.SendMessage(data,aRegisterDevices)
            self.transport.write("ACK")
Ensuite on attache ses 2 protocoles au “reacteur” qui est le Cœur de twisted. Pour le TCP on lui ajoute une surcouche au travers une factory (je ne sais pas pkoi il ne faut pas faire la même chose pour l USB…)
Avec ce design je me retrouve dans la même configuration que celle de mon “framework – Select” fait maison. On va donc ajouter une boucle qui sera capable de gérer la logique background (celle qui ne dépend pas d’un évènement particulier).
Pour cela on créer une méthode (dans notre cas elle se contente d’appeler la vrai méthode de processing) :
def tired_task(iBrain):
    #logging.info("I want to run slowly" + str (datetime.datetime.now()))
    iBrain.smartProcessing2(aRegisterDevices)
Dans mon cas cette méthode va mettre a jour les capteurs automatiquement quand nécessaire. Par exemple si le dernier relevé de température date de plus de 5 minutes dans le salon et que la config de ce capteur autorise un relevé toutes les 5 minutes….on le met à jour. Cette méthode va également vérifier l’ensemble des capteurs stable de l’appartement et les updater si nécessaire. Par exemple on va éteindre la lampe de l’entrée si personne n’a été détecté depuis 10 minutes.
    def smartProcessing2(self,iListOfDevice):
        '''Une boucle qui a lieu regulierement pour prendre des decision. Elle va verifier les detecteur et en fonction triger certains evenements.
        Par ex si qq un est detecte dans l entree on decide d allumer la lumiere.
        Cette classe va aussi verifier si certaines autres actions (non lie a la detection de personne) peuvent etre prise.
        Par ex : si on a pas eut de detection de personne depuis un moment ds l entree et que la lumiere est allume....on etient
        Enfin elle va aussi mettre a jour tous les capteurs en fonction de leur refresh rate
        Par exemple si ca fait trop longtemps qu on a pas updater la T alors on la met a jour'''
        logging.info("Begining of a smart loop")

        #Step 1 : Verifier tous les detecteurs (interupteurs stables) pour voir si ils ont ete actives et prendre les actions correspondantes avant de les reset
        #Par exemple si le detecteur de fumee a ete active alors on va envoyer un mail
        logging.info("Checking all possible event")
        for aOneDevice in iListOfDevice.registeredDevices:
            logging.debug("checking event : " + str(aOneDevice.id))
            if ((aOneDevice.id == 2) and (aOneDevice.currentStatus=="unstable")):
                sendEmailFireDetected()
            elif ((aOneDevice.id == 10) and (aOneDevice.currentStatus=="unstable")):
                self.PeopleDetectedEntree(iListOfDevice)
            elif ((aOneDevice.id == 9) and (aOneDevice.currentStatus=="unstable")):
                self.PeopleDetectedCharlesRoom(iListOfDevice)
            aOneDevice.reset()

        #Setp 2 : On reset les actions resultantes des detections passe
        #Par exemple si la lumiere de l entree ete ON car qq un avait ete detecte depuis 10 minutes mais qu il y a plus eu de detection depuis 10 min....on eteind
        logging.info("Reseting all previous automatic actions")
        for aOneDevice in iListOfDevice.registeredDevices:
            logging.debug("checking states : " + str(aOneDevice.id))
            if ((aOneDevice.id == 9) and ((iListOfDevice.getDevice(3)).currentStatus=="on") and (datetime.datetime.now() - aOneDevice.LastTMeaureDate > datetime.timedelta (seconds = 600))):
                self.TurnCharlesLightOff(iListOfDevice)
            elif ((aOneDevice.id == 10) and ((iListOfDevice.getDevice(8)).currentStatus=="on") and (datetime.datetime.now() - aOneDevice.LastTMeaureDate > datetime.timedelta (seconds = 180))):
                self.TurnEntreeLightOff(iListOfDevice)

        #Setp 3 : On force un refresh des capteurs periodiques
        logging.info("Force the auto refresh of capteur")
        for aOneDevice in iListOfDevice.registeredDevices:
            logging.debug("checking autoupdate : " + str(aOneDevice.id))
            if ( (aOneDevice.stateCanBeRefresh == True) and (aOneDevice.refreshOngoing == False)and (datetime.datetime.now() - aOneDevice.LastTMeaureDate > datetime.timedelta (minutes = aOneDevice.refreshRatemin) ) ):
                logging.debug("We can refresh : " + str(aOneDevice.id))
                self.refreshCapteur(aOneDevice,iListOfDevice)
Grace à cette nouvelle boucle intelligente la mise à jour des capteurs ne se fait plus dans la crontab avec :
# toutes les heures + 7 min on refresh la emperature entree
 7 * * * * /home/pi/Usb_Arduino_Leonardo/PythonWrapperWebArduinoUsbS.py -o CRONTAB -s 30
La mise à jour des capteurs fait maintenant partie intégrante de l’application.
J’ai également supprimé la base de données qui été interrogée par le site web et remplit par le serveur. Maintenant le site web interroge le serveur pour récupérer l’état T de n’importe quel capteur (en utilisant le format JSON).
Au site Web et les informations nécessaires pour la page seront utilisés. Toute la logique est en train de migrer vers le serveur python pour qu’il coordonne l’ensemble des actions. Je clarifie également toutes les interfaces pour utiliser des formats standard (JSON plutôt que des select de colonnes dans une base).