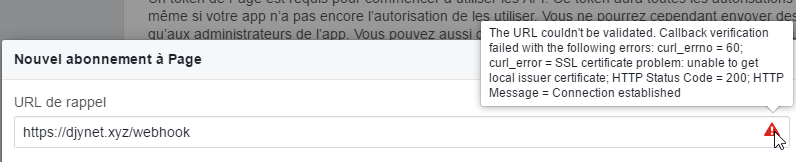
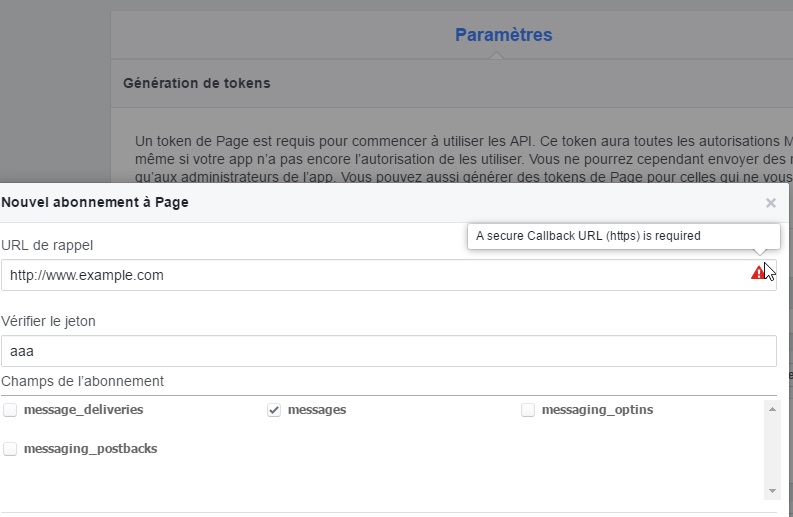
Following my first test to setup a HTTPS server to dialogue with facebook API describe in my previous article here I had error when trying to register the facebook webhook:
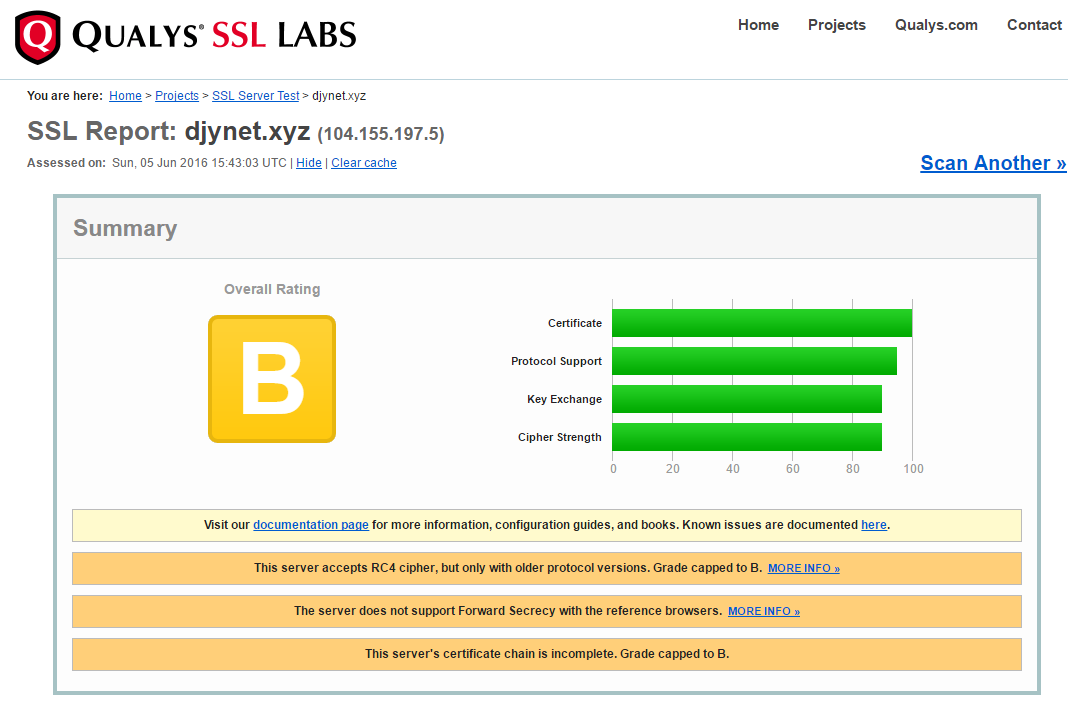
It seems good but there is a warning about the certificate chain… I done some quick research and it seem to be the root cause. After some investigation (and mainly thanks to this post) it seems the error comes from my nodejs server setup and more particularly the missing certificate authority certificate info. I miss it since it is not used in the official documentation. It is indeed an optional parameter
If this is omitted several well-known “root” CAs will be used, like VeriSign
Next step… you need a certificate. It needs to be provided by a certificate authority and it will cost you some money (depending on the authority and certificate type but once again…..google). You could buy one on rapidSSL for hundred dollars (https://www.rapidssl.com/) but since few weeks there is a new player in town provided free certificates: let’s encrypt.
“Let’s Encrypt is a free, automated, and open certificate authority (CA), run for the public’s benefit. Let’s Encrypt is a service provided by the Internet Security Research Group (ISRG).”
The service went out of beta in April 2016 with some limitation but the initiative is promising so I decided to try it.
$ ./certbot-auto --help
Usage: certbot-auto [OPTIONS]
A self-updating wrapper script for the Certbot ACME client. When run, updates
to both this script and certbot will be downloaded and installed. After
ensuring you have the latest versions installed, certbot will be invoked with
all arguments you have provided.
Help for certbot itself cannot be provided until it is installed.
  --debug                                   attempt experimental installation
  -h, --help                                print this help
  -n, --non-interactive, --noninteractive   run without asking for user input
  --no-self-upgrade                         do not download updates
  --os-packages-only                        install OS dependencies and exit
  -v, --verbose                             provide more output
You need to find the plugin to use depending on your webserver (more info HERE). I used the standalone plugin since there is nothing for nodejs. With this plugin the client will use the port 443 to act as a webserver to handle some challenge to prove that its own the domain.
var fs = require('fs');
 var https = require('https');
 var options = {
 key: fs.readFileSync('/etc/letsencrypt/live/djynet.xyz/privkey.pem'),
 cert: fs.readFileSync('/etc/letsencrypt/live/djynet.xyz/cert.pem')
 };
 https.createServer(options, function (req, res) {
 console.log(new Date()+' '+
 req.connection.remoteAddress+' '+
 req.method+' '+req.url);
 res.writeHead(200);
 res.end("hello world\n");
 }).listen(443,"0.0.0.0");
Let’s run it with
$ sudo node main.js
 Fri Jun 03 2016 02:41:57 GMT+0000 (UTC) 73.68.66.138 GET /
 Fri Jun 03 2016 02:41:57 GMT+0000 (UTC) 73.68.66.138 GET /favicon.ico
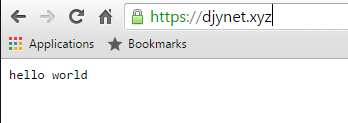
And check the result
Nice green lock… we’re safe !
Warning!
I discover few days after that it was node 100% working. The nodejs server does not provide the chain of certificate. See my follow up article to fix it HERE.
I wanted to try to install openshift on a GCE cluster with the official “ansible installer” available on github https://github.com/openshift/openshift-ansible. Nevertheless I did not manage to have the installer creating the VM on GCE and I’m not even sure it is possible (even if it seems based on libcloud). In the meantime I discover Terraform which allow describing an infrastructure in a common language and deploying it on multiple cloud (including GCE and AWS).
Finally I decided to work on a project that will include these 2 topics “Openshift installation with ansible” and “infrastructure creation with terrafrom”.
I did not had to search too long before I found an open source project that aim to do that: https://github.com/christian-posta/openshift-terraform-ansible
“This repo contains Ansible and terraform scripts for installing openshift onto OpenStack or AWS EC2.
The repo is organized into the different deployment models. Currently tested with EC2 and OpenStack, but can be extended to Google Compute, Digital Ocean, etc. Happy to take pull requests for additional infrastructure.”
That was perfect since I wanted to use GCE. I decided to contribute to this project by adding the GCE support.
Here is an overview of the whole process (more detail on the github project) :
Used Terrafrom to create the VMs cluster on the cloud
this is based on an Infrastructure file and Terrafrom.
Use Ansible to customize the VMs
this part use Ansible and an external Opensource project made by cisco to create dynamically a Ansible Inventory file from the Terrafrom files: https://github.com/CiscoCloud/terraform.py. This is not obvious today since the Cisco code is copied in the repo (see my comment later)
Use the Openshift-Ansible installer to install Openshift on these VMs
This part use the official installer but require a manual action first to create the ansible inventory file.
Remove static “Terraform.py” script
During my changes on the repo I noticed that it was relying on an Cisco project to create an Ansible inventory from the Terrafrom files. Nevertheless instead of cloning the cisco repo (like it is done for Openshift-Ansible Repo) it was committed.
I think it was done like this since the original creator was thinking to modify it later on but for now it prevent us to benefit from the changes done on the official github repository of Cisco. This is particularly true for my usecase since there was a bug preventing to create the inventory file for GCE in the actual version (but fix on the github last versions).
I thus decided first to create a PR to clone the Cisco repo in the procedure and remove the old version which was committed.
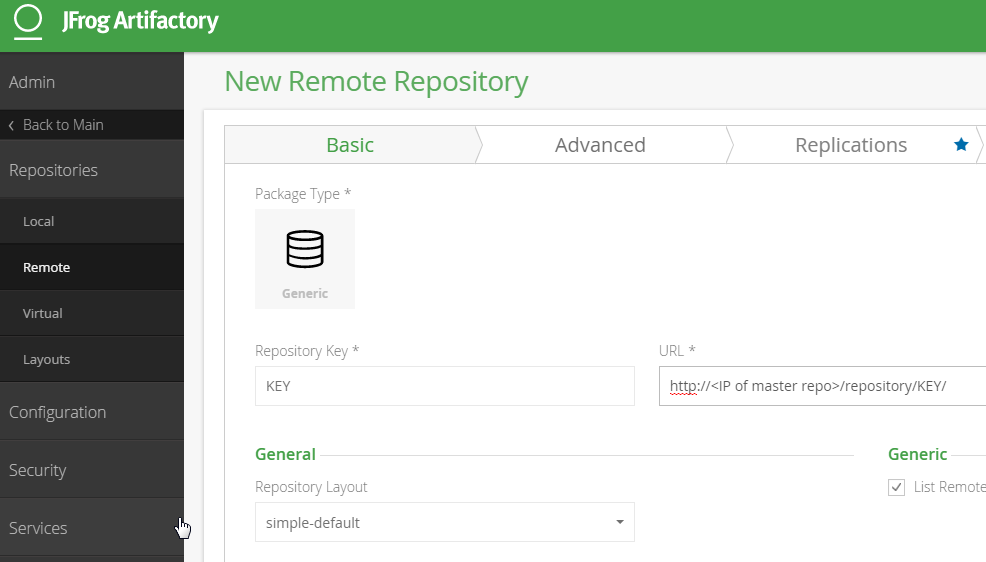
Artifactory is a repository manager. It is the one used in my current company to store various packages like RPM/Puppet/Pypi/Vagrant… You can find more documentation on their website: https://www.jfrog.com/open-source/
This post gathers my note to install an artifactory cache connected to another instance (master instance) to speed up the package retrieval. This procedure is used on a target server where you have no internet connection and no root access.
0/Download
Download Java + Artifactory free on a computer with internet access (or from Artifactory) and transfer them on the target server.
1/Untar/unpack
unzip jfrog-artifactory-oss-4.5.2.zip
tar zxvf jre-8u73-linux-x64.gz
Be careful when choosing the KEY. I strongly suggest to use the name of the remote repo you want to cache locally otherwise you will have different URL to download from depending on if you want to download from the MASTER or this CACHE.
5/Test it
Curl http://www.<target server IP>/repository/KEY/<stuff>
Stuff is an artifact that should exist on the MASTER artifactory otherwise it will fails…
Which send the 3 orientation information to the Tornado python server running on the Raspberry pi of the train. First I was doing JSON REST call to send the string containing the information but it was too slow to have the camera moving in real time. This was the perfect opportunity to use websocket for more real time communication.
function onOpen(evt) {
        console.log("CONNECTED");
        doSend("Hi there!");
    }
    function onClose(evt) {
        console.log("DISCONNECTED");
    }
    function onMessage(evt) {
        console.log('message: ' + evt.data);
    }
    function onError(evt) {
        writeToScreen('error' + evt.data);
    }
    function doSend(message) {
        websocket.send(message);
    }
function testWebSocket() {
        websocket.onopen = function(evt) { onOpen(evt) };
        websocket.onclose = function(evt) { onClose(evt) };
        websocket.onmessage = function(evt) { onMessage(evt) };
        websocket.onerror = function(evt) { onError(evt) };
}


if (!'WebSocket' in window){
    console.log("Sorry, your browser doesn't support Websockets");
} else {
var wsUri = "ws://192.168.10.1:80/ws";
var websocket = new WebSocket(wsUri);
    testWebSocket();
}
Which is received on the server side and put in a variable (see the class Handler_WS) :
    def on_message(self, iMessage):
        """Methode call when the server receive a message"""
        logging.info('Receive incoming message:'+str(iMessage))
        #self.write_message("toto")
        self.aTrainRef._cellAngles=str(iMessage)
This variable is then read every 125ms by the “foo” function:
At the end the real method called is in charge of updating the turret position. The whole stuff is based on an existing framework called servoBlaster which will take care of driving the Servo.
Servo Blaster is library able to drive Servo on the Raspberry pi using software PWM. It is pretty hard to do since the Pi is not running a real-time OS. It relies on very low level interruption to ensure the timing needed to have a proper PWM are respected. You can have more info on it here:
It basically start a daemon (which I added in the crontab to be launch at boot time) on which you can interact with writing the desired position of each servo in /dev/servoblaster like:
echo 3=120 > /dev/servoblaster
I also used servo blaster to send PWM info to the motor driver to change the train speed (since this functionality was broken when I moved from Arduino to Rapsberry Pi).
Contact sensors
I replace the old contact sensor by some new sensor able to detect an incoming obstacle before impact.
They are still binary sensors that will turn high if they detect an obstacle but they have a wider range between 2 and 10 centimeters. This allows the train to detect incoming obstacle and stop before hitting it. The sensor is available on ADAfruit: https://www.adafruit.com/products/1927
Demo
I made some videos on this new version on YouTube:
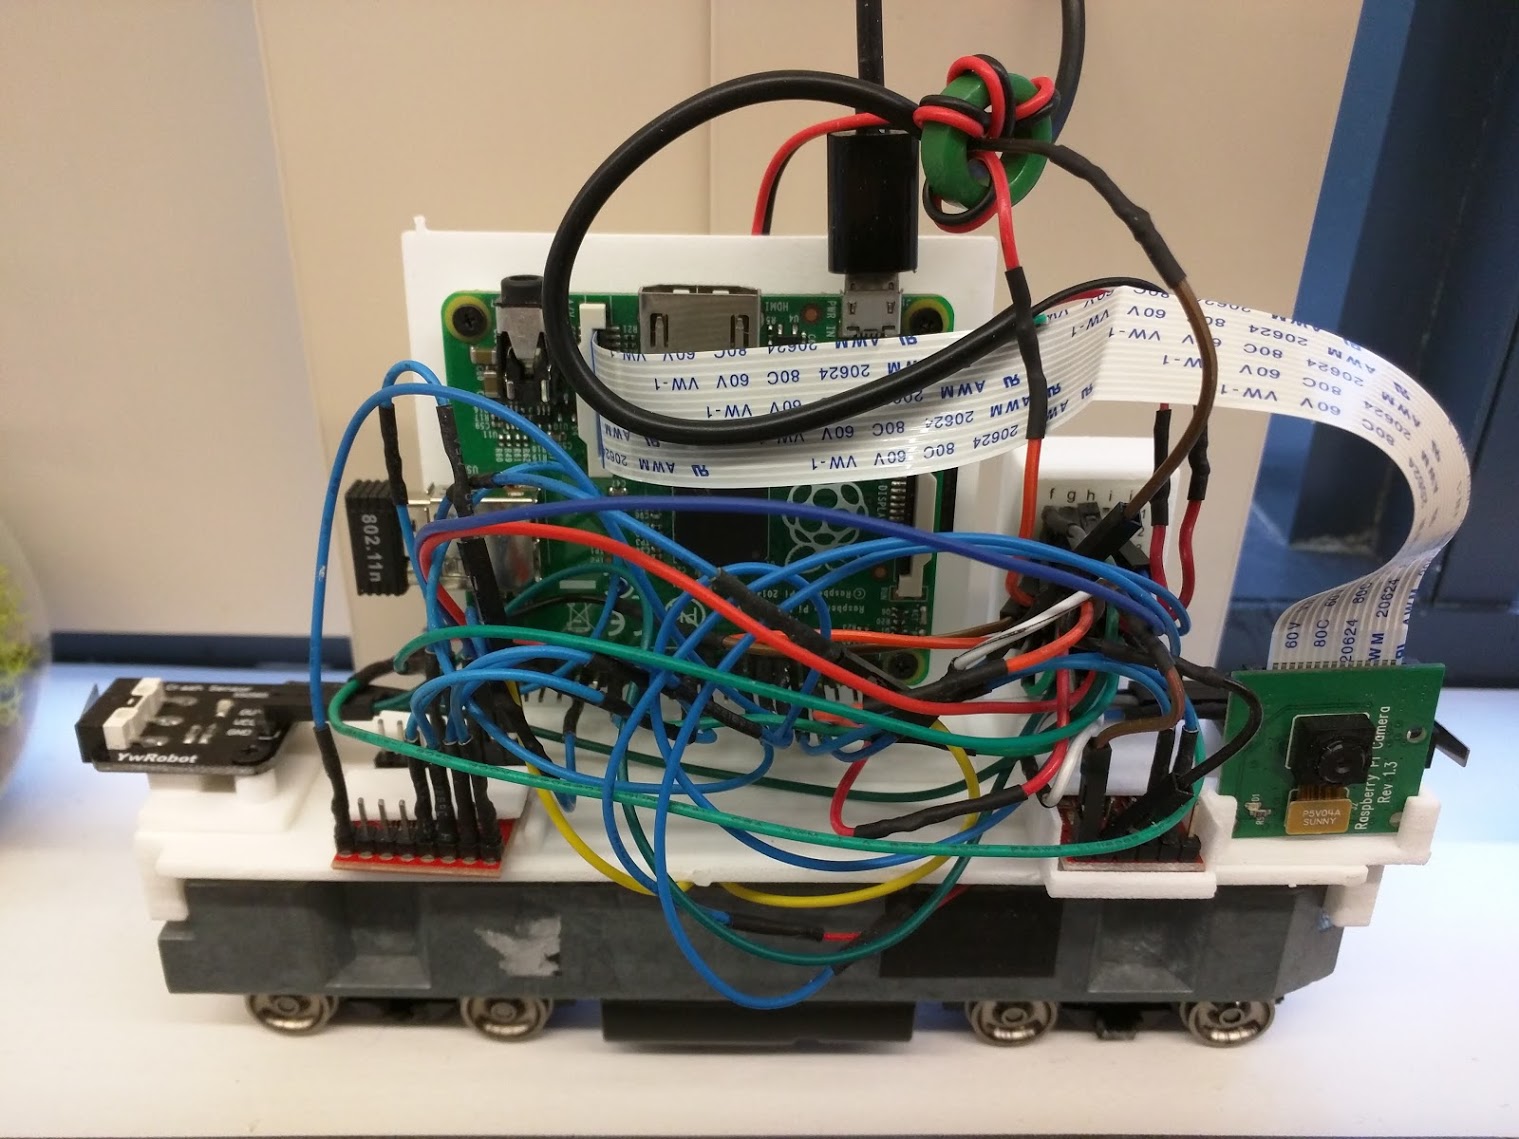
After some weeks of works I’m proud to announce the Version 2 of the electric train:
Wifi capabilities
The train can now be control with Wifi. It creates a wifi hotspot at boot time allowing people to connect to access a UI with some commands. The Wifi hotspot creation is describe HERE
Web
The train now offers a Web UI which allows controlling it and seeing the camera broadcast. The UI is done in Angular JS (with Bootsrap Angular UI). The Web server used to render the page is a python one : Tornado.
In addition of the UI it offers REST API to control the train (which are called today by the UI but could be used for a native Android application). The Web creation setup is detail HERE (TODO).
Embedded camera
The train is now equipped with a camera (the official Raspberry camera). The camera stream is broadcast and available on the train Web UI. The camera broadcast setup is describe HERE
Raspberry Pi brain
I replace the Arduino board with a Raspberry Pi A+. This extra boost of power was needed to broadcast the camera stream and create a wifi hotspot.
UBEC Power source
The biggest surprise I had when creating the new version was lot of unexpected Raspberry Pi reboot. Every time I was starting to move the train the Raspberry Pi was rebooting. I quickly suspect it was due to the motor which either took too much current or create perturbation that the 7805 cannot handle by itself. I done some research to understand how this issue was usually handle in R/C world and find out that they already have the perfect solution : BEC.
It is used to power the command part of the RC model from the same source than the motor. It provides a smooth tension and is able to absorb the impact of the motors on the power source with use of self and capacitor (wikipedia link). Since it is standard component in R/C world you can buy them pretty easily on the Web :
I need my Raspberry Pi to create its own private dedicated Wi-Fi network so that people can connect on it an access some service it provide (like camera broadcast).
To do so I’ve done some search and find out several tutorial to do it (see links at the end of the post). This post is just a sum up of what worked in my case (in case I need to redo it). I strongly suggest to check the links at the end of the article.
The solution rely on 2 software:
hostapd
HostAPD is a user space daemon for access point and authentication servers. That means it can will turn your Raspberry Pi into an access point that other computers can connect to. It will also handle security such that you can setup a WiFi password.
isc-dhcp-server
isc-dhcp-server is the Internet Systems Consortium’s implementation of a DHCP server. A DHCP server is responsible for assigning addresses to computers and devices connection to the WiFi access point.
Some people use udhcpd which is lighter version
GStreamer is a library for constructing graphs of media-handling components. The applications it supports range from simple Ogg/Vorbis playback, audio/video streaming to complex audio (mixing) and video (non-linear editing) processing.
RaspiMJPEG is an OpenMAX-Application based on the mmal-library, which is comparable to RaspiVid. Both applications save the recording formated as H264 into a file
The project consists primarily of a class (PiCamera) which is a re-implementation of high-level bits of the raspistill and raspivid commands using the ctypes based libmmal header conversion, plus a set of encoder classes which re-implement the encoder callback configuration in the aforementioned binaries. Various classes for specialized applications also exist (PiCameraCircularIO, PiBayerArray, etc.)
avconv is a very fast video and audio converter that can also grab from a live audio/video source. It can also convert between arbitrary sample rates and resize video on the fly with a high quality polyphase filter.
Finally I decided to use “RPi caminterface” which has the best feedback. I confirms it works out of the box (which save me lot of times).
I could maybe migrate to “WebRTC UV4L” if I decide to go to a Pi2 in the future…