Basic auth with kube python lib

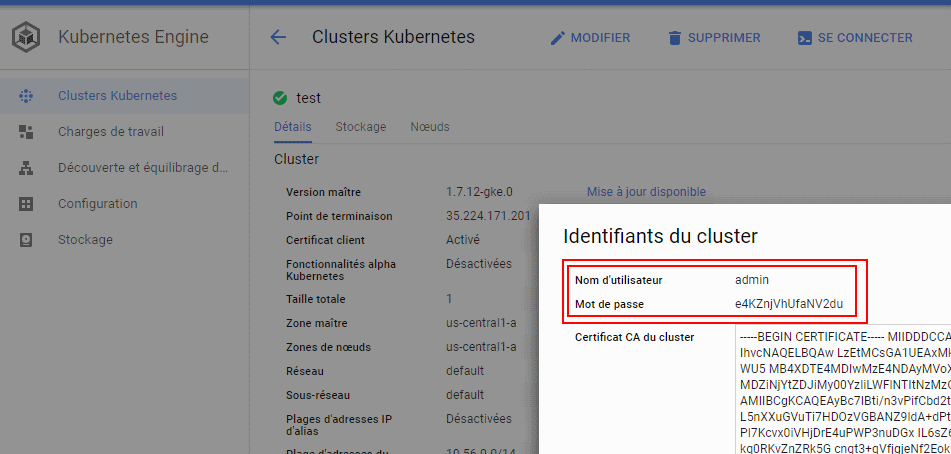
When a Kube cluster is created on Google Kube Engine you have access to a user/password combination that you could use to authenticate with Kube API.

This method of authentication is part of the official documentation of kubernetes:  

“Kubernetes uses client certificates, bearer tokens, an authenticating proxy, or HTTP basic auth to authenticate….” From https://kubernetes.io/docs/admin/authentication/ 

I wanted to try this authentication method with the official kubernetes python client: https://github.com/kubernetes-client/python 

Remote cluster 

The first issue I had was to specify a remote cluster since all the example of the API used a .kubeconfig and suppose that the kube client is on the server (and usable).  

After some digging I find the proper options and made a PR to add such example in the API doc: https://github.com/kubernetes-client/python/pull/446 

Bearer token auth 

The second issue was due to the BASIC authentication. There is already a ticket open about it (just few days before): https://github.com/kubernetes-client/python/issues/430 

There was no solution in it so I decided to dig in 😉 

After reading the code of the API I was only able to find the “bearer token” authentication method. There was nothing about the BASIC auth. I decided first to try the “bearer token” method to ensure the rest of my code was working fine. I submit an example of it on the ticket with the code below: 

from kubernetes import client, config 

#see https://kubernetes.io/docs/tasks/administer-cluster/access-cluster-api/#accessing-the-cluster-api to know how to get the token 
#The command look like kubectl get secrets | grep default | cut -f1 -d ' ') | grep -E '^token' | cut -f2 -d':' | tr -d '\t' but better check the official doc link  

aToken="eyJhXXXXXXXX82IKq0rod1dA" 

# Configs can be set in Configuration class directly or using helper utility 
configuration = client.Configuration() 
configuration.host="https://XXX.XXX.XXX.XXX:443" 
configuration.verify_ssl=False 
configuration.debug = True 


#Maybe there is a way to use these options instead of token since they are provided in Google cloud UI 
#configuration.username = "admin" 
#configuration.password = "XXXXXXXXXXX" 

configuration.api_key={"authorization":"Bearer "+ aToken} 
client.Configuration.set_default(configuration) 

v1 = client.CoreV1Api() 
print("Listing pods with their IPs:") 
ret = v1.list_pod_for_all_namespaces(watch=False) 
for i in ret.items: 
    print("%s\t%s\t%s" % (i.status.pod_ip, i.metadata.namespace, i.metadata.name)) 

It allows me to validate the “remote” cluster communication and also the token authentication nevertheless it is not my final goal. 

Basic auth 

Python kube API hack 

I spend some time digging in the code and did not find any code related to the BASIC auth. I check in the code and the method “get_basic_auth_token” in configuration.py is never call anywhere (and it is the only one dealing with username/password field). 

Then I try to “hack” a little the python code by modifying the class configuration and change its auth_setting with that 

def auth_settings(self): 
    """ 
    Gets Auth Settings dict for api client. 
    :return: The Auth Settings information dict. 
    """ 
    return { 
        'BearerToken': 
            { 
                'type': 'api_key', 
                'in': 'header', 
                'key': 'authorization', 
                'value': self.get_api_key_with_prefix('authorization') 
            }, 
            'http_basic_test': 
            { 
                'type': 'basic', 
                'in': 'header', 
                'key': 'Authorization', 
                'value': self.get_basic_auth_token() 
            }, 
    } 

I just added the “http_basic_test” here. Then you can take any functional class like “”core_v1_api and modify the method you plan to use (list_pod_for_all_namespaces_with_http_info in my case) and modify the auth part of the code. Replace:

auth_settings = ['BearerToken']

with

auth_settings = ['http_basic_test']

and then you can use username/password to authenticate (I verified and it works) 

You should have valid response and even see the basic auth info if you activate debug log (like it is done in my previous answer):

send: b'GET /version/ HTTP/1.1\r\nHost: XXX.XXX.XXX.XXX\r\nAccept-Encoding: identity\r\nAccept: application/json\r\n
Content-Type: application/json\r\nUser-Agent: Swagger-Codegen/4.0.0/python\r\nAuthorization: Basic YWRXXXXXXXXXXXRA==\r\n\r\n' 

This confirms that the basic auth can be used (as the kubernetes mentioned) but is not accessible from the python API.  

Clean solution 

The previous hack allowed me to be sure that I could authenticate with the cluster using the user//password nevertheless we cannot keep such dirty hack.  

After some investigation I find out the Python kube client is generated by swagger. The generator code is located here: https://github.com/kubernetes-client/gen 

This repo relies on the kubernetes swagger file located on the kubernetes repo: 

https://raw.githubusercontent.com/kubernetes/kubernetes/master/api/openapi-spec/swagger.json 

The URI of the swagger file is partialy hardcoded in the python file preprocess_spec.py 

spec_url = 'https://raw.githubusercontent.com/kubernetes/kubernetes/' \ 
             '%s/api/openapi-spec/swagger.json' % sys.argv[2] 

Then I check the swagger file with a specific look on the security part: 

  "securityDefinitions": { 
   "BearerToken": { 
    "description": "Bearer Token authentication", 
    "type": "apiKey", 
    "name": "authorization", 
    "in": "header" 
   } 
  }, 
  "security": [ 
   { 
    "BearerToken": [] 
   } 
  ] 

So there is indeed ne reference to any BASIC authentication process here. This is strange since the official doc mention it and since we just validated it works fine. 

Let’s try to generate again the python kube library after adding the BASIC auth in the swagger file 😉 

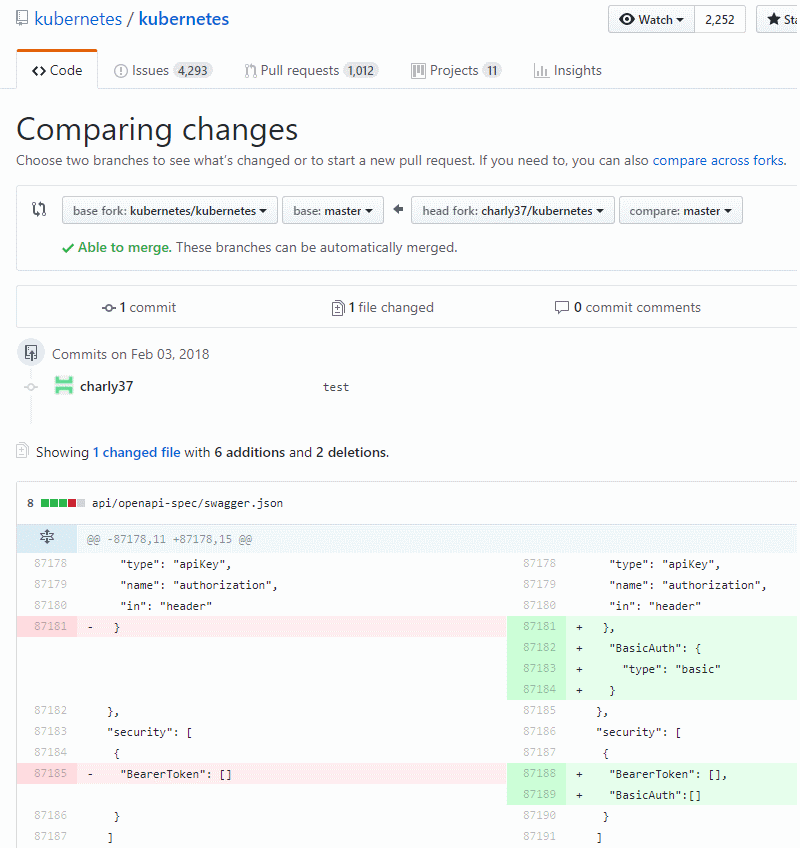
So I fork the kubernetes repo and modify the swagger file: 

"securityDefinitions": { 
   "BearerToken": { 
    "description": "Bearer Token authentication", 
    "type": "apiKey", 
    "name": "authorization", 
    "in": "header" 
   }, 
    "BasicAuth": { 
      "type": "basic" 
    } 
  }, 
  "security": [ 
   { 
    "BearerToken": [], 
    "BasicAuth":[] 
   } 
  ] 

(you can see the diff here: https://github.com/kubernetes/kubernetes/compare/master…charly37:master) 

Then we need to patch the generator to use my fork swager file. I just change the URI in preprocess_spec.py with: 

    spec_url = 'https://raw.githubusercontent.com/charly37/kubernetes/' \ 
               '%s/api/openapi-spec/swagger.json' % sys.argv[2] 

And then generate again the python library with: 

./python.sh test test.sh 

This comes from the README of the generator here: https://github.com/kubernetes-client/gen and the test.sh file content is: 

[charles@kube openapi]$ cat test.sh 
export KUBERNETES_BRANCH=master 
export CLIENT_VERSION=1.0.0b1 
export PACKAGE_NAME=kubernetes 

This will start a docker container and build the python library in the output directory which is ./test in our case: 

…
[INFO] ------------------------------------------------------------------------ 
[INFO] BUILD SUCCESS 
[INFO] ------------------------------------------------------------------------ 
[INFO] Total time: 11.396 s 
[INFO] Finished at: 2018-02-03T22:18:51Z 
[INFO] Final Memory: 26M/692M 
[INFO] ------------------------------------------------------------------------ 
---Done. 
---Done. 
--- Patching generated code... 
---Done. 

To be sure that the new security setup was taken into account we check the new python code and more specifically the configuration.py file with 

vi test/kubernetes/configuration.py 

leading to see:

    # Authentication Settings 
    # dict to store API key(s) 
    self.api_key = {} 
    # dict to store API prefix (e.g. Bearer) 
    self.api_key_prefix = {} 
    # Username for HTTP basic authentication 
    self.username = "" 
    # Password for HTTP basic authentication 
    self.password = "" 

We now have parameters related to the BASIC authentication. Seems very good 😉 

We install this generated library with: 

[root@kube test]# python setup.py install 

The last piece of the test is to replace the bearer token in our test script with these new parameters: 

    aUser = "admin" 
    aPassword = "e4KZnjVhUfaNV2du" 
... 
    #configuration.api_key = {"authorization": "Bearer " + aToken} 
    configuration.username = aUser 
    configuration.password = aPassword 

And run the script: 

[root@kube ~]# python kubeConect.py 

Listing pods with their IPs: 

[root@kube ~]# python kubeConect.py
Listing pods with their IPs:
/usr/lib/python2.7/site-packages/urllib3-1.22-py2.7.egg/urllib3/connectionpool.py:858: InsecureRequestWarning: Unverified HTTPS request is being made. Adding certificate verification is strongly advised. See: https://urllib3.readthedocs.io/en/latest/advanced-usage.html#ssl-warnings
  InsecureRequestWarning)
10.56.0.8       kube-system     event-exporter-v0.1.7-91598863-kkzgw
10.56.0.2       kube-system     fluentd-gcp-v2.0.9-nc8th
10.56.0.10      kube-system     heapster-v1.4.3-2870825772-h9z8j
10.56.0.7       kube-system     kube-dns-3468831164-t5ggk
10.56.0.3       kube-system     kube-dns-autoscaler-244676396-r5rnm
10.128.0.2      kube-system     kube-proxy-gke-test-default-pool-477f49cb-fksp
10.56.0.4       kube-system     kubernetes-dashboard-1265873680-kzdn2
10.56.0.6       kube-system     l7-default-backend-3623108927-rkv9w

Iworks !! Now we know that if we update the swagger file we will be able to use the BASIC auth with the python kube client library. The last step is to talk with the rest of the community to find out why the BASIC auth is not supported on the client libs (all generated from the swagger file) even if it is activated on Kube and present in the official doc… 

DNS challenge for let’s encrypt SSL certificates

Last week I had to generate a SSL certificate for a domain which has its web server on a corporate network. The Web Server on the corporate network has outgoing internet access but cannot be reach from Internet. I was not sure it was possible to generate a certificate in this case with let’s encrypt since my previous experience was with a Web server reachable from internet to answer the let’s encrypt challenge (http://djynet.net/?p=821).

Luckily I was wrong 😉 It is indeed possible to prove let’s encrypt that you own the domain with a DNS challenge! Here are my notes on how to do it.

Download the client with:

wget https://dl.eff.org/certbot-auto
chmod a+x ./certbot-auto

Run the client in manual mode with DNS challenge and wait for the client to provide you the challenge

[root@vps99754 ~]# ./certbot-auto certonly --manual --preferred-challenges dns --email <your email> -d <the domain>

Saving debug log to /var/log/letsencrypt/letsencrypt.log

Obtaining a new certificate

Performing the following challenges:

dns-01 challenge for <the domain>

-------------------------------------------------------------------------------

NOTE: The IP of this machine will be publicly logged as having requested this

certificate. If you're running certbot in manual mode on a machine that is not

your server, please ensure you're okay with that.

Are you OK with your IP being logged?

-------------------------------------------------------------------------------

(Y)es/(N)o: Y

-------------------------------------------------------------------------------

Please deploy a DNS TXT record under the name

_acme-challenge. <the domain> with the following value:

bIwIxGg1IXXXXXXXXXXXXXXXXXXXXXXXXXXXXXX

Once this is deployed,

-------------------------------------------------------------------------------

Press Enter to Continue

At this point you just need to update your DNS with the entry provided as show in the following picture and press enter (maybe wait few seconds after you done the update if you use a webUI like me to update your DNS provider)

Waiting for verification...

Cleaning up challenges

Generating key (2048 bits): /etc/letsencrypt/keys/0000_key-certbot.pem

Creating CSR: /etc/letsencrypt/csr/0000_csr-certbot.pem

IMPORTANT NOTES:

 - Congratulations! Your certificate and chain have been saved at

   /etc/letsencrypt/live/<the domain>/fullchain.pem. Your cert will

   expire on 2017-07-23. To obtain a new or tweaked version of this

   certificate in the future, simply run certbot-auto again. To

   non-interactively renew *all* of your certificates, run

   "certbot-auto renew"

 - If you like Certbot, please consider supporting our work by:

   Donating to ISRG / Let's Encrypt:   https://letsencrypt.org/donate

   Donating to EFF:                    https://eff.org/donate-le

All set 😉 Pretty easy and very nice feature to validate a Webserver not connected to internet (as long as you have access to its DNS server and it is reachable from internet).

HTTPS with let’s encrypt

If you want to try the new facebook bot capability you could come across the need of an HTTPS webserver for the callback URL:

securecallback

Anyway….since https is becoming the standard (http://trends.builtwith.com/ssl/SSL-by-Default, https://security.googleblog.com/2014/08/https-as-ranking-signal_6.html) it could be interesting to learn more about it and give it a try…

Want to know more about https? Google!

Next step… you need a certificate. It needs to be provided by a certificate authority and it will cost you some money (depending on the authority and certificate type but once again…..google). You could buy one on rapidSSL for hundred dollars (https://www.rapidssl.com/) but since few weeks there is a new player in town provided free certificates: let’s encrypt.

“Let’s Encrypt is a free, automated, and open certificate authority (CA), run for the public’s benefit. Let’s Encrypt is a service provided by the Internet Security Research Group (ISRG).”

The service went out of beta in April 2016 with some limitation but the initiative is promising so I decided to try it.

The documentation is pretty good :

First you retrieved the client with

wget https://dl.eff.org/certbot-auto
chmod a+x ./certbot-auto

then you check the options

$ ./certbot-auto --help
Usage: certbot-auto [OPTIONS]
A self-updating wrapper script for the Certbot ACME client. When run, updates
to both this script and certbot will be downloaded and installed. After
ensuring you have the latest versions installed, certbot will be invoked with
all arguments you have provided.
Help for certbot itself cannot be provided until it is installed.
  --debug                                   attempt experimental installation
  -h, --help                                print this help
  -n, --non-interactive, --noninteractive   run without asking for user input
  --no-self-upgrade                         do not download updates
  --os-packages-only                        install OS dependencies and exit
  -v, --verbose                             provide more output

You need to find the plugin to use depending on your webserver (more info HERE). I used the standalone plugin since there is nothing for nodejs. With this plugin the client will use the port 443 to act as a webserver to handle some challenge to prove that its own the domain.

./certbot-auto certonly --standalone --email charles.walker.37@gmail.com -ddjynet.xyz

The output will give you information about where the certificat/key have been generated so you can use them :

Congratulations! Your certificate and chain have been saved at
   /etc/letsencrypt/live/djynet.xyz/fullchain.pem......

Then we can try it with a simple page served by nodejs.

Here is a very simple https nodejs server (from the official doc : https://nodejs.org/api/https.html)

var fs = require('fs');
 var https = require('https');
 var options = {
 key: fs.readFileSync('/etc/letsencrypt/live/djynet.xyz/privkey.pem'),
 cert: fs.readFileSync('/etc/letsencrypt/live/djynet.xyz/cert.pem')
 };
 https.createServer(options, function (req, res) {
 console.log(new Date()+' '+
 req.connection.remoteAddress+' '+
 req.method+' '+req.url);
 res.writeHead(200);
 res.end("hello world\n");
 }).listen(443,"0.0.0.0");

Let’s run it with

$ sudo node main.js
 Fri Jun 03 2016 02:41:57 GMT+0000 (UTC) 73.68.66.138 GET /
 Fri Jun 03 2016 02:41:57 GMT+0000 (UTC) 73.68.66.138 GET /favicon.ico

And check the result

sslResult

Nice green lock… we’re safe !

Warning!

I discover few days after that it was node 100% working. The nodejs server does not provide the chain of certificate. See my follow up article to fix it HERE.

Openshift installation on GCE using terraform

I wanted to try to install openshift on a GCE cluster with the official “ansible installer” available on github https://github.com/openshift/openshift-ansible. Nevertheless I did not manage to have the installer creating the VM on GCE and I’m not even sure it is possible (even if it seems based on libcloud). In the meantime I discover Terraform which allow describing an infrastructure in a common language and deploying it on multiple cloud (including GCE and AWS).

Finally I decided to work on a project that will include these 2 topics “Openshift installation with ansible” and “infrastructure creation with terrafrom”.
I did not had to search too long before I found an open source project that aim to do that:
https://github.com/christian-posta/openshift-terraform-ansible

“This repo contains Ansible and terraform scripts for installing openshift onto OpenStack or AWS EC2.

The repo is organized into the different deployment models. Currently tested with EC2 and OpenStack, but can be extended to Google Compute, Digital Ocean, etc. Happy to take pull requests for additional infrastructure.”

That was perfect since I wanted to use GCE. I decided to contribute to this project by adding the GCE support.

Here is an overview of the whole process (more detail on the github project) :

  1. Used Terrafrom to create the VMs cluster on the cloud
    this is based on an Infrastructure file and Terrafrom.
  2. Use Ansible to customize the VMs
    this part use Ansible and an external Opensource project made by cisco to create dynamically a Ansible Inventory file from the Terrafrom files: https://github.com/CiscoCloud/terraform.py. This is not obvious today since the Cisco code is copied in the repo (see my comment later)
  3. Use the Openshift-Ansible installer to install Openshift on these VMs
    This part use the official installer but require a manual action first to create the ansible inventory file.

Remove static “Terraform.py” script

During my changes on the repo I noticed that it was relying on an Cisco project to create an Ansible inventory from the Terrafrom files. Nevertheless instead of cloning the cisco repo (like it is done for Openshift-Ansible Repo) it was committed.
I think it was done like this since the original creator was thinking to modify it later on but for now it prevent us to benefit from the changes done on the official github repository of Cisco. This is particularly true for my usecase since there was a bug preventing to create the inventory file for GCE in the actual version (but fix on the github last versions).
I thus decided first to create a PR to clone the Cisco repo in the procedure and remove the old version which was committed.

https://github.com/christian-posta/openshift-terraform-ansible/pull/1

GCE Terrafrom integration

todo

Root ssh is never possible with CentOs/RHEL

I spend 1 day to understand why I was not able to log with root user on GCE for RH and CentOs image whereas it works fine for Debian image. I post here the results of my findings hoping it will save time for some other people (I also open a bug report : https://code.google.com/p/google-compute-engine/issues/detail?id=114)

For my application I wanted to be able to connect to my new CentOs VM with root user. I don’t want to go in the “allow ssh with root is dangerous”….

I made all the necessary changes on the SSH conf on the new created centOs image but I was not able to log on the VM. I know that the setup was correct since I do the exact same scenario with a debian image and it was working just fine….Thus I start suspecting there was an issue….

I start investigate and found out that there are some google scripts running on background on each VMs to take care of replicating the SSH keys defined on GCE console to the VMs. The scripts are available here :

https://github.com/GoogleCloudPlatform/compute-image-packages

I added some logs and see the following pattern:

[AuthorizeSshKeys] user : charles ssh_keys : ['ssh-dss ….vQBN7nAVg== charles@ip-172-31-45-251'] UID : 500
[WriteAuthorizedSshKeysFile] Original File : /root/.ssh/authorized_keys
[WriteAuthorizedSshKeysFile] New_keys_path : /tmp/tmpjwGRv8
[WriteAuthorizedSshKeysFile] UID : 0 GID : 0
[AuthorizeSshKeys] user : root ssh_keys : ['ssh-dss …..nC4RvQBN7nAVg== root@ip-172-31-45-251'] UID : 0
[WriteAuthorizedSshKeysFile] Original File : /root/.ssh/authorized_keys
[WriteAuthorizedSshKeysFile] New_keys_path : /tmp/tmp15enQW
[WriteAuthorizedSshKeysFile] UID : 11 GID : 0
[AuthorizeSshKeys] user : operator ssh_keys : [] UID : 11
[WriteAuthorizedSshKeysFile] Original File : /home/charles/.ssh/authorized_keys
[WriteAuthorizedSshKeysFile] New_keys_path : /tmp/tmpDB6knL
[WriteAuthorizedSshKeysFile] UID : 500 GID : 500

The script update the ssh key for the following users : Charles, root, and then “operator”. I understand the 2 firsts users “Charles” and “root” which are the users I defined in GCE console nevertheless the user “operator” is more strange especially because it end up by changing the “root” sshkey.

I investigate deeper the python code and understand this last flow updating “operator” user. The google python daemon use /etc/passwd to determine the path to the ssh key and on RedHat (or Centos) the operator user is defined with :

User UID GID Home Directory Shell
root 0 0 /root /bin/bash
operator 11 0 /root /sbin/nologin

(source : https://access.redhat.com/documentation/en-US/Red_Hat_Enterprise_Linux/3/html/Reference_Guide/s1-users-groups-standard-users.html)

The « home dir » of « operator » is thus /root…..leading the daemon to update /root/.ssh/auth… when working on “operator” user. It thus removes the real “root” file preventing the root login. Checking deeper this flow is designed to clean the “ssh key” file for the users which are not present on the GCE console (which is the case for “operator”).

I would like to have more time to propose a patch but I me late on my project. I done a workaround which is to create a new centOs image with /sbin as the home dir for the operator user :

usermod -m -d /sbin operator

and then everything works fine !

For the final solution I would suggest to change the script to maybe check if a “home” is shared and do nothing in this case or change the RH image.

Update (Nov2014) : The issue has been fixed on GCE side with last version of images.

Test libcloud 0.14 beta 3 sur GCE, AWS et Rackspace

Depuis la version 0.14 (encore en phase de bêta) il est possible d’utiliser Google Compute Engine. Il existe encore qq bugs que j’essaye d’aider a éliminer :

https://github.com/apache/libcloud/commit/7a04971288791a02c1c335f9d36da2f90d892b5b

Grace a libcloud il est tres facile de creer des machinnes virtuel dans les cloud public. Voila un petit exemple pour GCE, AWS et RackSpace :

def createNodeGce(iGceConex,iAmi, iInstance, iLocation):
 #image = [i for i in iGceConex.list_images() if i.id == iAmi ][0]
 size = [s for s in iGceConex.list_sizes() if s.name == iInstance][0]
 alocation = [s for s in iGceConex.list_locations() if s.name == iLocation][0]
 print("Create server with image : " + str(iAmi) + " and server type : " + str(size) + " and location : " + str(alocation))
 node = iGceConex.create_node(name=GCE_INSTANCE_NAME, image=iAmi, size=size,location=alocation)
 print(str(node))
 return node
def createNodeAws(iAwsConex,iAmi, iInstance):
 image = [i for i in iAwsConex.list_images() if i.id == iAmi ][0]
 size = [s for s in iAwsConex.list_sizes() if s.id == iInstance][0]
 print("Create server with image : " + str(image) + " and server type : " + str(size))
 node = iAwsConex.create_node(name=EC2_INSTANCE_NAME, image=image, size=size,ex_securitygroup=EC2_SECURITY_GROUP,ex_keyname=EC2_KEY_NAME)
 print(str(node))
def createNodeRackSpace(iRackConex,iAmi, iInstance):
 image = [i for i in iRackConex.list_images() if i.name == iAmi ][0]
 size = [s for s in iRackConex.list_sizes() if s.id == iInstance ][0]
 aSshKeyFilePath = "SSH_KEY_PUBLIC"
 print("Create server with image : " + str(image) + " and server type : " + str(size))
 node = iRackConex.create_node(name=RACKSPACE_INSTANCE_NAME, image=image, size=size)

L’exemple complet est disponnible sur github ICI :

https://github.com/charly37/LibCloud014b3Test/blob/master/TestLibCloud.py

Tester sur une machinne Ubuntu 13 sur AWS avec l’instal suivante :

#Install setuptools. Necessaire pour pip
sudo apt-get -y install python-setuptools

#Install GIT. Necessaire pour libcloud DEV
sudo apt-get -y install git

#install PIP
curl -O https://pypi.python.org/packages/source/p/pip/pip-1.4.1.tar.gz
tar xvzf pip-1.4.1.tar.gz
cd pip-1.4.1
sudo python setup.py install

#install libcloud 
sudo pip install git+https://git-wip-us.apache.org/repos/asf/libcloud.git@trunk#egg=apache-libcloud

Voila le resultat avec listing des VMs sur les 3 providers et puis creation d’une VM sur chaque provider avant de lister une nouvelle fois les VMs existente.
ubuntu@domU-12-31-39-09-54-77:~$ python test.py

Create libcloud conex obj
Then list the different provider object (to validate logins)
Listing GCE :
Listing EC2 :
Listing RackSpace :

Then list the different VMs (on each provider)
Listing GCE :
Vms :
[]

Listing EC2 :
Vms :
[<Node: uuid=f8cc89f6b6e061784e37c49fbc28a3917a86acf2, name=TEST, state=0, public_ips=[‘54.196.177.12’], provider=Amazon EC2 …>, <Node: uuid=e81bdb7b32d3fbff0ec745e9dc63cf1d7e5c32bb, name=____AWS_TUNNEL, state=0, public_ips=[‘54.227.255.145’, ‘54.227.255.145’], provider=Amazon EC2 …>, <Node: uuid=d231cd56e5e7f3ffad93eb7d1f0b9445e91199ed, name=____Couchbase Master, state=5, public_ips=[], provider=Amazon EC2 …>]

Listing RackSpace :
Vms :
[<Node: uuid=d6ef246e8a738ac80cdb99e2f162b1ec46f21992, name=Rgrid, state=0, public_ips=[u’2001:4801:7820:0075:55e7:a60b:ff10:acdc’, u’162.209.53.19′], provider=Rackspace Cloud (Next Gen) …>]

Then create nodes

Create server with image : <NodeImage: id=ami-ad184ac4, name=099720109477/ubuntu/images/ebs/ubuntu-saucy-13.10-amd64-server-20131015, driver=Amazon EC2  …> and server type : <NodeSize: id=t1.micro, name=Micro Instance, ram=613 disk=15 bandwidth=None price=0.02 driver=Amazon EC2 …>
<Node: uuid=0c2b1e827325d3605c338aed44eb7d87e2b448b1, name=test, state=3, public_ips=[], provider=Amazon EC2 …>
Create server with image : <NodeImage: id=f70ed7c7-b42e-4d77-83d8-40fa29825b85, name=CentOS 6.4, driver=Rackspace Cloud (Next Gen)  …> and server type : <OpenStackNodeSize: id=3, name=1GB Standard Instance, ram=1024, disk=40, bandwidth=None, price=0.06, driver=Rackspace Cloud (Next Gen), vcpus=1,  …>
Create server with image : centos-6-v20131120 and server type : <NodeSize: id=12907738072351752276, name=n1-standard-1, ram=3840 disk=10 bandwidth=0 price=None driver=Google Compute Engine …> and location : <NodeLocation: id=654410885410918457, name=us-central1-a, country=us, driver=Google Compute Engine>
<Node: uuid=cd805862d414792acd7b7ed8771de3d56ace54ad, name=test, state=0, public_ips=[u’173.255.117.171′], provider=Google Compute Engine …>

Wait few seconds

Then list the different VMs again(on each provider)

Listing GCE :
Vms :
[<Node: uuid=cd805862d414792acd7b7ed8771de3d56ace54ad, name=test, state=0, public_ips=[u’173.255.117.171′], provider=Google Compute Engine …>]

Listing EC2 :
Vms :
[<Node: uuid=f8cc89f6b6e061784e37c49fbc28a3917a86acf2, name=TEST, state=0, public_ips=[‘54.196.177.12’], provider=Amazon EC2 …>, <Node: uuid=e81bdb7b32d3fbff0ec745e9dc63cf1d7e5c32bb, name=____AWS_TUNNEL, state=0, public_ips=[‘54.227.255.145’, ‘54.227.255.145’], provider=Amazon EC2 …>, <Node: uuid=d231cd56e5e7f3ffad93eb7d1f0b9445e91199ed, name=____Couchbase Master, state=5, public_ips=[], provider=Amazon EC2 …>, <Node: uuid=0c2b1e827325d3605c338aed44eb7d87e2b448b1, name=test, state=0, public_ips=[‘50.16.66.112′], provider=Amazon EC2 …>]

Listing RackSpace :
Vms :
[<Node: uuid=a41759d8732fdbddf37a22327d63734bd89647aa, name=test, state=0, public_ips=[u’2001:4801:7819:0074:55e7:a60b:ff10:dc68′, u’166.78.242.86′], provider=Rackspace Cloud (Next Gen) …>, <Node: uuid=d6ef246e8a738ac80cdb99e2f162b1ec46f21992, name=Rgrid, state=0, public_ips=[u’2001:4801:7820:0075:55e7:a60b:ff10:acdc’, u’162.209.53.19′], provider=Rackspace Cloud (Next Gen) …>]
ubuntu@domU-12-31-39-09-54-77:~$

Serveur CentOs 6.4 avec stockage éphémère sur Amazon Web Service

Pour des raisons de portabilité entre Cloud provider j’ai décidé de migrer de l’image “Linux AMI” disponible uniquement sur AWS vers CentOS 6.4 disponible chez tous les Cloud public.

Pendant la migration j’ai cependant constate quelques problèmes avec les disques éphémères de mes instances qui n’été plus accessibles.

Avec la distribution « Linux AMI » et d’autres (par exemple Ubuntu) les disques éphémères sont utilisable dès la création de l’instance :

ubuntu@ip-10-181-140-167:~$ df
 Filesystem     1K-blocks   Used Available Use% Mounted on
 /dev/xvda1       8125880 739816   6966636  10% /
 none                   4      0         4   0% /sys/fs/cgroup
 udev              836600     12    836588   1% /dev
 tmpfs             169208    184    169024   1% /run
 none                5120      0      5120   0% /run/lock
 none              846032      0    846032   0% /run/shm
 none              102400      0    102400   0% /run/user
 /dev/xvdb      153899044 192068 145889352   1% /mnt

Alors qu’ils ne sont pas disponibles sur CentOS :

[root@ip-10-180-141-3 ~]# df
 Filesystem           1K-blocks      Used Available Use% Mounted on
 /dev/xvde              8256952    649900   7187624   9% /
 tmpfs                   847608         0    847608   0% /dev/shm
 [root@ip-10-180-141-3 ~]# ll

Pour pouvoir utiliser les disques éphémères sur une centOS il faut faire 2 choses !

1/demander à avoir les disques éphémères lors de la création de la VM.

Cela peut se faire dans l’interface graphique lors de la création de la VM (fig) ou alors en ligne de commande lors de la création également.

Ephemere

Dans mon cas j’utilise « libcloud » et il faut donc ajouter l’option « block mapping ». Voilà comment procéder :

node = EC2_Conex.create_node(name=aServerName, image=image, 
size=size,ex_securitygroup=[EC2_SECURITY_GROUP],ex_keyname=EC2_KEY_NAME, 
ex_blockdevicemappings=[{'DeviceName': '/dev/sdb', 'VirtualName': 'ephemeral0'}])

Ensuite il faut attendre que la VM soit créé pour passer à l’étape 2.

J’ai créé 2 VMs pour montrer la différence « avec » et « sans » l’option.

AVEC :

charles@ip-10-164-17-109:~$ ssh -i /Rbox/conf/Rbox_Proto2.pem root@ec2-107-21-170-54.compute-1.amazonaws.com
 Last login: Fri Oct  4 08:58:53 2013 from 10.164.17.109
 [root@ip-10-182-164-253 ~]# fdisk -l

 Disk /dev/xvdf: 160.1 GB, 160104972288 bytes
 255 heads, 63 sectors/track, 19464 cylinders
 Units = cylinders of 16065 * 512 = 8225280 bytes
 Sector size (logical/physical): 512 bytes / 512 bytes
 I/O size (minimum/optimal): 512 bytes / 512 bytes
 Disk identifier: 0x00000000

 Disk /dev/xvde: 8589 MB, 8589934592 bytes
 255 heads, 63 sectors/track, 1044 cylinders
 Units = cylinders of 16065 * 512 = 8225280 bytes
 Sector size (logical/physical): 512 bytes / 512 bytes
 I/O size (minimum/optimal): 512 bytes / 512 bytes
 Disk identifier: 0x00000000

Sans

[root@ip-10-28-86-161 ~]# fdisk -l

 Disk /dev/xvde: 8589 MB, 8589934592 bytes
 255 heads, 63 sectors/track, 1044 cylinders
 Units = cylinders of 16065 * 512 = 8225280 bytes
 Sector size (logical/physical): 512 bytes / 512 bytes
 I/O size (minimum/optimal): 512 bytes / 512 bytes
 Disk identifier: 0x00000000

 [root@ip-10-28-86-161 ~]# exit

La VM créer sans cette options ne pourra jamais utiliser le stockage éphémère et vous pouvez vous arrêter ici…..

La seconde étape permet d’utiliser les disques. En effet il ne sont pas utilisable pour le moment meme sur la machine qui a le disque éphémère :

[root@ip-10-182-164-253 ~]# df
 Filesystem           1K-blocks      Used Available Use% Mounted on
 /dev/xvde              8256952    650188   7187336   9% /
 tmpfs                   847608         0    847608   0% /dev/shm
 [root@ip-10-182-164-253 ~]#

2/Rendre les disques utilisable

 [root@ip-10-182-164-253 ~]# fdisk -l

 Disk /dev/xvdf: 160.1 GB, 160104972288 bytes
 255 heads, 63 sectors/track, 19464 cylinders
 Units = cylinders of 16065 * 512 = 8225280 bytes
 Sector size (logical/physical): 512 bytes / 512 bytes
 I/O size (minimum/optimal): 512 bytes / 512 bytes
 Disk identifier: 0x00000000

 Disk /dev/xvde: 8589 MB, 8589934592 bytes
 255 heads, 63 sectors/track, 1044 cylinders
 Units = cylinders of 16065 * 512 = 8225280 bytes
 Sector size (logical/physical): 512 bytes / 512 bytes
 I/O size (minimum/optimal): 512 bytes / 512 bytes
 Disk identifier: 0x00000000

 [root@ip-10-182-164-253 ~]# df
 Filesystem           1K-blocks      Used Available Use% Mounted on
 /dev/xvde              8256952    650188   7187336   9% /
 tmpfs                   847608         0    847608   0% /dev/shm
 [root@ip-10-182-164-253 ~]# mkfs -t ext4 /dev/xvdf
 mke2fs 1.41.12 (17-May-2010)
 Filesystem label=
 OS type: Linux
 Block size=4096 (log=2)
 Fragment size=4096 (log=2)
 Stride=0 blocks, Stripe width=0 blocks
 9773056 inodes, 39088128 blocks
 1954406 blocks (5.00%) reserved for the super user
 First data block=0
 Maximum filesystem blocks=4294967296
 1193 block groups
 32768 blocks per group, 32768 fragments per group
 8192 inodes per group
 Superblock backups stored on blocks:
         32768, 98304, 163840, 229376, 294912, 819200, 884736, 1605632, 2654208,
         4096000, 7962624, 11239424, 20480000, 23887872

 Writing inode tables: done
 Creating journal (32768 blocks): done
 Writing superblocks and filesystem accounting information:
 done

 This filesystem will be automatically checked every 34 mounts or
 180 days, whichever comes first.  Use tune2fs -c or -i to override.
 [root@ip-10-182-164-253 ~]#
 [root@ip-10-182-164-253 ~]# df
 Filesystem           1K-blocks      Used Available Use% Mounted on
 /dev/xvde              8256952    650188   7187336   9% /
 tmpfs                   847608         0    847608   0% /dev/shm
 [root@ip-10-182-164-253 ~]# mkdir /ephemeral0
 [root@ip-10-182-164-253 ~]# echo "/dev/xvdf /ephemeral0 ext4 defaults 1 2" >> /etc/fstab
 [root@ip-10-182-164-253 ~]# mount /ephemeral0
 [root@ip-10-182-164-253 ~]# df
 Filesystem           1K-blocks      Used Available Use% Mounted on
 /dev/xvde              8256952    650192   7187332   9% /
 tmpfs                   847608         0    847608   0% /dev/shm
 /dev/xvdf            153899044    191936 145889484   1% /ephemeral0

Et voilà 😉

Resume :

mkfs -t ext4 /dev/xvdf
mkdir /ephemeral0
echo "/dev/xvdf /ephemeral0 ext4 defaults 1 2" >> /etc/fstab
mount /ephemeral0