Let’s encrypt with docker

Few years ago i wrote this post to explain how to get a SSL certificate with let’s encypt: http://djynet.net/?p=795

They now have a docker version which is even more easy to use:

docker run -it --rm --name certbot -v "/etc/letsencrypt:/etc/letsencrypt" -p 80:80 -v "/var/lib/letsencrypt:/var/lib/letsencrypt" certbot/certbot certonly --standalone --email charles.walker.37@gmail.com -ddjynet.xyz

Basic auth with kube python lib

When a Kube cluster is created on Google Kube Engine you have access to a user/password combination that you could use to authenticate with Kube API.
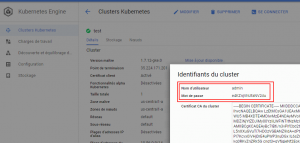
This method of authentication is part of the official documentation of kubernetes:  

“Kubernetes uses client certificates, bearer tokens, an authenticating proxy, or HTTP basic auth to authenticate….” From https://kubernetes.io/docs/admin/authentication/ 

I wanted to try this authentication method with the official kubernetes python client: https://github.com/kubernetes-client/python 

Remote cluster 

The first issue I had was to specify a remote cluster since all the example of the API used a .kubeconfig and suppose that the kube client is on the server (and usable).  

After some digging I find the proper options and made a PR to add such example in the API doc: https://github.com/kubernetes-client/python/pull/446 

Bearer token auth 

The second issue was due to the BASIC authentication. There is already a ticket open about it (just few days before): https://github.com/kubernetes-client/python/issues/430 

There was no solution in it so I decided to dig in 😉 

After reading the code of the API I was only able to find the “bearer token” authentication method. There was nothing about the BASIC auth. I decided first to try the “bearer token” method to ensure the rest of my code was working fine. I submit an example of it on the ticket with the code below: 

from kubernetes import client, config 

#see https://kubernetes.io/docs/tasks/administer-cluster/access-cluster-api/#accessing-the-cluster-api to know how to get the token 
#The command look like kubectl get secrets | grep default | cut -f1 -d ' ') | grep -E '^token' | cut -f2 -d':' | tr -d '\t' but better check the official doc link  

aToken="eyJhXXXXXXXX82IKq0rod1dA" 

# Configs can be set in Configuration class directly or using helper utility 
configuration = client.Configuration() 
configuration.host="https://XXX.XXX.XXX.XXX:443" 
configuration.verify_ssl=False 
configuration.debug = True 


#Maybe there is a way to use these options instead of token since they are provided in Google cloud UI 
#configuration.username = "admin" 
#configuration.password = "XXXXXXXXXXX" 

configuration.api_key={"authorization":"Bearer "+ aToken} 
client.Configuration.set_default(configuration) 

v1 = client.CoreV1Api() 
print("Listing pods with their IPs:") 
ret = v1.list_pod_for_all_namespaces(watch=False) 
for i in ret.items: 
    print("%s\t%s\t%s" % (i.status.pod_ip, i.metadata.namespace, i.metadata.name)) 

It allows me to validate the “remote” cluster communication and also the token authentication nevertheless it is not my final goal. 

Basic auth 

Python kube API hack 

I spend some time digging in the code and did not find any code related to the BASIC auth. I check in the code and the method “get_basic_auth_token” in configuration.py is never call anywhere (and it is the only one dealing with username/password field). 

Then I try to “hack” a little the python code by modifying the class configuration and change its auth_setting with that 

def auth_settings(self): 
    """ 
    Gets Auth Settings dict for api client. 
    :return: The Auth Settings information dict. 
    """ 
    return { 
        'BearerToken': 
            { 
                'type': 'api_key', 
                'in': 'header', 
                'key': 'authorization', 
                'value': self.get_api_key_with_prefix('authorization') 
            }, 
            'http_basic_test': 
            { 
                'type': 'basic', 
                'in': 'header', 
                'key': 'Authorization', 
                'value': self.get_basic_auth_token() 
            }, 
    } 

I just added the “http_basic_test” here. Then you can take any functional class like “”core_v1_api and modify the method you plan to use (list_pod_for_all_namespaces_with_http_info in my case) and modify the auth part of the code. Replace:

auth_settings = ['BearerToken']

with

auth_settings = ['http_basic_test']

and then you can use username/password to authenticate (I verified and it works) 

You should have valid response and even see the basic auth info if you activate debug log (like it is done in my previous answer):

send: b'GET /version/ HTTP/1.1\r\nHost: XXX.XXX.XXX.XXX\r\nAccept-Encoding: identity\r\nAccept: application/json\r\n
Content-Type: application/json\r\nUser-Agent: Swagger-Codegen/4.0.0/python\r\nAuthorization: Basic YWRXXXXXXXXXXXRA==\r\n\r\n' 

This confirms that the basic auth can be used (as the kubernetes mentioned) but is not accessible from the python API.  

Clean solution 

The previous hack allowed me to be sure that I could authenticate with the cluster using the user//password nevertheless we cannot keep such dirty hack.  

After some investigation I find out the Python kube client is generated by swagger. The generator code is located here: https://github.com/kubernetes-client/gen 

This repo relies on the kubernetes swagger file located on the kubernetes repo: 

https://raw.githubusercontent.com/kubernetes/kubernetes/master/api/openapi-spec/swagger.json 

The URI of the swagger file is partialy hardcoded in the python file preprocess_spec.py 

spec_url = 'https://raw.githubusercontent.com/kubernetes/kubernetes/' \ 
             '%s/api/openapi-spec/swagger.json' % sys.argv[2] 

Then I check the swagger file with a specific look on the security part: 

  "securityDefinitions": { 
   "BearerToken": { 
    "description": "Bearer Token authentication", 
    "type": "apiKey", 
    "name": "authorization", 
    "in": "header" 
   } 
  }, 
  "security": [ 
   { 
    "BearerToken": [] 
   } 
  ] 

So there is indeed ne reference to any BASIC authentication process here. This is strange since the official doc mention it and since we just validated it works fine. 

Let’s try to generate again the python kube library after adding the BASIC auth in the swagger file 😉 

So I fork the kubernetes repo and modify the swagger file: 

"securityDefinitions": { 
   "BearerToken": { 
    "description": "Bearer Token authentication", 
    "type": "apiKey", 
    "name": "authorization", 
    "in": "header" 
   }, 
    "BasicAuth": { 
      "type": "basic" 
    } 
  }, 
  "security": [ 
   { 
    "BearerToken": [], 
    "BasicAuth":[] 
   } 
  ] 

(you can see the diff here: https://github.com/kubernetes/kubernetes/compare/master…charly37:master) 
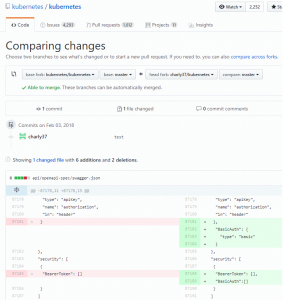
Then we need to patch the generator to use my fork swager file. I just change the URI in preprocess_spec.py with: 

    spec_url = 'https://raw.githubusercontent.com/charly37/kubernetes/' \ 
               '%s/api/openapi-spec/swagger.json' % sys.argv[2] 

And then generate again the python library with: 

./python.sh test test.sh 

This comes from the README of the generator here: https://github.com/kubernetes-client/gen and the test.sh file content is: 

[charles@kube openapi]$ cat test.sh 
export KUBERNETES_BRANCH=master 
export CLIENT_VERSION=1.0.0b1 
export PACKAGE_NAME=kubernetes 

This will start a docker container and build the python library in the output directory which is ./test in our case: 

…
[INFO] ------------------------------------------------------------------------ 
[INFO] BUILD SUCCESS 
[INFO] ------------------------------------------------------------------------ 
[INFO] Total time: 11.396 s 
[INFO] Finished at: 2018-02-03T22:18:51Z 
[INFO] Final Memory: 26M/692M 
[INFO] ------------------------------------------------------------------------ 
---Done. 
---Done. 
--- Patching generated code... 
---Done. 

To be sure that the new security setup was taken into account we check the new python code and more specifically the configuration.py file with 

vi test/kubernetes/configuration.py 

leading to see:

    # Authentication Settings 
    # dict to store API key(s) 
    self.api_key = {} 
    # dict to store API prefix (e.g. Bearer) 
    self.api_key_prefix = {} 
    # Username for HTTP basic authentication 
    self.username = "" 
    # Password for HTTP basic authentication 
    self.password = "" 

We now have parameters related to the BASIC authentication. Seems very good 😉 

We install this generated library with: 

[root@kube test]# python setup.py install 

The last piece of the test is to replace the bearer token in our test script with these new parameters: 

    aUser = "admin" 
    aPassword = "e4KZnjVhUfaNV2du" 
... 
    #configuration.api_key = {"authorization": "Bearer " + aToken} 
    configuration.username = aUser 
    configuration.password = aPassword 

And run the script: 

[root@kube ~]# python kubeConect.py 

Listing pods with their IPs: 

[root@kube ~]# python kubeConect.py
Listing pods with their IPs:
/usr/lib/python2.7/site-packages/urllib3-1.22-py2.7.egg/urllib3/connectionpool.py:858: InsecureRequestWarning: Unverified HTTPS request is being made. Adding certificate verification is strongly advised. See: https://urllib3.readthedocs.io/en/latest/advanced-usage.html#ssl-warnings
  InsecureRequestWarning)
10.56.0.8       kube-system     event-exporter-v0.1.7-91598863-kkzgw
10.56.0.2       kube-system     fluentd-gcp-v2.0.9-nc8th
10.56.0.10      kube-system     heapster-v1.4.3-2870825772-h9z8j
10.56.0.7       kube-system     kube-dns-3468831164-t5ggk
10.56.0.3       kube-system     kube-dns-autoscaler-244676396-r5rnm
10.128.0.2      kube-system     kube-proxy-gke-test-default-pool-477f49cb-fksp
10.56.0.4       kube-system     kubernetes-dashboard-1265873680-kzdn2
10.56.0.6       kube-system     l7-default-backend-3623108927-rkv9w

Iworks !! Now we know that if we update the swagger file we will be able to use the BASIC auth with the python kube client library. The last step is to talk with the rest of the community to find out why the BASIC auth is not supported on the client libs (all generated from the swagger file) even if it is activated on Kube and present in the official doc… 

DNS challenge for let’s encrypt SSL certificates

Last week I had to generate a SSL certificate for a domain which has its web server on a corporate network. The Web Server on the corporate network has outgoing internet access but cannot be reach from Internet. I was not sure it was possible to generate a certificate in this case with let’s encrypt since my previous experience was with a Web server reachable from internet to answer the let’s encrypt challenge (http://djynet.net/?p=821).

Luckily I was wrong 😉 It is indeed possible to prove let’s encrypt that you own the domain with a DNS challenge! Here are my notes on how to do it.

Download the client with:

wget https://dl.eff.org/certbot-auto
chmod a+x ./certbot-auto

Run the client in manual mode with DNS challenge and wait for the client to provide you the challenge

[root@vps99754 ~]# ./certbot-auto certonly --manual --preferred-challenges dns --email <your email> -d <the domain>

Saving debug log to /var/log/letsencrypt/letsencrypt.log

Obtaining a new certificate

Performing the following challenges:

dns-01 challenge for <the domain>

-------------------------------------------------------------------------------

NOTE: The IP of this machine will be publicly logged as having requested this

certificate. If you're running certbot in manual mode on a machine that is not

your server, please ensure you're okay with that.

Are you OK with your IP being logged?

-------------------------------------------------------------------------------

(Y)es/(N)o: Y

-------------------------------------------------------------------------------

Please deploy a DNS TXT record under the name

_acme-challenge. <the domain> with the following value:

bIwIxGg1IXXXXXXXXXXXXXXXXXXXXXXXXXXXXXX

Once this is deployed,

-------------------------------------------------------------------------------

Press Enter to Continue

At this point you just need to update your DNS with the entry provided as show in the following picture and press enter (maybe wait few seconds after you done the update if you use a webUI like me to update your DNS provider)

Waiting for verification...

Cleaning up challenges

Generating key (2048 bits): /etc/letsencrypt/keys/0000_key-certbot.pem

Creating CSR: /etc/letsencrypt/csr/0000_csr-certbot.pem

IMPORTANT NOTES:

 - Congratulations! Your certificate and chain have been saved at

   /etc/letsencrypt/live/<the domain>/fullchain.pem. Your cert will

   expire on 2017-07-23. To obtain a new or tweaked version of this

   certificate in the future, simply run certbot-auto again. To

   non-interactively renew *all* of your certificates, run

   "certbot-auto renew"

 - If you like Certbot, please consider supporting our work by:

   Donating to ISRG / Let's Encrypt:   https://letsencrypt.org/donate

   Donating to EFF:                    https://eff.org/donate-le

All set 😉 Pretty easy and very nice feature to validate a Webserver not connected to internet (as long as you have access to its DNS server and it is reachable from internet).

Determine file system type

It will avoid me to stackoverflow it every time…

[myuser@myserver ~]$ df -T
Filesystem     Type     1K-blocks    Used Available Use% Mounted on
/dev/sda1      xfs       10473900 2185416   8288484  21% /
...
/dev/sdb1      xfs      209611780  315256 209296524   1% /ephemeral

Works fine unless the FS is not yet mounted…. Otherwise use “file”:

[myuser@myserver ~]$ sudo file -sL /dev/sdb1
/dev/sdb1: SGI XFS filesystem data (blksz 4096, inosz 256, v2 dirs)

Openshift installation on GCE using terraform

I wanted to try to install openshift on a GCE cluster with the official “ansible installer” available on github https://github.com/openshift/openshift-ansible. Nevertheless I did not manage to have the installer creating the VM on GCE and I’m not even sure it is possible (even if it seems based on libcloud). In the meantime I discover Terraform which allow describing an infrastructure in a common language and deploying it on multiple cloud (including GCE and AWS).

Finally I decided to work on a project that will include these 2 topics “Openshift installation with ansible” and “infrastructure creation with terrafrom”.
I did not had to search too long before I found an open source project that aim to do that:
https://github.com/christian-posta/openshift-terraform-ansible

“This repo contains Ansible and terraform scripts for installing openshift onto OpenStack or AWS EC2.

The repo is organized into the different deployment models. Currently tested with EC2 and OpenStack, but can be extended to Google Compute, Digital Ocean, etc. Happy to take pull requests for additional infrastructure.”

That was perfect since I wanted to use GCE. I decided to contribute to this project by adding the GCE support.

Here is an overview of the whole process (more detail on the github project) :

  1. Used Terrafrom to create the VMs cluster on the cloud
    this is based on an Infrastructure file and Terrafrom.
  2. Use Ansible to customize the VMs
    this part use Ansible and an external Opensource project made by cisco to create dynamically a Ansible Inventory file from the Terrafrom files: https://github.com/CiscoCloud/terraform.py. This is not obvious today since the Cisco code is copied in the repo (see my comment later)
  3. Use the Openshift-Ansible installer to install Openshift on these VMs
    This part use the official installer but require a manual action first to create the ansible inventory file.

Remove static “Terraform.py” script

During my changes on the repo I noticed that it was relying on an Cisco project to create an Ansible inventory from the Terrafrom files. Nevertheless instead of cloning the cisco repo (like it is done for Openshift-Ansible Repo) it was committed.
I think it was done like this since the original creator was thinking to modify it later on but for now it prevent us to benefit from the changes done on the official github repository of Cisco. This is particularly true for my usecase since there was a bug preventing to create the inventory file for GCE in the actual version (but fix on the github last versions).
I thus decided first to create a PR to clone the Cisco repo in the procedure and remove the old version which was committed.

https://github.com/christian-posta/openshift-terraform-ansible/pull/1

GCE Terrafrom integration

todo

Artifactory cache (no root/no internet)

Artifactory is a repository manager. It is the one used in my current company to store various packages like RPM/Puppet/Pypi/Vagrant… You can find more documentation on their website:
https://www.jfrog.com/open-source/

This post gathers my note to install an artifactory cache connected to another instance (master instance) to speed up the package retrieval. This procedure is used on a target server where you have no internet connection and no root access.

0/Download

Download Java + Artifactory free on a computer with internet access (or from Artifactory) and transfer them on the target server.

1/Untar/unpack

unzip jfrog-artifactory-oss-4.5.2.zip
tar zxvf jre-8u73-linux-x64.gz

2/Java install

export PATH=/home/sbox/jre1.8.0_73/bin:$PATH
export JAVA_HOME=/home/sbox/jre1.8.0_73

3/Artifactory install

nohup ./bin/artifactory.sh &

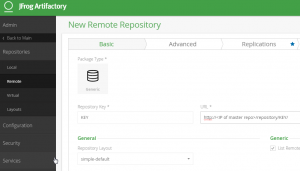
4/Add the link to Master repo (to act as cache)

Use the admin UI on port 8080 :

ArtifactoryCache

Be careful when choosing the KEY. I strongly suggest to use the name of the remote repo you want to cache locally otherwise you will have different URL to download from depending on if you want to download from the MASTER or this CACHE.

5/Test it

Curl http://www.<target server IP>/repository/KEY/<stuff>

Stuff is an artifact that should exist on the MASTER artifactory otherwise it will fails…

Depot docker

Création d’un dépôt d’image docker prive pour distribuer notre application sur un ensemble de nœuds distribues.

Pour ceux qui ne connaissent pas Docker : https://www.docker.io/

Un Dépôt d’image docker s’appelle un “registery”. Il s’agit d’un serveur code en python et demande donc certaines dépendance pour être installe….

Heureusement les gens de docker ont également créé une image docker qui contient tout ce qu’il faut pour mettre en place notre registery en quelques secondes. Le seul pré-requit est donc d’installer docker

Installation de docker

Pour tester j’utilise une centOs 6.4 sur AWS. L’installation de Docker est assez simple grâce à la documentation : http://docs.docker.io/en/latest/

[root@ip-10-170-79-155 conf]# sudo yum -y install docker-io

puis

[root@ip-10-170-79-155 conf]# sudo service docker start
 Starting cgconfig service:                                 [  OK  ]
 Starting docker:                                           [  OK  ]
 [root@ip-10-170-79-155 conf]#

Vérification de l’installation

La vérification de l’installation peut se faire simplement en démarrant un bash depuis un container contenant fedora

[root@ip-10-170-79-155 conf]# sudo docker run -i -t fedora /bin/bash
Unable to find image 'fedora' (tag: latest) locally
Pulling repository fedora
58394af37342: Download complete
0d20aec6529d: Download complete
511136ea3c5a: Download complete
8abc22fbb042: Download complete
bash-4.2# ls
bin  dev  etc  home  lib  lib64  lost+found  media  mnt  opt  proc  root  run  sbin  srv  sys  tmp  usr  var
bash-4.2#

Maintenant que l’on a installé docker on va pouvoir créer notre repository privé.

Création d’un repository privé

Il suffit de récupérer un container docker qui contient le serveur python faisant office de repository avec toutes ses dépendances

[root@ip-10-235-32-145 conf]# docker pull samalba/docker-registry
Pulling repository samalba/docker-registry
2eabb5a82e71: Download complete
511136ea3c5a: Download complete
46e4dee27895: Download complete
476aa49de636: Download complete
8332c1d90a62: Download complete
324b0d2e019a: Download complete
c19da4fc3dea: Download complete
4b494adef24f: Download complete
10e80f2583d5: Download complete
76b4a87578b7: Download complete
ac854be3b13a: Download complete
1fd060b2bdb1: Download complete

Il suffit ensuite de démarrer le container

[root@ip-10-235-32-145 conf]# docker run -d -p 5000:5000 samalba/docker-registry
71e3adbb75eaad87e8f32462cd0963988092935f60fce9ffd74a43b852e942a7

On dispose maintenant d’un registery docker que l’on peut utiliser pour déployer notre application. Il ne faut pas oublier d’ouvrir le port 5000 sur la machine ou tourne notre registery….

Utilisation du registery privé

Création d’une image docker

On va tester l’utilisation de notre registre privee depuis une autre machine. La première chose à faire est de créer une nouvelle image qui contient notre software. Pour cela on utilise la fonction build de docker.

La création d’une image est très bien expliquée sur les sites suivants :

Voilà le dockerfile correspondant à mon application :

#https://index.docker.io/search?q=centos
#https://www.docker.io/learn/dockerfile/level1/
#http://docs.docker.io/en/latest/use/builder/

#Image docker de base : Centos (https://index.docker.io/_/centos/)
FROM centos

#le mainteneur du package
MAINTAINER Charles Walker, charles.walker.37@gmail.com

# Usage: ADD [source directory or URL] [destination directory]
# It has to be a relative path ! It will not works if runing build with stdin like docker build -t TEST1 - < Dockerfile
ADD ./packages /root/packages
ADD ./Data /root/Data
ADD ./conf /root/conf
ADD ./AWS_Non1aData /root/AWS_Non1aData

#commande a lancer sur le container pdt sa creation
#RUN

#La commande a execute qd le container se lance
#le hash dans la commande indique un argument
ENTRYPOINT /root/conf/installAgent.sh #

#Port to "open"
EXPOSE 22 80 443 4001 4369 5000 5984 7001 8080 8091 8092 8140 10000 10001 10002 10003 11210 11211 14111 20022 21100 22222 48007 49007 50007

#le repetoire qu on monte depuis le host physique
VOLUME ["/ama"]

Je vais maintenant demander a docker de mon construire une nouvelle image a partir de ce dockerfile avec :

[root@ip-10-138-39-50 ~]# docker build -t TEST4 .
Uploading context 1.489 GB
Uploading context
Step 1 : FROM centos
 ---> 539c0211cd76
Step 2 : MAINTAINER Charles Walker, charles.walker.37@gmail.com
 ---> Using cache
 ---> 719b786c1be6
Step 3 : ADD ./packages /root/packages
 ---> Using cache
 ---> 6b65b75fd77c
Step 4 : ADD ./Data /root/Data
 ---> e34e5c199d29
Step 5 : ADD ./conf /root/conf
 ---> d438752ee616
Step 6 : ADD ./AWS_Non1aData /root/AWS_Non1aData
 ---> 419f91258841
Step 7 : ENTRYPOINT /root/conf/installAgent.sh #
 ---> Running in ad779fd56403
 ---> d6156694fbb6
Step 8 : EXPOSE 22 80 443 4001 4369 5000 5984 7001 8080 8091 8092 8140 10000 10001 10002 10003 11210 11211 14111 20022 21100 22222 48007 49007 50007
 ---> Running in 492ee8547e8b
 ---> c91f6583e370
Step 9 : VOLUME ["/ama"]
 ---> Running in 7b35f3a0dedd
 ---> b220758ee96e
Successfully built b220758ee96e

La vérification est simple :

[root@ip-10-138-39-50 ~]# docker images
REPOSITORY          TAG                 IMAGE ID            CREATED             VIRTUAL SIZE
TEST4               latest              b220758ee96e        8 minutes ago       1.782 GB
centos              6.4                 539c0211cd76        10 months ago       300.6 MB
centos              latest              539c0211cd76        10 months ago       300.6 MB

Upload d’image docker sur notre registery privé

On va maintenant pousser cette image sur notre registery local. Pour rappel ce dernier tourne sur un autre serveur AWS :

DockerAwsNode

On commencer par renommerl’image puisque Docker utilise le namespace présent dans le nom de l’image pour savoir sur quel registery il doit pousser.

[root@ip-10-238-143-211 ~]# docker tag TEST4 domU-12-31-39-14-5D-9B.compute-1.internal:5000/myrepo

Ainsi Docker va maintenant pousser cette image sur notre registery privé. Le push se fait de la manière suivante :

[root@ip-10-238-143-211 ~]# docker push domU-12-31-39-14-5D-9B.compute-1.internal:5000/myrepo
The push refers to a repository [domU-12-31-39-14-5D-9B.compute-1.internal:5000/myrepo] (len: 1)
Sending image list
Pushing repository domU-12-31-39-14-5D-9B.compute-1.internal:5000/myrepo (1 tags)
539c0211cd76: Image successfully pushed
155d292465db: Image successfully pushed
0cee42788752: Image successfully pushed
9eadab9e81c4: Image successfully pushed
3baae99c022d: Image successfully pushed
54cd5c7eccc3: Image successfully pushed
b58b382eb217: Image successfully pushed
f768630bab4c: Image successfully pushed
feab39ed50f7: Image successfully pushed
Pushing tags for rev [feab39ed50f7] on {http://domU-12-31-39-14-5D-9B.compute-1.internal:5000/v1/repositories/myrepo/tags/latest}

 Utilisation de notre image

Nous allons maintenant créer un 3eme nœud AWS pour downloader notre image docker et l’utiliser.

On va récupérer notre image depuis notre nouveau noeud avec :

[root@ip-10-73-145-136 conf]# docker images
REPOSITORY          TAG                 IMAGE ID            CREATED             VIRTUAL SIZE
[root@ip-10-73-145-136 conf]# docker pull domU-12-31-39-14-5D-9B.compute-1.internal:5000/myrepo
Pulling repository domU-12-31-39-14-5D-9B.compute-1.internal:5000/myrepo
155d292465db: Download complete
0cee42788752: Download complete
feab39ed50f7: Download complete
539c0211cd76: Download complete
b58b382eb217: Download complete
f768630bab4c: Download complete
3baae99c022d: Download complete
54cd5c7eccc3: Download complete
9eadab9e81c4: Download complete
[root@ip-10-73-145-136 conf]# docker images
REPOSITORY                                              TAG                 IMAGE ID            CREATED             VIRTUAL SIZE
domU-12-31-39-14-5D-9B.compute-1.internal:5000/myrepo   latest              feab39ed50f7        3 hours ago         1.782 GB
[root@ip-10-73-145-136 conf]#

Maintenant que l’on a notre image on va lancer son exécution avec un paramètre. Pour rappel le container va essayer de lancer un script shell “installAgent.sh” au démarrage. Ce script a besoin d’une adresse IP que je passe donc en paramètrede la commande run de docker.

[root@ip-10-239-7-206 conf]# docker run domU-12-31-39-14-5D-9B.compute-1.internal:5000/myrepo 127.0.0.1
**********Install OS Packages with YUM**********
Loaded plugins: fastestmirror
Error: Cannot retrieve repository metadata (repomd.xml) for repository: base. Please verify its path and try again
Could not retrieve mirrorlist http://mirrorlist.centos.org/?release=6&arch=x86_64&repo=os error was
14: PYCURL ERROR 7 - "Failed to connect to 2a02:2498:1:3d:5054:ff:fed3:e91a: Network is unreachable"
Loaded plugins: fastestmirror

Le container est lancé correctement. Mon script s’exécute avec le paramètre spécifié dans le run de docker. Cependant mon script ne fonctionne pas car yum ne réussit pas à récupérer les packages.

YUM ne réussit pas installer les packages car il essaye de communiquer avec les serveur distant en IPV6 et docker ne supporte pas l IPv6 :

Je dois donc trouver une solution pour mon script mais cela n’a aucun rapport avec notre sujet actuel.

Voilà donc comment mettre en place un registery privé Docker pour partager une application propriétaire dans notre Cluster.

Test libcloud 0.14 beta 3 sur GCE, AWS et Rackspace

Depuis la version 0.14 (encore en phase de bêta) il est possible d’utiliser Google Compute Engine. Il existe encore qq bugs que j’essaye d’aider a éliminer :

https://github.com/apache/libcloud/commit/7a04971288791a02c1c335f9d36da2f90d892b5b

Grace a libcloud il est tres facile de creer des machinnes virtuel dans les cloud public. Voila un petit exemple pour GCE, AWS et RackSpace :

def createNodeGce(iGceConex,iAmi, iInstance, iLocation):
 #image = [i for i in iGceConex.list_images() if i.id == iAmi ][0]
 size = [s for s in iGceConex.list_sizes() if s.name == iInstance][0]
 alocation = [s for s in iGceConex.list_locations() if s.name == iLocation][0]
 print("Create server with image : " + str(iAmi) + " and server type : " + str(size) + " and location : " + str(alocation))
 node = iGceConex.create_node(name=GCE_INSTANCE_NAME, image=iAmi, size=size,location=alocation)
 print(str(node))
 return node
def createNodeAws(iAwsConex,iAmi, iInstance):
 image = [i for i in iAwsConex.list_images() if i.id == iAmi ][0]
 size = [s for s in iAwsConex.list_sizes() if s.id == iInstance][0]
 print("Create server with image : " + str(image) + " and server type : " + str(size))
 node = iAwsConex.create_node(name=EC2_INSTANCE_NAME, image=image, size=size,ex_securitygroup=EC2_SECURITY_GROUP,ex_keyname=EC2_KEY_NAME)
 print(str(node))
def createNodeRackSpace(iRackConex,iAmi, iInstance):
 image = [i for i in iRackConex.list_images() if i.name == iAmi ][0]
 size = [s for s in iRackConex.list_sizes() if s.id == iInstance ][0]
 aSshKeyFilePath = "SSH_KEY_PUBLIC"
 print("Create server with image : " + str(image) + " and server type : " + str(size))
 node = iRackConex.create_node(name=RACKSPACE_INSTANCE_NAME, image=image, size=size)

L’exemple complet est disponnible sur github ICI :

https://github.com/charly37/LibCloud014b3Test/blob/master/TestLibCloud.py

Tester sur une machinne Ubuntu 13 sur AWS avec l’instal suivante :

#Install setuptools. Necessaire pour pip
sudo apt-get -y install python-setuptools

#Install GIT. Necessaire pour libcloud DEV
sudo apt-get -y install git

#install PIP
curl -O https://pypi.python.org/packages/source/p/pip/pip-1.4.1.tar.gz
tar xvzf pip-1.4.1.tar.gz
cd pip-1.4.1
sudo python setup.py install

#install libcloud 
sudo pip install git+https://git-wip-us.apache.org/repos/asf/libcloud.git@trunk#egg=apache-libcloud

Voila le resultat avec listing des VMs sur les 3 providers et puis creation d’une VM sur chaque provider avant de lister une nouvelle fois les VMs existente.
ubuntu@domU-12-31-39-09-54-77:~$ python test.py

Create libcloud conex obj
Then list the different provider object (to validate logins)
Listing GCE :
Listing EC2 :
Listing RackSpace :

Then list the different VMs (on each provider)
Listing GCE :
Vms :
[]

Listing EC2 :
Vms :
[<Node: uuid=f8cc89f6b6e061784e37c49fbc28a3917a86acf2, name=TEST, state=0, public_ips=[‘54.196.177.12’], provider=Amazon EC2 …>, <Node: uuid=e81bdb7b32d3fbff0ec745e9dc63cf1d7e5c32bb, name=____AWS_TUNNEL, state=0, public_ips=[‘54.227.255.145’, ‘54.227.255.145’], provider=Amazon EC2 …>, <Node: uuid=d231cd56e5e7f3ffad93eb7d1f0b9445e91199ed, name=____Couchbase Master, state=5, public_ips=[], provider=Amazon EC2 …>]

Listing RackSpace :
Vms :
[<Node: uuid=d6ef246e8a738ac80cdb99e2f162b1ec46f21992, name=Rgrid, state=0, public_ips=[u’2001:4801:7820:0075:55e7:a60b:ff10:acdc’, u’162.209.53.19′], provider=Rackspace Cloud (Next Gen) …>]

Then create nodes

Create server with image : <NodeImage: id=ami-ad184ac4, name=099720109477/ubuntu/images/ebs/ubuntu-saucy-13.10-amd64-server-20131015, driver=Amazon EC2  …> and server type : <NodeSize: id=t1.micro, name=Micro Instance, ram=613 disk=15 bandwidth=None price=0.02 driver=Amazon EC2 …>
<Node: uuid=0c2b1e827325d3605c338aed44eb7d87e2b448b1, name=test, state=3, public_ips=[], provider=Amazon EC2 …>
Create server with image : <NodeImage: id=f70ed7c7-b42e-4d77-83d8-40fa29825b85, name=CentOS 6.4, driver=Rackspace Cloud (Next Gen)  …> and server type : <OpenStackNodeSize: id=3, name=1GB Standard Instance, ram=1024, disk=40, bandwidth=None, price=0.06, driver=Rackspace Cloud (Next Gen), vcpus=1,  …>
Create server with image : centos-6-v20131120 and server type : <NodeSize: id=12907738072351752276, name=n1-standard-1, ram=3840 disk=10 bandwidth=0 price=None driver=Google Compute Engine …> and location : <NodeLocation: id=654410885410918457, name=us-central1-a, country=us, driver=Google Compute Engine>
<Node: uuid=cd805862d414792acd7b7ed8771de3d56ace54ad, name=test, state=0, public_ips=[u’173.255.117.171′], provider=Google Compute Engine …>

Wait few seconds

Then list the different VMs again(on each provider)

Listing GCE :
Vms :
[<Node: uuid=cd805862d414792acd7b7ed8771de3d56ace54ad, name=test, state=0, public_ips=[u’173.255.117.171′], provider=Google Compute Engine …>]

Listing EC2 :
Vms :
[<Node: uuid=f8cc89f6b6e061784e37c49fbc28a3917a86acf2, name=TEST, state=0, public_ips=[‘54.196.177.12’], provider=Amazon EC2 …>, <Node: uuid=e81bdb7b32d3fbff0ec745e9dc63cf1d7e5c32bb, name=____AWS_TUNNEL, state=0, public_ips=[‘54.227.255.145’, ‘54.227.255.145’], provider=Amazon EC2 …>, <Node: uuid=d231cd56e5e7f3ffad93eb7d1f0b9445e91199ed, name=____Couchbase Master, state=5, public_ips=[], provider=Amazon EC2 …>, <Node: uuid=0c2b1e827325d3605c338aed44eb7d87e2b448b1, name=test, state=0, public_ips=[‘50.16.66.112′], provider=Amazon EC2 …>]

Listing RackSpace :
Vms :
[<Node: uuid=a41759d8732fdbddf37a22327d63734bd89647aa, name=test, state=0, public_ips=[u’2001:4801:7819:0074:55e7:a60b:ff10:dc68′, u’166.78.242.86′], provider=Rackspace Cloud (Next Gen) …>, <Node: uuid=d6ef246e8a738ac80cdb99e2f162b1ec46f21992, name=Rgrid, state=0, public_ips=[u’2001:4801:7820:0075:55e7:a60b:ff10:acdc’, u’162.209.53.19′], provider=Rackspace Cloud (Next Gen) …>]
ubuntu@domU-12-31-39-09-54-77:~$

Serveur CentOs 6.4 avec stockage éphémère sur Amazon Web Service

Pour des raisons de portabilité entre Cloud provider j’ai décidé de migrer de l’image “Linux AMI” disponible uniquement sur AWS vers CentOS 6.4 disponible chez tous les Cloud public.

Pendant la migration j’ai cependant constate quelques problèmes avec les disques éphémères de mes instances qui n’été plus accessibles.

Avec la distribution « Linux AMI » et d’autres (par exemple Ubuntu) les disques éphémères sont utilisable dès la création de l’instance :

ubuntu@ip-10-181-140-167:~$ df
 Filesystem     1K-blocks   Used Available Use% Mounted on
 /dev/xvda1       8125880 739816   6966636  10% /
 none                   4      0         4   0% /sys/fs/cgroup
 udev              836600     12    836588   1% /dev
 tmpfs             169208    184    169024   1% /run
 none                5120      0      5120   0% /run/lock
 none              846032      0    846032   0% /run/shm
 none              102400      0    102400   0% /run/user
 /dev/xvdb      153899044 192068 145889352   1% /mnt

Alors qu’ils ne sont pas disponibles sur CentOS :

[root@ip-10-180-141-3 ~]# df
 Filesystem           1K-blocks      Used Available Use% Mounted on
 /dev/xvde              8256952    649900   7187624   9% /
 tmpfs                   847608         0    847608   0% /dev/shm
 [root@ip-10-180-141-3 ~]# ll

Pour pouvoir utiliser les disques éphémères sur une centOS il faut faire 2 choses !

1/demander à avoir les disques éphémères lors de la création de la VM.

Cela peut se faire dans l’interface graphique lors de la création de la VM (fig) ou alors en ligne de commande lors de la création également.

Ephemere

Dans mon cas j’utilise « libcloud » et il faut donc ajouter l’option « block mapping ». Voilà comment procéder :

node = EC2_Conex.create_node(name=aServerName, image=image, 
size=size,ex_securitygroup=[EC2_SECURITY_GROUP],ex_keyname=EC2_KEY_NAME, 
ex_blockdevicemappings=[{'DeviceName': '/dev/sdb', 'VirtualName': 'ephemeral0'}])

Ensuite il faut attendre que la VM soit créé pour passer à l’étape 2.

J’ai créé 2 VMs pour montrer la différence « avec » et « sans » l’option.

AVEC :

charles@ip-10-164-17-109:~$ ssh -i /Rbox/conf/Rbox_Proto2.pem root@ec2-107-21-170-54.compute-1.amazonaws.com
 Last login: Fri Oct  4 08:58:53 2013 from 10.164.17.109
 [root@ip-10-182-164-253 ~]# fdisk -l

 Disk /dev/xvdf: 160.1 GB, 160104972288 bytes
 255 heads, 63 sectors/track, 19464 cylinders
 Units = cylinders of 16065 * 512 = 8225280 bytes
 Sector size (logical/physical): 512 bytes / 512 bytes
 I/O size (minimum/optimal): 512 bytes / 512 bytes
 Disk identifier: 0x00000000

 Disk /dev/xvde: 8589 MB, 8589934592 bytes
 255 heads, 63 sectors/track, 1044 cylinders
 Units = cylinders of 16065 * 512 = 8225280 bytes
 Sector size (logical/physical): 512 bytes / 512 bytes
 I/O size (minimum/optimal): 512 bytes / 512 bytes
 Disk identifier: 0x00000000

Sans

[root@ip-10-28-86-161 ~]# fdisk -l

 Disk /dev/xvde: 8589 MB, 8589934592 bytes
 255 heads, 63 sectors/track, 1044 cylinders
 Units = cylinders of 16065 * 512 = 8225280 bytes
 Sector size (logical/physical): 512 bytes / 512 bytes
 I/O size (minimum/optimal): 512 bytes / 512 bytes
 Disk identifier: 0x00000000

 [root@ip-10-28-86-161 ~]# exit

La VM créer sans cette options ne pourra jamais utiliser le stockage éphémère et vous pouvez vous arrêter ici…..

La seconde étape permet d’utiliser les disques. En effet il ne sont pas utilisable pour le moment meme sur la machine qui a le disque éphémère :

[root@ip-10-182-164-253 ~]# df
 Filesystem           1K-blocks      Used Available Use% Mounted on
 /dev/xvde              8256952    650188   7187336   9% /
 tmpfs                   847608         0    847608   0% /dev/shm
 [root@ip-10-182-164-253 ~]#

2/Rendre les disques utilisable

 [root@ip-10-182-164-253 ~]# fdisk -l

 Disk /dev/xvdf: 160.1 GB, 160104972288 bytes
 255 heads, 63 sectors/track, 19464 cylinders
 Units = cylinders of 16065 * 512 = 8225280 bytes
 Sector size (logical/physical): 512 bytes / 512 bytes
 I/O size (minimum/optimal): 512 bytes / 512 bytes
 Disk identifier: 0x00000000

 Disk /dev/xvde: 8589 MB, 8589934592 bytes
 255 heads, 63 sectors/track, 1044 cylinders
 Units = cylinders of 16065 * 512 = 8225280 bytes
 Sector size (logical/physical): 512 bytes / 512 bytes
 I/O size (minimum/optimal): 512 bytes / 512 bytes
 Disk identifier: 0x00000000

 [root@ip-10-182-164-253 ~]# df
 Filesystem           1K-blocks      Used Available Use% Mounted on
 /dev/xvde              8256952    650188   7187336   9% /
 tmpfs                   847608         0    847608   0% /dev/shm
 [root@ip-10-182-164-253 ~]# mkfs -t ext4 /dev/xvdf
 mke2fs 1.41.12 (17-May-2010)
 Filesystem label=
 OS type: Linux
 Block size=4096 (log=2)
 Fragment size=4096 (log=2)
 Stride=0 blocks, Stripe width=0 blocks
 9773056 inodes, 39088128 blocks
 1954406 blocks (5.00%) reserved for the super user
 First data block=0
 Maximum filesystem blocks=4294967296
 1193 block groups
 32768 blocks per group, 32768 fragments per group
 8192 inodes per group
 Superblock backups stored on blocks:
         32768, 98304, 163840, 229376, 294912, 819200, 884736, 1605632, 2654208,
         4096000, 7962624, 11239424, 20480000, 23887872

 Writing inode tables: done
 Creating journal (32768 blocks): done
 Writing superblocks and filesystem accounting information:
 done

 This filesystem will be automatically checked every 34 mounts or
 180 days, whichever comes first.  Use tune2fs -c or -i to override.
 [root@ip-10-182-164-253 ~]#
 [root@ip-10-182-164-253 ~]# df
 Filesystem           1K-blocks      Used Available Use% Mounted on
 /dev/xvde              8256952    650188   7187336   9% /
 tmpfs                   847608         0    847608   0% /dev/shm
 [root@ip-10-182-164-253 ~]# mkdir /ephemeral0
 [root@ip-10-182-164-253 ~]# echo "/dev/xvdf /ephemeral0 ext4 defaults 1 2" >> /etc/fstab
 [root@ip-10-182-164-253 ~]# mount /ephemeral0
 [root@ip-10-182-164-253 ~]# df
 Filesystem           1K-blocks      Used Available Use% Mounted on
 /dev/xvde              8256952    650192   7187332   9% /
 tmpfs                   847608         0    847608   0% /dev/shm
 /dev/xvdf            153899044    191936 145889484   1% /ephemeral0

Et voilà 😉

Resume :

mkfs -t ext4 /dev/xvdf
mkdir /ephemeral0
echo "/dev/xvdf /ephemeral0 ext4 defaults 1 2" >> /etc/fstab
mount /ephemeral0