AcTricker

Im working in an openspace of 15 peoples and most of us are very cold. There is one thermostat for the whole openspace with the actual temperature display on it but it seems we cannot change the desired temperature… We complain several times to our management about it and after some time the responsible of the amenities comes and explains us the situation. The temperature is set by the landlord for the whole building and the sensor in our openspace is just to detect the temperature in our space to open air vent or not. In other word…there is nothing they can do about it, is it? 

This is the AcTricker! The solution to our problem 😉

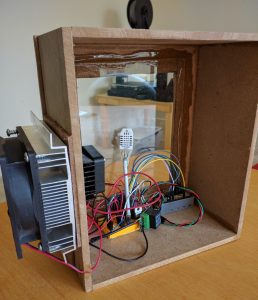
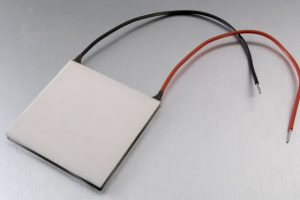
It’s design to be put against the wall around the temperature sensor. It will create a cold micro climate around the sensor to trick it thinking that the office is cold and thus never start the AC in our openspace. It works with a Peltier device that generate cold inside the enclosure and Hot outside of the enclosure when a current is passing (I did not research how/why it is work but just use it as is).

The Peltier device is in sandwich with the hot face facing outside with a big heatsink/fan to dissipate the heat and the cold side facing in the enclosure with a smaller heatsink/fan. It is important to dissipate the heat/cold quickly otherwise the Peltier become inefficient. It would had been enough to stop here and the device would had been functional nevertheless I wanted to add more functionalities… 

The whole system is control with an android application with Bluetooth so people can check what is the simulated temperature inside the enclosure and act on it by stopping the Peltier device and fans. The brain of the whole system on the device side is an Arduino micro (small size). It is connected to a Bluetooth modem and a temperature/humidity sensor (DHT22/RHT03) for data exchange. There is also 2 MOSFET to control the fans and 1 static relay to control the Peltier device. 

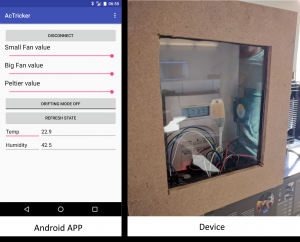
The android application allows to retrieve Temperature and Humidity and control the fans and Peltier. The application design is very similar to the one I created for previous project (like this one) and use the BT of android to communicate with the device so i will not details again here. The Arduino side is also very similar to previous projects (same one than the app). Here is the system after it is plug (android screen capture on the right and device on the left) :

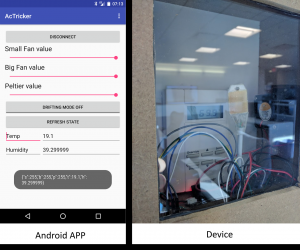
and the result 10 minutes after:

We reduce the temperature from 23 degrees Celsius to 19 degrees Celsius leading the AC to completely stop 😉

Code is on my bitbucket repo.

Improvement idea: Have the Arduino automatically stopping the Peltier/fan when the temperature inside is low enough to save power and reduce noise. 

Static Relay ??

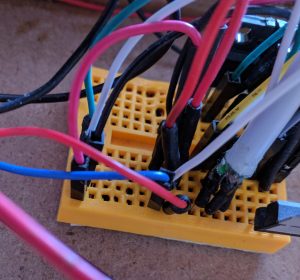
I used a static relay for the Peltier device after burning 2 MOSFETs when trying to control the Peltier with them. The MOSFET were becoming very hot very quick and even damage the breadboard as you can see on the picture

At the beginning, I was not sure why the MOSFET was becoming so hot. I know that the Peltier device use lot of current (around 7A) but the MOSFET I used (P16NF06FP) should had been OK since it was able to handle load up to 11A (I use the TO-220FP package which is plastic package and thus dissipate less heat than the metal package):

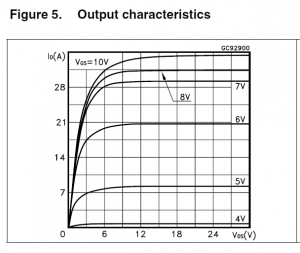
After some research (and particularly this blog post) I think the explanation is that the MOSFET was not able to handle 11A with my configuration. I was driving the MOSFET from the Arduino with a voltage of 5V but the MOSFET require more voltage to be fully open. I was thus not able to use the full MOSFET capability due to a gate voltage too low. The impact of the gate voltage (Vgs) on the possible current output (Id) is also in the datasheet:

As you can see if we switch the Gate voltage from 5V to the recommended 10V the current we can drain grow from 7A to more than 28A.

This is why the MOSFET was become too hot and unusable. I should have bought a MOSFET design to be driven with a gate voltage more compatible with Arduino like the IRL540.

Electric train hack proto

This will be a very quick post since there is nothing new on this project….except maybe the use of openscad to do the design of the train structure.

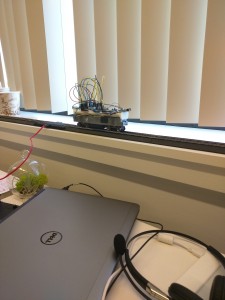
Original goal is to have a small electric train running all over the office hanging on the celling. This is the prototype 😉

Train_proto

I simply buy an electric train on Amazon :

http://www.amazon.com/Bachmann-Trains-Thoroughbred-Ready–Scale/dp/B001RG7LDU/ref=sr_1_12?s=toys-and-games&ie=UTF8&qid=1437179429&sr=1-12

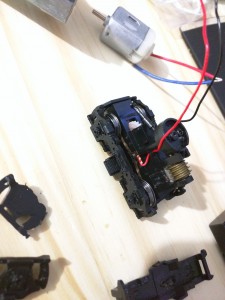
Then I rip it apart to understand how it works to be able to hack it.

Train principle

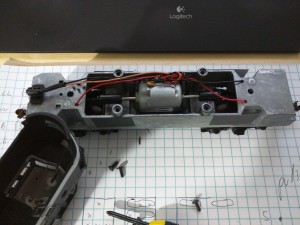
The train itself is very very stupid and is just some metal structure (pretty heavy by the way) with a motor.

Train_rip

The power for the motor comes directly from the rail through the wheels:

Train_wheel

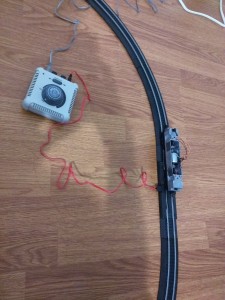
The rails on the other side are smarter since there is a control panel to change the train speed/direction.

Rail_train

The principle is thus very simple…..The command panel generate a different tension in the rail to increase/decrease the speed. It can also invert the tension to go revert.

Hack it

I wanted several things:

  • Possibiility to control the train from phone
  • Train should works without a close circuit (in the office we only have one straigt way).

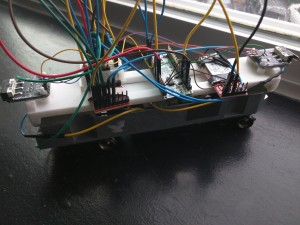
I decided to put the logic in the train rather than the rail. To do so I used an Arduino Micro (same as leonardo but smaller) with a motor controller and a BT receiver. There is nothing new here that I already done/explain in previous project except the motor controller.

The Bluetooth communication with an Android APP is the same software that the one used in this previous project : http://djynet.net/?p=639

The motor controller is the one of Sparkfun (HERE) and can control up to 2 motors. I used it to be able to change the motor rotation direction and speed (with PWM from arduino). This is indeed mandatory because the train will have to go in the 2 directions due to the linear rail circuit (one strait line).

The rails have now a constant tension of 12V from a AC/DC converter which power all the cards. The train is equipped with 2 sensors at front and rear. They are used to detect collision at the end of rail road and change the motor direction to go reverse

collision_sensor

The program is pretty simple since it just monitor collision sensor to change direction and serial bus for incoming Bluetooth message.

Finally I needed to put all that on the top of the train base with a nice 3D printed support. This was the good opportunity to try 3D printing. I done the design with OpenScad

Thus it might be the application you are looking for when you are planning to create 3D models of machine parts but pretty sure is not what you are looking for when you are more interested in creating computer-animated movies.

OpenSCAD is not an interactive modeller. Instead it is something like a 3D-compiler that reads in a script file that describes the object and renders the 3D model from this script file.

To sum up….you code your design and then compile it to generate the STL file 😉

I just created a basic shape with the place for the sensor at both end and then upload it on shapeways (a cloud 3D printing service).

train_3d_base

It fit perfectly the train and here is the final result once everything is mounted on it:

train_final

All the code (Arduino, Android, OpenScad) is available on my bitbucket account here.

Next step…..why not a camera on the train streaming live 😉

Bluetooth Low Energy device and Android communication

Long time I didn’t post an article since I was busy with my move to Boston…..

I was so tired of having to type my Android Password all the time I wanted to use my phone (when listening to music for example) that I decided to do something about it….. Nevertheless I didn’t want to remove the password protection on my phone since it contains lot of important information.

First I decided to have a look on NFC communication to be able to unlock the phone with a NFC card. I didn’t have lot of success with this lead since the NFC module is stop when the device is locked (as far as I understand).

Then I thought about using Bluetooth communication since I already had some experience on BT communication under android (link). I also wanted to have a look on Bluetooth last version “Bluetooth low energy”. It seems a promising technology (Apple Ibeacon, Smartwatch, Activity tracker…). I finally decided to create a service on Android which will detect the BLE devices in range and depending on that can remove/reset the android security policy. Basically if my BLE device is in range the service will remove the android security policy so the phone will no longer require a password. Moreover as soon as the BLE device is no longer in range the service will revert to the previous security policy (see video for concrete example).

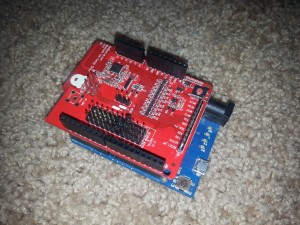
I didn’t focus too much on the hardware part which is simply composed of a BLE beacon. To do it I simply used a Arduino Leonardo and a BLE Arduino shield: http://redbearlab.com/bleshield/

BLE_Ardu

The Arduino code is the example provided in the shield library available here

The Android part of the project is composed of 2 parts: BLE interface and Android Device Policy interface.

BLE interface

The first important thing to understand is that the support of BLE is only working fine with Android > 4.4 (the official doc mentioned 4.3 but some people report issue when trying to use 4.3 and BLE). Be sure to use the API >= 4.4.

There is pretty good tutorial on Google Android Website available here : https://developer.android.com/guide/topics/connectivity/bluetooth-le.html

I mainly follow it (with lot of simplification to kept the only necessary step) to dialogue with my BLE device. It would be useless to describe it here but the process is pretty straightforward :

  • Declare valid permission (some website indicate that the BLUETOOTH_ADMIN is only necessary to turn on/off the BT and thus you don’t need it if the BT is already ON….this is correct for BT but not for BLE. )
  • Activate BT if necessary. Similar to the BT process
  • Scan for BLE devices : Don t forget to stop scanning ASAP otherwise it will empty your phone battery. Implement the scan callback (called every time that the scan finds a device
  • Connect to the BLE : BLE connection is different from the usual BT. There is more granularity in the association process due to the fact that the BLE device can expose several different services with different access level. For example the device could let you access public information without any access check and offer private functionality (like administration) with user access control.
  • Register to BLE change : Once connected we also reegister to the BLE device status changes. This will be used by the process to activate (or not) the Android security policy. This is done by implementing the callback “onConnectionStateChange”
    public void onConnectionStateChange(BluetoothGatt gatt, int status, int newState) {
                Log.i("MyActivity", "onConnectionStateChange");
                gatt.readRemoteRssi();
                if(newState ==  BluetoothProfile.STATE_CONNECTED) {
                    aDeviceInRange = true;
                    deactivate_lock();
                    Log.i("MyActivity", "Device is in range");
                }
                else {
                    aDeviceInRange = false;
                    Log.i("MyActivity", "Device is not in range");
                    activate_lock();
                }
    
                runOnUiThread(new Runnable() {
    
                    @Override
                    public void run() {
                        Log.i("MyActivity", "scanning");
    
                        TextView t = (TextView)findViewById(R.id.textView4);
                        t.setText("Status : " + String.valueOf(aDeviceInRange));
                    }
                });
            }
    

 Android Device Policy changes

Unlike the BLE connection there is no clear documentation about “how to change android security setting”. If you look for it you will find 2 things : KeyguardManager/KeyguardLock and WindowManager.LayoutParams.FLAG_DISMISS_KEYGUARD.

So let’s be clear …. There is no way to do it with the “layout flag”. The best you will achieve is to be able to turn on the phone and display your application but you will not be able to exit your application. If you try to exit your application the OS will ask for the password. That is the best you can do today with this solution.

The other one “KeyguardManager/KeyguardLock” could (or could not) work depending on your luck ! Indeed it has been deprecated since API 13 as explained on the official documentation here : http://developer.android.com/reference/android/app/KeyguardManager.KeyguardLock.html

Hopefully it works fine in my case so I didn’t dig too much for another solution but if it doesn’t works for you I suggest to check the android device administration class available here (but continue reading) : http://developer.android.com/guide/topics/admin/device-admin.html

The lock/unlock code is thus pretty simple with the 2 following functions :

    public void activate_lock() {
        Log.i("MyActivity", "click on activate lock button");
        boolean isAdmin = mDevicePolicyManager.isAdminActive(mComponentName);
        if (isAdmin) {
            boolean result = mDevicePolicyManager.resetPassword("test",DevicePolicyManager.RESET_PASSWORD_REQUIRE_ENTRY);
            KeyguardManager kgManager = (KeyguardManager)getSystemService(Activity.KEYGUARD_SERVICE);
            KeyguardManager.KeyguardLock lock = kgManager.newKeyguardLock(Context.KEYGUARD_SERVICE);
            lock.reenableKeyguard();
        }else{
            Toast.makeText(getApplicationContext(), "Not Registered as admin", Toast.LENGTH_SHORT).show();
        }
    }

    public void deactivate_lock() {
        Log.i("MyActivity", "click on remove lock button");
        boolean isAdmin = mDevicePolicyManager.isAdminActive(mComponentName);
        if (isAdmin) {
            mDevicePolicyManager.resetPassword("",0);
            KeyguardManager kgManager = (KeyguardManager)getSystemService(Activity.KEYGUARD_SERVICE);
            KeyguardManager.KeyguardLock lock = kgManager.newKeyguardLock(Context.KEYGUARD_SERVICE);
            lock.disableKeyguard();
        }else{
            Toast.makeText(getApplicationContext(), "Not Registered as admin", Toast.LENGTH_SHORT).show();
        }
    }

The full code (not sure it include the last changes done just before I move to Boston) available on my BitBucket account here and a demo video is available on youtube here.

Next steps

None ! indeed I just read an article about android 5.0 and this exact functionality has been integrated on the OS itself so my app is no longer useful. The full article is available on TC : http://techcrunch.com/2014/10/28/android-5-lollipop-security-features/ but it solve the exact same problem as you can see from the abstract below :

Lollipop adds some new lock methods that make it easier to keep your 
device secure, which is a huge boon to the overall integrity of the 
platform. The biggest roadblock to mobile device security is actually 
user apathy, which sees people skipping basic security practices like 
implementing a lock screen pin code because it’s inconvenient when 
you’re checking your device every few minutes. Lollipop offers Smart 
Lock to help address this, which uses paired devices to let you tell 
your device it’s okay to open up without requiring a password or 
other means of authentication.

BT discovery on Android

This article present how to use Bluetooth on Android device. The full project include Arduino Leonardo card and is detailed on this article : http://djynet.net/?p=639

First….some ressources to understand BT communication and BT handling on Android :

  • https://learn.sparkfun.com/tutorials/using-the-bluesmirf/all
  • https://learn.sparkfun.com/tutorials/bluetooth-basics/all
  • http://developer.android.com/guide/topics/connectivity/bluetooth.html

Before starting….I thanks the guy who wrote the following article which help me a lot to understand android – Arduino BT links :
http://english.cxem.net/arduino/arduino5.php

I finish the DEV but it happen to be more complicated than I originaly think it would be… Especialy the “receive” part from Android which require ansynch tasks. Nevertheless I put lot of comments in the code so it should be easy to understand it.

The first things is to request BT use in the manifest :

<uses-permission android:name=”android.permission.BLUETOOTH” />

Then I created a simple layout with some button and textview to interact with the user
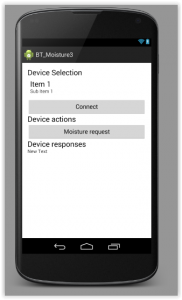
BT_Moisture_interface

The first section hold the potential BT devices and allow to connect to the one selected. The second section is only 1 button “Moisture request” which will send the char ‘h’ to the arduino board. Last text view is used to display the Arduino response which is the moisture value in the earth.

The association button-callback is done in the xml view directly :

<Button
        android:layout_width="fill_parent"
        android:layout_height="wrap_content"
        android:id="@+id/connect"
        android:onClick="myClickHandler"
        android:text="@string/hello_world" />

At startup the program check if the phone as BT capability :

if (mBluetoothAdapter == null) {
            // Device does not support Bluetooth
            Log.w("MyActivity", "Device does not support Bluetooth");
            Toast.makeText(this.getParent(), "Go buy a more recent phone", Toast.LENGTH_LONG).show();
        }
and if the BT is not turn on it will request it to the OS (which will prompt the user) :
if (!mBluetoothAdapter.isEnabled()) {
                Log.i("MyActivity", "BT is not enabled. I request to start it");
                Intent enableBtIntent = new Intent(BluetoothAdapter.ACTION_REQUEST_ENABLE);
                startActivityForResult(enableBtIntent, 643);
            }

Another solution is to turn it on without asking kindly but it request more permission (in manifest).

Once the BT is ready the program will populate the UI with the list of paired devices :

BluetoothAdapter mBluetoothAdapter = BluetoothAdapter.getDefaultAdapter();
        Set<BluetoothDevice> pairedDevices = mBluetoothAdapter.getBondedDevices();
        // If there are paired devices
        if (pairedDevices.size() > 0) {

            //Fill the spinner on view with devices
            Spinner spinner = (Spinner) findViewById(R.id.spinner);
            // Create an empty ArrayAdapter
            ArrayAdapter <CharSequence> adapter = new ArrayAdapter <CharSequence> (this, android.R.layout.simple_spinner_item );
            // Specify the layout to use when the list of choices appears
            adapter.setDropDownViewResource(android.R.layout.simple_spinner_dropdown_item);
            // Apply the adapter to the spinner
            spinner.setAdapter(adapter);
            //Populate IT !!
            for (BluetoothDevice device : pairedDevices) {
                adapter.add(device.getName() + "\n" + device.getAddress());
            }
        }

I didn’t handle the BT discovery here….which means that I already paired my Arduino with my phone. This operation could be done directly in android when you turn on the BT. It need to be done only 1 time and will ask you the code of the arduino BT module (1234).

Then….the user can select its module in the drop down menu (that we just populate in the previous function) and open a connection with it by pressing the “connect” button. It will call button callback :

public void myClickHandler(View v) {
        Log.i("MyActivity", "click button");
        connectMoisture();
    }

which call the real interesting process 🙂

protected void connectMoisture()
    {
        BluetoothAdapter mBluetoothAdapter = BluetoothAdapter.getDefaultAdapter();

        Log.i("MyActivity", "We open the connection");
        // I will use the standard SPP UUID - remember it is not link to our device on contrary of MAC address
        UUID aSppUuid = UUID.fromString("00001101-0000-1000-8000-00805F9B34FB");
        // The Arduino BT receiver address
        String aArduinoBtAddress = "00:06:66:60:42:BE";
        try{
            Log.i("MyActivity", "Going to retrieve the device");
            BluetoothDevice aBtDevice = mBluetoothAdapter.getRemoteDevice(aArduinoBtAddress);
            Log.i("MyActivity", "Device retrieved, creating socket now");
            _blueToothSocket = aBtDevice.createRfcommSocketToServiceRecord(aSppUuid);
            Log.i("MyActivity", "Socket created");
        }catch(IOException createSocketException){
            Log.e("MyActivity", "error1508"+ createSocketException.getMessage());
        }
        // Establish the connection.  This will block until it connects.
        Log.i("MyActivity", "Will try to connect to remote device");
        try {
            _blueToothSocket.connect();
            Log.i("MyActivity", "Connection is done");
        } catch (IOException e) {
            Log.e("MyActivity", "error148"+ e.getMessage());
            try {
                Log.i("MyActivity", "Closing socket");
                _blueToothSocket.close();
                Log.i("MyActivity", "Socket closed");
            } catch (IOException e2) {
                Log.e("MyActivity", "another issue" + e2.getMessage());
            }
        }
        // Step 3 create stream to talk with BT deice
        try {
            _streamOutgoing = _blueToothSocket.getOutputStream();
        } catch (IOException e) {
            Log.e("MyActivity", "another issue" + e.getMessage());
        }
    }
Now the program is connected to the device (the Ardunio BT board will probably have a LED which will reflect this new state). The user can now request the moisture value by clicking on the second button :
public void mySecondClickHandler(View v) {
        Log.i("MyActivity", "Sending h");
        //sendData("l");
        sendData("h");

    }

which call a sending routing with ‘h’ char :

protected void sendData(String message) {
        // start thread which handle input BT data before we send the request to Arduino.
        // With this design we know that we will be able to handle response
        ImplementsRunnable rc = new ImplementsRunnable();
        Thread t1 = new Thread(rc);
        t1.start();
        // The thread which is listening to input data from Arduino is now started
        // We can go to next step and send request to Arduino

        //Convert the String to send to byte
        byte[] msgBuffer = message.getBytes();
        Log.d("MyActivity", "About to send : " + message);

        try {
            _streamOutgoing.write(msgBuffer);
            //The next line is sending h char. I kept it as a debug test because I was worried Android will add extra char which will not be understand on Arduino side like end of line
            //_streamOutgoing.write('h');
        } catch (IOException e) {
            Log.e("MyActivity", "Error when trying to send data : " + e.getMessage());
        }
        //This is over. The Arduino response will be handle separately by another thread that we started before sending the request
    }

OK….So here I have to explain the first part where we start a dedicated thread. Before sending the request to Arduino Board we start a thread which will wait for incoming data on BT. It is the normal way to handle incoming message. The other part of the function is the data sending to arduino.

After this call the arduino received the char ‘h’ which trig a moisture detection and it will send back the moisture value to the BT module which will send it to the Android Phone.

As explained the reception is done in a dedicated thread. This is done by the following class which implement the “runable” interface :

class ImplementsRunnable implements Runnable {
        private InputStream _streamIncoming = null;

        public void run() {
            Log.d("MyActivity", "Thread run");

            //First we retrieve the input stream of the BT socket to be able to read incoming bytes
            try {
                _streamIncoming = _blueToothSocket.getInputStream();
                Log.i("MyActivity", "Input stream acquired");
            } catch (IOException e) {
                Log.e("MyActivity", "another issue" + e.getMessage());
            }

            //This single read works because I only wait for one message from Arduino but we should have a infinite loop here to catch everything arriving all the time
            try {
                //Not clean but we only receive a small message
                BufferedReader aMyBufferReader = new BufferedReader(new InputStreamReader(_streamIncoming));
                String aArduinoDataStr = "";
                aArduinoDataStr = aMyBufferReader.readLine();

                Log.i("MyActivity", "Received " + aArduinoDataStr );
                _ThreadMsgHandler.obtainMessage(31444, aArduinoDataStr).sendToTarget();     // Send to message queue Handler

            } catch (IOException e) {
                Log.e("MyActivity", "another issue" + e.getMessage());
            }
            Log.i("MyActivity", "Leaving thread run method " );
        }
    }

Once data are received by this thread they will be forwarded to the UI thread. This is done by the use of ‘Android handler’ in the UI thread :

_ThreadMsgHandler = new Handler(Looper.getMainLooper()) {
            //Will be called when new message arrive from other threads
            public void handleMessage(Message msg) {
                Log.d("MyActivity", "Handler is handling a message of type : " + msg.what);
                switch (msg.what) {
                    //Random ID .... should be the same as the one use when sending the msg from the thread
                    case 31444:
                        String aMyMoistureValue = (String) msg.obj;
                        // For now we only log it and toast it
                        Log.i("MyActivity", "Toasting moisture value : " + aMyMoistureValue);
                        Toast.makeText(MyActivity.this, aMyMoistureValue, Toast.LENGTH_LONG).show();
                        TextView aMyTextViewHandlingResponse = (TextView) findViewById(R.id.textView);
                        aMyTextViewHandlingResponse.setText("Moisture: " + aMyMoistureValue);
                        break;
                    //I think it should never occurs but just to be safe we log it
                    default:
                        Log.w("MyActivity", "Received an unknown message type : " + msg.what);
                }
            };
        };

Don’t forget…..this methods in on the UI thread ! We will come back to it after I finish explaining my runable class…..

The Data are send from the runable class to the UI thread with the handler :

_ThreadMsgHandler.obtainMessage(31444, aArduinoDataStr).sendToTarget();     // Send to message queue Handler

which is “catch” in the UI thread by the handler I just show before. The important point is the 31444 which has to be the same and act as an unique identifier. To finish the UI thread toast this value (debuging) and update the textview.

The results with the sensor in moist earth (or not) with the Arduino and Android output.
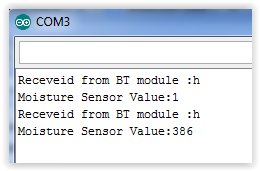
Moisture_Ardu

Andro_Moisture

The whole code for the project (Android and Arduino) is on my bitbucket account here.


Bluetooth Arduino for moisture sensor

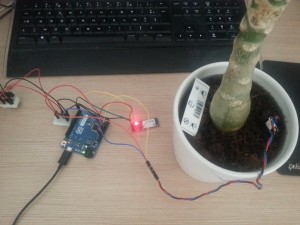
This WE I wanted to try BT communication with an Arduino…. To have a real project I decided to use a moisture sensor to detect from my phone if my green plant needs some water.

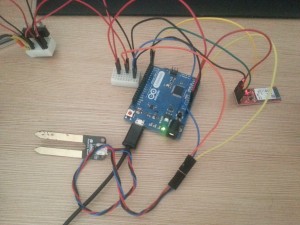
Global1

Global2

Arduino Board

To do so I bought a sparkfun BT module “Bluetooth Mate Silver” available following this direct link : https://www.sparkfun.com/products/12576

The moisture sensor is pretty standard : http://www.dfrobot.com/index.php?route=product/product&product_id=599#.U8JDQbE39b0

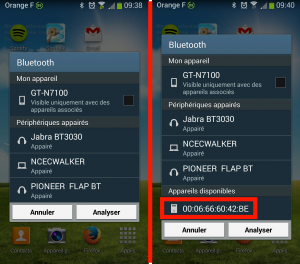
The connection to the BT module is pretty easy with Power (+3.3V, Gnd) and serial Data (Rx BT – Tx Leonardo and Tx BT – Rx Leonardo). As soon as the BT module is powered up it will be visible as a BT module.

2014-07-12-09-38-59

On the Arduino side I done a very simple program which will listen on the serial link established with the BT module. Once the Leonardo received a char ‘h’ it will read the humidity sensor value (analog read) and send it back on the BT link. Here is the code :

/*
Created by Charles Walker (charles.walker.37@gmail.com)
 Test program for bluetooth communication
 Tested with Arduino Leonardo and BT module Mate Silver (sparkfun)
 */

void setup()
{
  //USB Serial port
  Serial.begin(115200);
  //BT module serial port
  Serial1.begin(115200); 
}

void loop()
{
  delay(5000);
  if(Serial1.available())  
  {
    //We received something on BT module
    char aReceived;
    aReceived = (char)Serial1.read();
    Serial.print("Receveid from BT module :");
    Serial.println(aReceived);  

    // if we received a read humidity request
    if (aReceived=='h')
    {
      // Reading humidity
      unsigned int aHumidityValue;
      aHumidityValue=analogRead(0);
      Serial.print("Moisture Sensor Value:");
      Serial.println(aHumidityValue);
      // Sending it to the BT module
      Serial1.println(aHumidityValue);
    }
  }
  if(Serial.available())  
  {
    //We received something on USB serial line - We will send it to the BT module
    char aToBeSend;
    aToBeSend = (char)Serial.read();
    Serial.print("Going to send :");
    Serial.println(aToBeSend);

    //Sending it to the BT module
    Serial1.print(aToBeSend);
  }
}

The last version is available on bitbucket HERE.

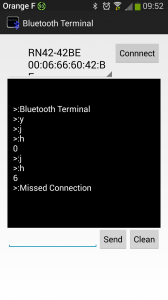
The second part is the Android application which will be able to interact with the Arduino module through BT communication. Before starting coding it I wanted to verify that the Arduino part is working fine.

To do so I download a Arduino App able to communicate over BT. I tried few of them and the best one I find is :

https://play.google.com/store/apps/details?id=ptah.apps.bluetoothterminal

I installed it and then try sending some commands to the Leonardo board.

BT_Moisture_Test

The application properly connects to the BT module and then we are able to send some commands. The Leonardo only respond to the ‘h’ command which trig moisture read and send it back to the phone.

Android application

First step….. Fix android Studio Beta 0.8 issue….. See : http://djynet.net/?p=652
Android APP creation in a dedicated thread….. See : http://djynet.net/?p=658

Conclusion :

The results with the sensor in moist earth (or not) with the Arduino and Android output.
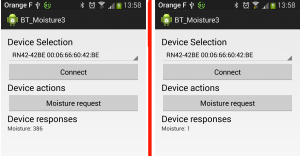
Moisture_Ardu

Andro_Moisture

The whole code for the project (Android and Arduino) is on my bitbucket account here.