Bluetooth Low Energy device and Android communication

Long time I didn’t post an article since I was busy with my move to Boston…..

I was so tired of having to type my Android Password all the time I wanted to use my phone (when listening to music for example) that I decided to do something about it….. Nevertheless I didn’t want to remove the password protection on my phone since it contains lot of important information.

First I decided to have a look on NFC communication to be able to unlock the phone with a NFC card. I didn’t have lot of success with this lead since the NFC module is stop when the device is locked (as far as I understand).

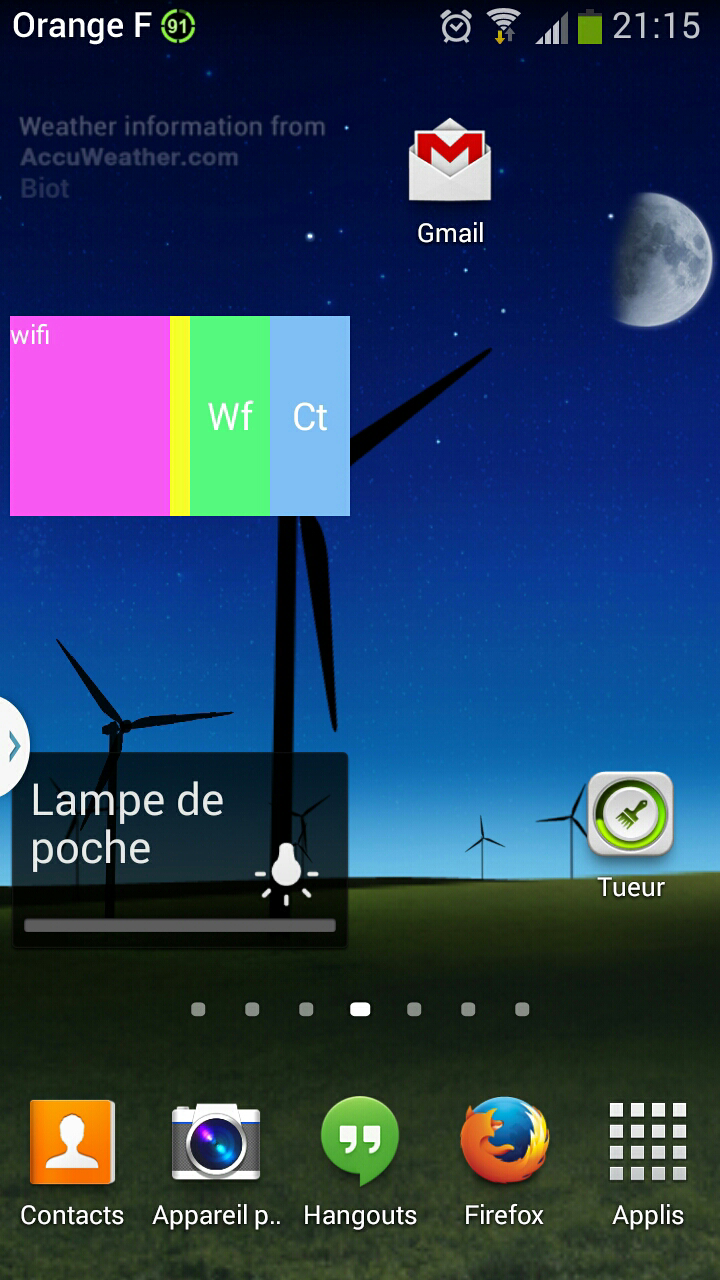
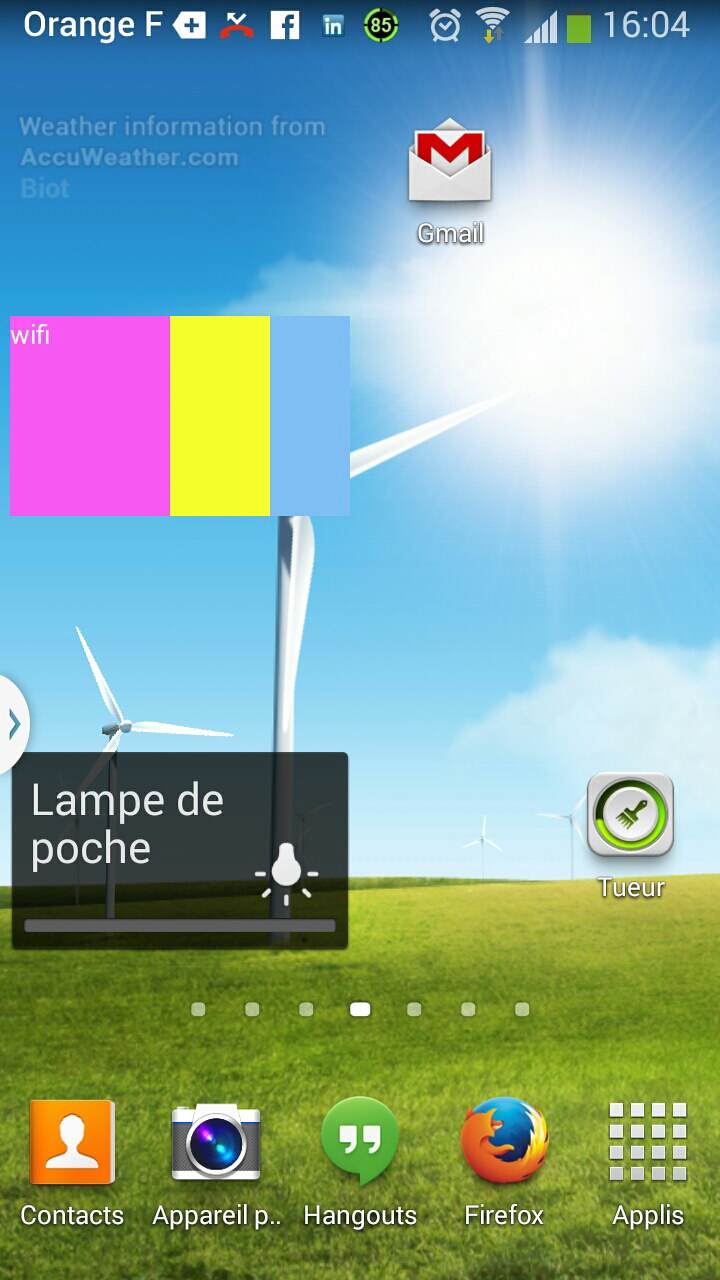
Then I thought about using Bluetooth communication since I already had some experience on BT communication under android (link). I also wanted to have a look on Bluetooth last version “Bluetooth low energy”. It seems a promising technology (Apple Ibeacon, Smartwatch, Activity tracker…). I finally decided to create a service on Android which will detect the BLE devices in range and depending on that can remove/reset the android security policy. Basically if my BLE device is in range the service will remove the android security policy so the phone will no longer require a password. Moreover as soon as the BLE device is no longer in range the service will revert to the previous security policy (see video for concrete example).

I didn’t focus too much on the hardware part which is simply composed of a BLE beacon. To do it I simply used a Arduino Leonardo and a BLE Arduino shield: http://redbearlab.com/bleshield/

BLE_Ardu

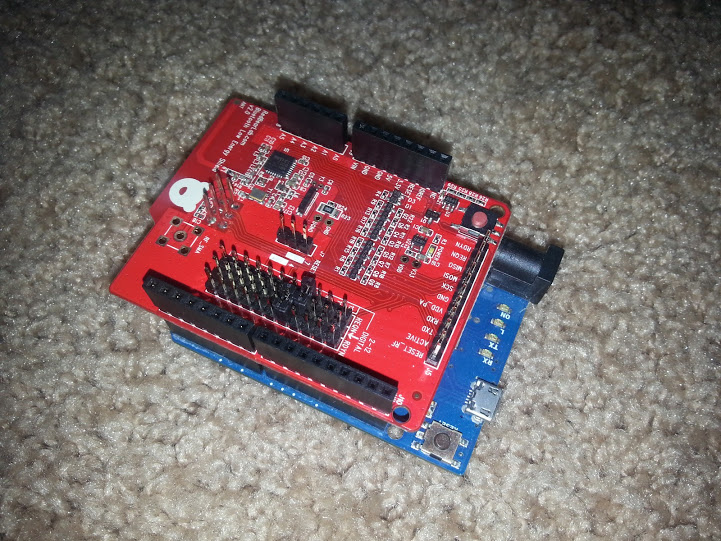
The Arduino code is the example provided in the shield library available here

The Android part of the project is composed of 2 parts: BLE interface and Android Device Policy interface.

BLE interface

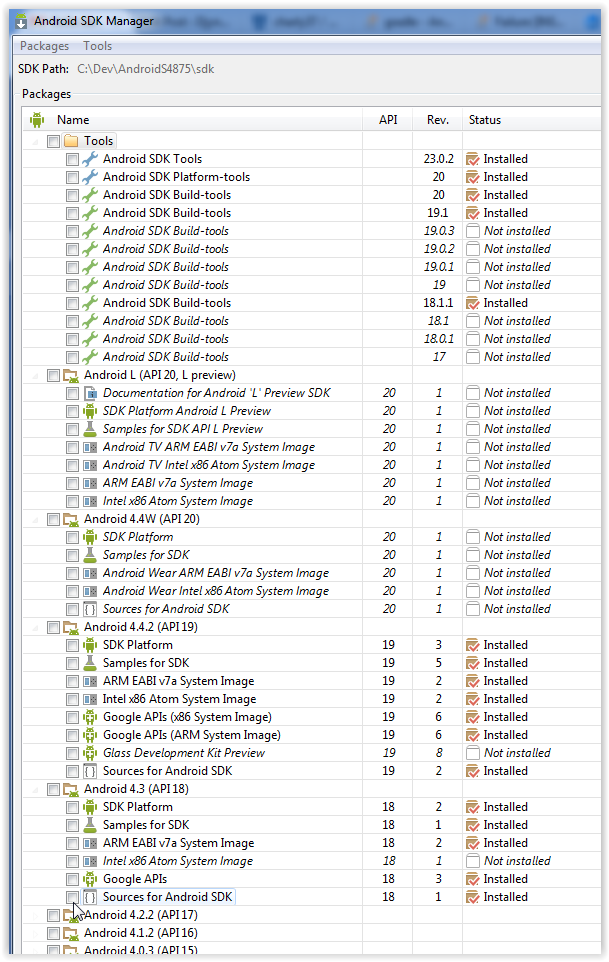
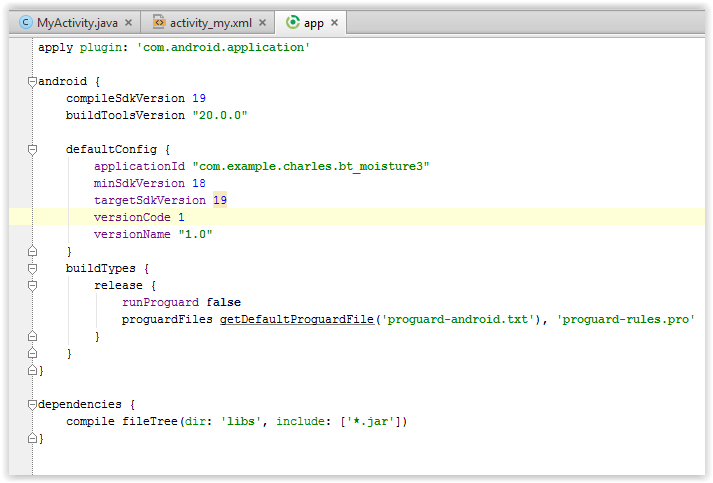
The first important thing to understand is that the support of BLE is only working fine with Android > 4.4 (the official doc mentioned 4.3 but some people report issue when trying to use 4.3 and BLE). Be sure to use the API >= 4.4.

There is pretty good tutorial on Google Android Website available here : https://developer.android.com/guide/topics/connectivity/bluetooth-le.html

I mainly follow it (with lot of simplification to kept the only necessary step) to dialogue with my BLE device. It would be useless to describe it here but the process is pretty straightforward :

  • Declare valid permission (some website indicate that the BLUETOOTH_ADMIN is only necessary to turn on/off the BT and thus you don’t need it if the BT is already ON….this is correct for BT but not for BLE. )
  • Activate BT if necessary. Similar to the BT process
  • Scan for BLE devices : Don t forget to stop scanning ASAP otherwise it will empty your phone battery. Implement the scan callback (called every time that the scan finds a device
  • Connect to the BLE : BLE connection is different from the usual BT. There is more granularity in the association process due to the fact that the BLE device can expose several different services with different access level. For example the device could let you access public information without any access check and offer private functionality (like administration) with user access control.
  • Register to BLE change : Once connected we also reegister to the BLE device status changes. This will be used by the process to activate (or not) the Android security policy. This is done by implementing the callback “onConnectionStateChange”
    public void onConnectionStateChange(BluetoothGatt gatt, int status, int newState) {
                Log.i("MyActivity", "onConnectionStateChange");
                gatt.readRemoteRssi();
                if(newState ==  BluetoothProfile.STATE_CONNECTED) {
                    aDeviceInRange = true;
                    deactivate_lock();
                    Log.i("MyActivity", "Device is in range");
                }
                else {
                    aDeviceInRange = false;
                    Log.i("MyActivity", "Device is not in range");
                    activate_lock();
                }
    
                runOnUiThread(new Runnable() {
    
                    @Override
                    public void run() {
                        Log.i("MyActivity", "scanning");
    
                        TextView t = (TextView)findViewById(R.id.textView4);
                        t.setText("Status : " + String.valueOf(aDeviceInRange));
                    }
                });
            }
    

 Android Device Policy changes

Unlike the BLE connection there is no clear documentation about “how to change android security setting”. If you look for it you will find 2 things : KeyguardManager/KeyguardLock and WindowManager.LayoutParams.FLAG_DISMISS_KEYGUARD.

So let’s be clear …. There is no way to do it with the “layout flag”. The best you will achieve is to be able to turn on the phone and display your application but you will not be able to exit your application. If you try to exit your application the OS will ask for the password. That is the best you can do today with this solution.

The other one “KeyguardManager/KeyguardLock” could (or could not) work depending on your luck ! Indeed it has been deprecated since API 13 as explained on the official documentation here : http://developer.android.com/reference/android/app/KeyguardManager.KeyguardLock.html

Hopefully it works fine in my case so I didn’t dig too much for another solution but if it doesn’t works for you I suggest to check the android device administration class available here (but continue reading) : http://developer.android.com/guide/topics/admin/device-admin.html

The lock/unlock code is thus pretty simple with the 2 following functions :

    public void activate_lock() {
        Log.i("MyActivity", "click on activate lock button");
        boolean isAdmin = mDevicePolicyManager.isAdminActive(mComponentName);
        if (isAdmin) {
            boolean result = mDevicePolicyManager.resetPassword("test",DevicePolicyManager.RESET_PASSWORD_REQUIRE_ENTRY);
            KeyguardManager kgManager = (KeyguardManager)getSystemService(Activity.KEYGUARD_SERVICE);
            KeyguardManager.KeyguardLock lock = kgManager.newKeyguardLock(Context.KEYGUARD_SERVICE);
            lock.reenableKeyguard();
        }else{
            Toast.makeText(getApplicationContext(), "Not Registered as admin", Toast.LENGTH_SHORT).show();
        }
    }

    public void deactivate_lock() {
        Log.i("MyActivity", "click on remove lock button");
        boolean isAdmin = mDevicePolicyManager.isAdminActive(mComponentName);
        if (isAdmin) {
            mDevicePolicyManager.resetPassword("",0);
            KeyguardManager kgManager = (KeyguardManager)getSystemService(Activity.KEYGUARD_SERVICE);
            KeyguardManager.KeyguardLock lock = kgManager.newKeyguardLock(Context.KEYGUARD_SERVICE);
            lock.disableKeyguard();
        }else{
            Toast.makeText(getApplicationContext(), "Not Registered as admin", Toast.LENGTH_SHORT).show();
        }
    }

The full code (not sure it include the last changes done just before I move to Boston) available on my BitBucket account here and a demo video is available on youtube here.

Next steps

None ! indeed I just read an article about android 5.0 and this exact functionality has been integrated on the OS itself so my app is no longer useful. The full article is available on TC : http://techcrunch.com/2014/10/28/android-5-lollipop-security-features/ but it solve the exact same problem as you can see from the abstract below :

Lollipop adds some new lock methods that make it easier to keep your 
device secure, which is a huge boon to the overall integrity of the 
platform. The biggest roadblock to mobile device security is actually 
user apathy, which sees people skipping basic security practices like 
implementing a lock screen pin code because it’s inconvenient when 
you’re checking your device every few minutes. Lollipop offers Smart 
Lock to help address this, which uses paired devices to let you tell 
your device it’s okay to open up without requiring a password or 
other means of authentication.

Android Studio 0.8.14 – missing SKD

I just had a new PC so I needed to reinstall Android Studio to do some Android DEV. I already install it several time previously but face an issue in the last version (0.8.14) available on the official website : https://developer.android.com/sdk/installing/studio.html

The download link mentioned that the SDK is part of the download package:

Androidpackage

The install page also details the procedure :

installAndroidStudio

Both of these 2 sources lead to think that the SDK is part of the installer…which in no longer the case since 0.8.14. So if you try to follow this procedure Android studio will not start properly (it will ask you for the SDK). I thought there was something wrong with my install and lost too much time investigating what could be wrong. I tried to run it as admin or other trick found on SO…..this is completely useless !

If you have the same error it is in fact completely normal ! Since 0.8.14 the SDK is no longer part of the DL and you have to install it yourself. The documentation is not up to date which is very confusing but the information is available on some place but hard to find. You will have it on the “recent change” page on the beta side channel available here : http://tools.android.com/recent/androidstudio0814inbetachannel

AndroidNoSdk

So in case you have the same issue…..don’t spend time on useless investigation and just install the SDK yourself ! I hope it will help people until google update the info on the official install doc.


Root ssh is never possible with CentOs/RHEL

I spend 1 day to understand why I was not able to log with root user on GCE for RH and CentOs image whereas it works fine for Debian image. I post here the results of my findings hoping it will save time for some other people (I also open a bug report : https://code.google.com/p/google-compute-engine/issues/detail?id=114)

For my application I wanted to be able to connect to my new CentOs VM with root user. I don’t want to go in the “allow ssh with root is dangerous”….

I made all the necessary changes on the SSH conf on the new created centOs image but I was not able to log on the VM. I know that the setup was correct since I do the exact same scenario with a debian image and it was working just fine….Thus I start suspecting there was an issue….

I start investigate and found out that there are some google scripts running on background on each VMs to take care of replicating the SSH keys defined on GCE console to the VMs. The scripts are available here :

https://github.com/GoogleCloudPlatform/compute-image-packages

I added some logs and see the following pattern:

[AuthorizeSshKeys] user : charles ssh_keys : ['ssh-dss ….vQBN7nAVg== charles@ip-172-31-45-251'] UID : 500
[WriteAuthorizedSshKeysFile] Original File : /root/.ssh/authorized_keys
[WriteAuthorizedSshKeysFile] New_keys_path : /tmp/tmpjwGRv8
[WriteAuthorizedSshKeysFile] UID : 0 GID : 0
[AuthorizeSshKeys] user : root ssh_keys : ['ssh-dss …..nC4RvQBN7nAVg== root@ip-172-31-45-251'] UID : 0
[WriteAuthorizedSshKeysFile] Original File : /root/.ssh/authorized_keys
[WriteAuthorizedSshKeysFile] New_keys_path : /tmp/tmp15enQW
[WriteAuthorizedSshKeysFile] UID : 11 GID : 0
[AuthorizeSshKeys] user : operator ssh_keys : [] UID : 11
[WriteAuthorizedSshKeysFile] Original File : /home/charles/.ssh/authorized_keys
[WriteAuthorizedSshKeysFile] New_keys_path : /tmp/tmpDB6knL
[WriteAuthorizedSshKeysFile] UID : 500 GID : 500

The script update the ssh key for the following users : Charles, root, and then “operator”. I understand the 2 firsts users “Charles” and “root” which are the users I defined in GCE console nevertheless the user “operator” is more strange especially because it end up by changing the “root” sshkey.

I investigate deeper the python code and understand this last flow updating “operator” user. The google python daemon use /etc/passwd to determine the path to the ssh key and on RedHat (or Centos) the operator user is defined with :

User UID GID Home Directory Shell
root 0 0 /root /bin/bash
operator 11 0 /root /sbin/nologin

(source : https://access.redhat.com/documentation/en-US/Red_Hat_Enterprise_Linux/3/html/Reference_Guide/s1-users-groups-standard-users.html)

The « home dir » of « operator » is thus /root…..leading the daemon to update /root/.ssh/auth… when working on “operator” user. It thus removes the real “root” file preventing the root login. Checking deeper this flow is designed to clean the “ssh key” file for the users which are not present on the GCE console (which is the case for “operator”).

I would like to have more time to propose a patch but I me late on my project. I done a workaround which is to create a new centOs image with /sbin as the home dir for the operator user :

usermod -m -d /sbin operator

and then everything works fine !

For the final solution I would suggest to change the script to maybe check if a “home” is shared and do nothing in this case or change the RH image.

Update (Nov2014) : The issue has been fixed on GCE side with last version of images.

BT discovery on Android

This article present how to use Bluetooth on Android device. The full project include Arduino Leonardo card and is detailed on this article : http://djynet.net/?p=639

First….some ressources to understand BT communication and BT handling on Android :

  • https://learn.sparkfun.com/tutorials/using-the-bluesmirf/all
  • https://learn.sparkfun.com/tutorials/bluetooth-basics/all
  • http://developer.android.com/guide/topics/connectivity/bluetooth.html

Before starting….I thanks the guy who wrote the following article which help me a lot to understand android – Arduino BT links :
http://english.cxem.net/arduino/arduino5.php

I finish the DEV but it happen to be more complicated than I originaly think it would be… Especialy the “receive” part from Android which require ansynch tasks. Nevertheless I put lot of comments in the code so it should be easy to understand it.

The first things is to request BT use in the manifest :

<uses-permission android:name=”android.permission.BLUETOOTH” />

Then I created a simple layout with some button and textview to interact with the user

BT_Moisture_interface

The first section hold the potential BT devices and allow to connect to the one selected. The second section is only 1 button “Moisture request” which will send the char ‘h’ to the arduino board. Last text view is used to display the Arduino response which is the moisture value in the earth.

The association button-callback is done in the xml view directly :

<Button
        android:layout_width="fill_parent"
        android:layout_height="wrap_content"
        android:id="@+id/connect"
        android:onClick="myClickHandler"
        android:text="@string/hello_world" />

At startup the program check if the phone as BT capability :

if (mBluetoothAdapter == null) {
            // Device does not support Bluetooth
            Log.w("MyActivity", "Device does not support Bluetooth");
            Toast.makeText(this.getParent(), "Go buy a more recent phone", Toast.LENGTH_LONG).show();
        }
and if the BT is not turn on it will request it to the OS (which will prompt the user) :
if (!mBluetoothAdapter.isEnabled()) {
                Log.i("MyActivity", "BT is not enabled. I request to start it");
                Intent enableBtIntent = new Intent(BluetoothAdapter.ACTION_REQUEST_ENABLE);
                startActivityForResult(enableBtIntent, 643);
            }

Another solution is to turn it on without asking kindly but it request more permission (in manifest).

Once the BT is ready the program will populate the UI with the list of paired devices :

BluetoothAdapter mBluetoothAdapter = BluetoothAdapter.getDefaultAdapter();
        Set<BluetoothDevice> pairedDevices = mBluetoothAdapter.getBondedDevices();
        // If there are paired devices
        if (pairedDevices.size() > 0) {

            //Fill the spinner on view with devices
            Spinner spinner = (Spinner) findViewById(R.id.spinner);
            // Create an empty ArrayAdapter
            ArrayAdapter <CharSequence> adapter = new ArrayAdapter <CharSequence> (this, android.R.layout.simple_spinner_item );
            // Specify the layout to use when the list of choices appears
            adapter.setDropDownViewResource(android.R.layout.simple_spinner_dropdown_item);
            // Apply the adapter to the spinner
            spinner.setAdapter(adapter);
            //Populate IT !!
            for (BluetoothDevice device : pairedDevices) {
                adapter.add(device.getName() + "\n" + device.getAddress());
            }
        }

I didn’t handle the BT discovery here….which means that I already paired my Arduino with my phone. This operation could be done directly in android when you turn on the BT. It need to be done only 1 time and will ask you the code of the arduino BT module (1234).

Then….the user can select its module in the drop down menu (that we just populate in the previous function) and open a connection with it by pressing the “connect” button. It will call button callback :

public void myClickHandler(View v) {
        Log.i("MyActivity", "click button");
        connectMoisture();
    }

which call the real interesting process 🙂

protected void connectMoisture()
    {
        BluetoothAdapter mBluetoothAdapter = BluetoothAdapter.getDefaultAdapter();

        Log.i("MyActivity", "We open the connection");
        // I will use the standard SPP UUID - remember it is not link to our device on contrary of MAC address
        UUID aSppUuid = UUID.fromString("00001101-0000-1000-8000-00805F9B34FB");
        // The Arduino BT receiver address
        String aArduinoBtAddress = "00:06:66:60:42:BE";
        try{
            Log.i("MyActivity", "Going to retrieve the device");
            BluetoothDevice aBtDevice = mBluetoothAdapter.getRemoteDevice(aArduinoBtAddress);
            Log.i("MyActivity", "Device retrieved, creating socket now");
            _blueToothSocket = aBtDevice.createRfcommSocketToServiceRecord(aSppUuid);
            Log.i("MyActivity", "Socket created");
        }catch(IOException createSocketException){
            Log.e("MyActivity", "error1508"+ createSocketException.getMessage());
        }
        // Establish the connection.  This will block until it connects.
        Log.i("MyActivity", "Will try to connect to remote device");
        try {
            _blueToothSocket.connect();
            Log.i("MyActivity", "Connection is done");
        } catch (IOException e) {
            Log.e("MyActivity", "error148"+ e.getMessage());
            try {
                Log.i("MyActivity", "Closing socket");
                _blueToothSocket.close();
                Log.i("MyActivity", "Socket closed");
            } catch (IOException e2) {
                Log.e("MyActivity", "another issue" + e2.getMessage());
            }
        }
        // Step 3 create stream to talk with BT deice
        try {
            _streamOutgoing = _blueToothSocket.getOutputStream();
        } catch (IOException e) {
            Log.e("MyActivity", "another issue" + e.getMessage());
        }
    }
Now the program is connected to the device (the Ardunio BT board will probably have a LED which will reflect this new state). The user can now request the moisture value by clicking on the second button :
public void mySecondClickHandler(View v) {
        Log.i("MyActivity", "Sending h");
        //sendData("l");
        sendData("h");

    }

which call a sending routing with ‘h’ char :

protected void sendData(String message) {
        // start thread which handle input BT data before we send the request to Arduino.
        // With this design we know that we will be able to handle response
        ImplementsRunnable rc = new ImplementsRunnable();
        Thread t1 = new Thread(rc);
        t1.start();
        // The thread which is listening to input data from Arduino is now started
        // We can go to next step and send request to Arduino

        //Convert the String to send to byte
        byte[] msgBuffer = message.getBytes();
        Log.d("MyActivity", "About to send : " + message);

        try {
            _streamOutgoing.write(msgBuffer);
            //The next line is sending h char. I kept it as a debug test because I was worried Android will add extra char which will not be understand on Arduino side like end of line
            //_streamOutgoing.write('h');
        } catch (IOException e) {
            Log.e("MyActivity", "Error when trying to send data : " + e.getMessage());
        }
        //This is over. The Arduino response will be handle separately by another thread that we started before sending the request
    }

OK….So here I have to explain the first part where we start a dedicated thread. Before sending the request to Arduino Board we start a thread which will wait for incoming data on BT. It is the normal way to handle incoming message. The other part of the function is the data sending to arduino.

After this call the arduino received the char ‘h’ which trig a moisture detection and it will send back the moisture value to the BT module which will send it to the Android Phone.

As explained the reception is done in a dedicated thread. This is done by the following class which implement the “runable” interface :

class ImplementsRunnable implements Runnable {
        private InputStream _streamIncoming = null;

        public void run() {
            Log.d("MyActivity", "Thread run");

            //First we retrieve the input stream of the BT socket to be able to read incoming bytes
            try {
                _streamIncoming = _blueToothSocket.getInputStream();
                Log.i("MyActivity", "Input stream acquired");
            } catch (IOException e) {
                Log.e("MyActivity", "another issue" + e.getMessage());
            }

            //This single read works because I only wait for one message from Arduino but we should have a infinite loop here to catch everything arriving all the time
            try {
                //Not clean but we only receive a small message
                BufferedReader aMyBufferReader = new BufferedReader(new InputStreamReader(_streamIncoming));
                String aArduinoDataStr = "";
                aArduinoDataStr = aMyBufferReader.readLine();

                Log.i("MyActivity", "Received " + aArduinoDataStr );
                _ThreadMsgHandler.obtainMessage(31444, aArduinoDataStr).sendToTarget();     // Send to message queue Handler

            } catch (IOException e) {
                Log.e("MyActivity", "another issue" + e.getMessage());
            }
            Log.i("MyActivity", "Leaving thread run method " );
        }
    }

Once data are received by this thread they will be forwarded to the UI thread. This is done by the use of ‘Android handler’ in the UI thread :

_ThreadMsgHandler = new Handler(Looper.getMainLooper()) {
            //Will be called when new message arrive from other threads
            public void handleMessage(Message msg) {
                Log.d("MyActivity", "Handler is handling a message of type : " + msg.what);
                switch (msg.what) {
                    //Random ID .... should be the same as the one use when sending the msg from the thread
                    case 31444:
                        String aMyMoistureValue = (String) msg.obj;
                        // For now we only log it and toast it
                        Log.i("MyActivity", "Toasting moisture value : " + aMyMoistureValue);
                        Toast.makeText(MyActivity.this, aMyMoistureValue, Toast.LENGTH_LONG).show();
                        TextView aMyTextViewHandlingResponse = (TextView) findViewById(R.id.textView);
                        aMyTextViewHandlingResponse.setText("Moisture: " + aMyMoistureValue);
                        break;
                    //I think it should never occurs but just to be safe we log it
                    default:
                        Log.w("MyActivity", "Received an unknown message type : " + msg.what);
                }
            };
        };

Don’t forget…..this methods in on the UI thread ! We will come back to it after I finish explaining my runable class…..

The Data are send from the runable class to the UI thread with the handler :

_ThreadMsgHandler.obtainMessage(31444, aArduinoDataStr).sendToTarget();     // Send to message queue Handler

which is “catch” in the UI thread by the handler I just show before. The important point is the 31444 which has to be the same and act as an unique identifier. To finish the UI thread toast this value (debuging) and update the textview.

The results with the sensor in moist earth (or not) with the Arduino and Android output.

Moisture_Ardu

Andro_Moisture

The whole code for the project (Android and Arduino) is on my bitbucket account here.


Android 0.8 Beta – INSTALL_FAILED_OLDER_SDK

I updated my android studio to the last version 0.8.2. Since this update it is no longer possible to have my APP runing on my phone.

Everytime I tried to upload it to the phone I have the following error :
INSTALL_FAILED_OLDER_SDK

I tried a fresh install too leading to the same issue. After some googling it seems the issue impact lot of people :

  • http://stackoverflow.com/questions/24465289/android-studio-failure-install-failed-older-sdk
  • http://stackoverflow.com/questions/24469754/failure-install-failed-older-sdk-in-android-studio
  • https://code.google.com/p/android/issues/detail?id=72840
  • http://blog.csdn.net/hotlinhao/article/details/37498201
  • ….

I m not interested in the last API of Android L since my phone is only 4.3 nevertheless even by specifiying that I want to be using 4.3 the build didn’t take it into account. The solution I found is to remove all Android L SDK/Compiler from  the SDK manager and install android 4.3 (and/or 4.4)

Android4-3bug

and then restart android. After that the SDK selection will works fine and if you create a new project you should have the following gradle file.

gradleXml

Now the upload to the phone works fine 😉

Google plus sing-in API

Maintenant que je connais les bases de Flask je peux continuer mon test de l’API Google Plus.

La documentation la plus a jour est disponible ICI : https://developers.google.com/+/ et je vous conseil aussi de jeter un œil au tutorial disponible ICI : http://www.googleplusdaily.com/2013/03/add-google-sign-in-in-6-easy-steps.html

J’ai réalisé un site web minimaliste en utilisant Jquery Mobile et Flask. Le site offre la possibilité de se logger avec son compte Google grâce a la méthode de sign in de Google plus.

Création du client ID

Pour pouvoir utiliser les services de google il faut déclarer notre projet dans la console disponible a l’adresse suivante :

https://console.developers.google.com/project

Il faut ensuite créer un nouveau projet (ou utiliser un de vos projets existants). Il faut ensuite activer l API Google + pour ce projet en cliquant sur API.

GoogleApiOn

Il faut enfin créer une clé d’identification pour utiliser l’API. Pour cela on clique sur le sous menu “credentials” situe en dessous du menu API.

GoogleApiCle

 Site web

Le site est très simple et repose sur l’utilisation de Flask (voir mon article précédant). L’utilisation de l’API google est assez bien documente (voir liens au début de l’article) et je ne vais pas répéter toutes les étapes.

L’ensemble du code est disponible sur bitbucket ICI :
https://bitbucket.org/charly37/googlesign/overview

Il suffit de remplacer le client ID présent dans le code par celui crée dans l’étape précédente :

class="g-signin"
data-callback="signinCallback"
data-clientid="67694002414-idd640ukscsntd4nmn80gg66i6sirup1.apps.googleusercontent.com"
data-cookiepolicy="single_host_origin"
data-requestvisibleactions="http://schemas.google.com/AddActivity"
data-scope="https://www.googleapis.com/auth/plus.login">

Le résultat :

GoogleSignInApiLogin

A la fin du logging le site affichera le nom de l’utilisateur :

GoogleApiResult

Voila 😉


Flask

J’ai décidé de tester le système de “sign-in” de google pour authentification des gens sur un site web. En regardant plusieurs vidéos de google DEV sur youtube j’ai remarqué qu’ils utilisent souvent un serveur web python : Flask

Voilà donc quelques tests rapides de ce que l’on peut faire avec Falsk.

Test basique

Création d’un site qui affiche une string de bienvenu.

##############
#Test basique#
##############
#On creer un decorateur qui prend en parametre une route correspondant a une page web
@app.route('/')
#on decore notre fonction avec le decorateur precedement creer. Cette fonction sera en charge de creer la page web correspondant a la route du decorateur
def index():
    return "Hello"

#On refait un autre test pour une autre page web. Pour info le nom de la fonction n a aucun importance
@app.route('/test1')
def unTest():
    return "Test 1

FlaskBasic

Test multi-route

Plusieurs adresses renvoyant vers le même site basique.

##################
#Test multi route#
##################
#On refait un autre test pour une autre page web. On peut avoir plusieur decorateur pour un seul fonction
@app.route('/test31')
@app.route('/test32')
@app.route('/test33')
def unTest():
    return "Meme page pour test31 et test32 et test33"

FlasMultiRoute

Test route dynamique

Le site est un peu plus complexe car il utilise des informations passe dans l’adresse du site.

######################
#Test route dynamique#
######################
@app.route('/dynamique/<nom>')
#Attention : le parametre de la route doit etre le meme que le nom de l argument dans la fonction
def routeDynamik(nom):
    return "Bonjour : " + nom

FlaskComplexe

Test route redirection

le site vous redirige vers google en utilisant le code erreur 301

########################
#Test route redirection#
########################
@app.route('/testRedirect')
def testRedirect():
    return redirect('http://www.google.fr')

Test template

Le site est créé à partir d’un Template html

################
#Test templates#
################
@app.route('/template')
#Il faut absolument que la page correspondante html existe dans le repertoire template. La commande ll permetera de le verifier avec ll templates/hello_world.html
def TestTemplate():
    return render_template('hello_world.html')

Il faut également créer un fichier html de Template dans le répertoire “/template” avec le nom correspondant. Le nom du répertoire doit être respecte.

[root@domU-12-31-39-14-5D-9B templates]# cat hello_world.html
<!DOCTYPE html>
<html>
    <head>
        <meta charset="utf-8" />
        <title>hello</title>
    </head>

    <body>
        <h1>hello</h1>
    </body>
</html>

FalskTemplate

Test template dynamique

Le site crée à partir du Template prend en compte des informations passe depuis la fonction python.

#################################
#test avec template plus dynamik#
#################################
@app.route('/template2')
#Il faut absolument que la page correspondante html existe dans le repertoire template. La commande ll permetera de le verifier avec ll templates/hello_world.html
def TestTemplateidyna():
    return render_template('complex.html', titre="un titre de site", contenu="un contenu de site")

Comme pour l’exemple précédant il faut créer le Template html dans le répertoire template.

[root@domU-12-31-39-14-5D-9B templates]# cat complex.html
<!DOCTYPE html>
<html>
    <head>
        <meta charset="utf-8" />
        <title>{{ titre }}</title>
    </head>

    <body>
        <h1>{{ titre }}</h1>
            {{ contenu }}
    </body>
</html>

FalskTemplateComplexe

L’ensemble du code est disponible sur bitbucket : https://bitbucket.org/charly37/decouverteflask

Depot docker

Création d’un dépôt d’image docker prive pour distribuer notre application sur un ensemble de nœuds distribues.

Pour ceux qui ne connaissent pas Docker : https://www.docker.io/

Un Dépôt d’image docker s’appelle un “registery”. Il s’agit d’un serveur code en python et demande donc certaines dépendance pour être installe….

Heureusement les gens de docker ont également créé une image docker qui contient tout ce qu’il faut pour mettre en place notre registery en quelques secondes. Le seul pré-requit est donc d’installer docker

Installation de docker

Pour tester j’utilise une centOs 6.4 sur AWS. L’installation de Docker est assez simple grâce à la documentation : http://docs.docker.io/en/latest/

[root@ip-10-170-79-155 conf]# sudo yum -y install docker-io

puis

[root@ip-10-170-79-155 conf]# sudo service docker start
 Starting cgconfig service:                                 [  OK  ]
 Starting docker:                                           [  OK  ]
 [root@ip-10-170-79-155 conf]#

Vérification de l’installation

La vérification de l’installation peut se faire simplement en démarrant un bash depuis un container contenant fedora

[root@ip-10-170-79-155 conf]# sudo docker run -i -t fedora /bin/bash
Unable to find image 'fedora' (tag: latest) locally
Pulling repository fedora
58394af37342: Download complete
0d20aec6529d: Download complete
511136ea3c5a: Download complete
8abc22fbb042: Download complete
bash-4.2# ls
bin  dev  etc  home  lib  lib64  lost+found  media  mnt  opt  proc  root  run  sbin  srv  sys  tmp  usr  var
bash-4.2#

Maintenant que l’on a installé docker on va pouvoir créer notre repository privé.

Création d’un repository privé

Il suffit de récupérer un container docker qui contient le serveur python faisant office de repository avec toutes ses dépendances

[root@ip-10-235-32-145 conf]# docker pull samalba/docker-registry
Pulling repository samalba/docker-registry
2eabb5a82e71: Download complete
511136ea3c5a: Download complete
46e4dee27895: Download complete
476aa49de636: Download complete
8332c1d90a62: Download complete
324b0d2e019a: Download complete
c19da4fc3dea: Download complete
4b494adef24f: Download complete
10e80f2583d5: Download complete
76b4a87578b7: Download complete
ac854be3b13a: Download complete
1fd060b2bdb1: Download complete

Il suffit ensuite de démarrer le container

[root@ip-10-235-32-145 conf]# docker run -d -p 5000:5000 samalba/docker-registry
71e3adbb75eaad87e8f32462cd0963988092935f60fce9ffd74a43b852e942a7

On dispose maintenant d’un registery docker que l’on peut utiliser pour déployer notre application. Il ne faut pas oublier d’ouvrir le port 5000 sur la machine ou tourne notre registery….

Utilisation du registery privé

Création d’une image docker

On va tester l’utilisation de notre registre privee depuis une autre machine. La première chose à faire est de créer une nouvelle image qui contient notre software. Pour cela on utilise la fonction build de docker.

La création d’une image est très bien expliquée sur les sites suivants :

Voilà le dockerfile correspondant à mon application :

#https://index.docker.io/search?q=centos
#https://www.docker.io/learn/dockerfile/level1/
#http://docs.docker.io/en/latest/use/builder/

#Image docker de base : Centos (https://index.docker.io/_/centos/)
FROM centos

#le mainteneur du package
MAINTAINER Charles Walker, charles.walker.37@gmail.com

# Usage: ADD [source directory or URL] [destination directory]
# It has to be a relative path ! It will not works if runing build with stdin like docker build -t TEST1 - < Dockerfile
ADD ./packages /root/packages
ADD ./Data /root/Data
ADD ./conf /root/conf
ADD ./AWS_Non1aData /root/AWS_Non1aData

#commande a lancer sur le container pdt sa creation
#RUN

#La commande a execute qd le container se lance
#le hash dans la commande indique un argument
ENTRYPOINT /root/conf/installAgent.sh #

#Port to "open"
EXPOSE 22 80 443 4001 4369 5000 5984 7001 8080 8091 8092 8140 10000 10001 10002 10003 11210 11211 14111 20022 21100 22222 48007 49007 50007

#le repetoire qu on monte depuis le host physique
VOLUME ["/ama"]

Je vais maintenant demander a docker de mon construire une nouvelle image a partir de ce dockerfile avec :

[root@ip-10-138-39-50 ~]# docker build -t TEST4 .
Uploading context 1.489 GB
Uploading context
Step 1 : FROM centos
 ---> 539c0211cd76
Step 2 : MAINTAINER Charles Walker, charles.walker.37@gmail.com
 ---> Using cache
 ---> 719b786c1be6
Step 3 : ADD ./packages /root/packages
 ---> Using cache
 ---> 6b65b75fd77c
Step 4 : ADD ./Data /root/Data
 ---> e34e5c199d29
Step 5 : ADD ./conf /root/conf
 ---> d438752ee616
Step 6 : ADD ./AWS_Non1aData /root/AWS_Non1aData
 ---> 419f91258841
Step 7 : ENTRYPOINT /root/conf/installAgent.sh #
 ---> Running in ad779fd56403
 ---> d6156694fbb6
Step 8 : EXPOSE 22 80 443 4001 4369 5000 5984 7001 8080 8091 8092 8140 10000 10001 10002 10003 11210 11211 14111 20022 21100 22222 48007 49007 50007
 ---> Running in 492ee8547e8b
 ---> c91f6583e370
Step 9 : VOLUME ["/ama"]
 ---> Running in 7b35f3a0dedd
 ---> b220758ee96e
Successfully built b220758ee96e

La vérification est simple :

[root@ip-10-138-39-50 ~]# docker images
REPOSITORY          TAG                 IMAGE ID            CREATED             VIRTUAL SIZE
TEST4               latest              b220758ee96e        8 minutes ago       1.782 GB
centos              6.4                 539c0211cd76        10 months ago       300.6 MB
centos              latest              539c0211cd76        10 months ago       300.6 MB

Upload d’image docker sur notre registery privé

On va maintenant pousser cette image sur notre registery local. Pour rappel ce dernier tourne sur un autre serveur AWS :

DockerAwsNode

On commencer par renommerl’image puisque Docker utilise le namespace présent dans le nom de l’image pour savoir sur quel registery il doit pousser.

[root@ip-10-238-143-211 ~]# docker tag TEST4 domU-12-31-39-14-5D-9B.compute-1.internal:5000/myrepo

Ainsi Docker va maintenant pousser cette image sur notre registery privé. Le push se fait de la manière suivante :

[root@ip-10-238-143-211 ~]# docker push domU-12-31-39-14-5D-9B.compute-1.internal:5000/myrepo
The push refers to a repository [domU-12-31-39-14-5D-9B.compute-1.internal:5000/myrepo] (len: 1)
Sending image list
Pushing repository domU-12-31-39-14-5D-9B.compute-1.internal:5000/myrepo (1 tags)
539c0211cd76: Image successfully pushed
155d292465db: Image successfully pushed
0cee42788752: Image successfully pushed
9eadab9e81c4: Image successfully pushed
3baae99c022d: Image successfully pushed
54cd5c7eccc3: Image successfully pushed
b58b382eb217: Image successfully pushed
f768630bab4c: Image successfully pushed
feab39ed50f7: Image successfully pushed
Pushing tags for rev [feab39ed50f7] on {http://domU-12-31-39-14-5D-9B.compute-1.internal:5000/v1/repositories/myrepo/tags/latest}

 Utilisation de notre image

Nous allons maintenant créer un 3eme nœud AWS pour downloader notre image docker et l’utiliser.

On va récupérer notre image depuis notre nouveau noeud avec :

[root@ip-10-73-145-136 conf]# docker images
REPOSITORY          TAG                 IMAGE ID            CREATED             VIRTUAL SIZE
[root@ip-10-73-145-136 conf]# docker pull domU-12-31-39-14-5D-9B.compute-1.internal:5000/myrepo
Pulling repository domU-12-31-39-14-5D-9B.compute-1.internal:5000/myrepo
155d292465db: Download complete
0cee42788752: Download complete
feab39ed50f7: Download complete
539c0211cd76: Download complete
b58b382eb217: Download complete
f768630bab4c: Download complete
3baae99c022d: Download complete
54cd5c7eccc3: Download complete
9eadab9e81c4: Download complete
[root@ip-10-73-145-136 conf]# docker images
REPOSITORY                                              TAG                 IMAGE ID            CREATED             VIRTUAL SIZE
domU-12-31-39-14-5D-9B.compute-1.internal:5000/myrepo   latest              feab39ed50f7        3 hours ago         1.782 GB
[root@ip-10-73-145-136 conf]#

Maintenant que l’on a notre image on va lancer son exécution avec un paramètre. Pour rappel le container va essayer de lancer un script shell “installAgent.sh” au démarrage. Ce script a besoin d’une adresse IP que je passe donc en paramètrede la commande run de docker.

[root@ip-10-239-7-206 conf]# docker run domU-12-31-39-14-5D-9B.compute-1.internal:5000/myrepo 127.0.0.1
**********Install OS Packages with YUM**********
Loaded plugins: fastestmirror
Error: Cannot retrieve repository metadata (repomd.xml) for repository: base. Please verify its path and try again
Could not retrieve mirrorlist http://mirrorlist.centos.org/?release=6&arch=x86_64&repo=os error was
14: PYCURL ERROR 7 - "Failed to connect to 2a02:2498:1:3d:5054:ff:fed3:e91a: Network is unreachable"
Loaded plugins: fastestmirror

Le container est lancé correctement. Mon script s’exécute avec le paramètre spécifié dans le run de docker. Cependant mon script ne fonctionne pas car yum ne réussit pas à récupérer les packages.

YUM ne réussit pas installer les packages car il essaye de communiquer avec les serveur distant en IPV6 et docker ne supporte pas l IPv6 :

Je dois donc trouver une solution pour mon script mais cela n’a aucun rapport avec notre sujet actuel.

Voilà donc comment mettre en place un registery privé Docker pour partager une application propriétaire dans notre Cluster.

Android Widget V2 : Ajout Wifi

Suite de mon precedant artcile sur la creation d’un widget android :
http://djynet.net/?p=585

J’ai décidé d’ajouter un bouton supplémentaire pour changer l’état du wifi sur le téléphone. La premiere etape est d’ajouter la possibilite de controler le widi depuis notre application en ajoutant les permissions dans le manifest :

<uses-permission android:name="android.permission.ACCESS_WIFI_STATE" />
<uses-permission android:name="android.permission.CHANGE_WIFI_STATE" />
<uses-permission android:name="android.permission.WAKE_LOCK" />

Puis ajouter un bouton dans le layout du widget :

<Button
        android:id="@ id/sync_button2"
        android:layout_width="40dp"
        android:layout_height="match_parent"
        android:background="@color/green"
        android:text="@string/button1"
        android:layout_toLeftOf="@ id/sync_button"/>

Il est ensuite possible d’utiliser la classe android “wifimanager” pour intergair avec le module wifi.

import android.net.wifi.WifiManager;
...
 WifiManager wifiManager = (WifiManager) context.getSystemService(Context.WIFI_SERVICE);
        if (wifiManager.isWifiEnabled()) {
            wifiManager.setWifiEnabled(false);
        } else {
            wifiManager.setWifiEnabled(true);
        }

Dans notre cas on utilisera un event/broadcast pour déclenché cette action. Il s’agit du même type de code utilise dans mon article précédant.

Screenshots_2014-02-12-21-15-57

L’ensemble du code est disponible sur Bitbucket :

https://charly37@bitbucket.org/charly37/wifi3gstarterv2


Creation widget android

Dans cet article je vais expliquer comment creer un widget pour android. Le but etant d’avoir un widget sur le bureau avec un bouton et un compteur de clique.

Widget layout

La première étape est la création du layout pour notre widget. Ce dernier sera compose d’un « textview » pour afficher notre compteur et d’un bouton pour augmenter le compteur. On Placera le tout dans un « relative layout » avec la zone de text a gauche et le bouton a droite.

Voila le xml correspondant :

<?xml version="1.0" encoding="utf-8"?>

<RelativeLayout xmlns:android="http://schemas.android.com/apk/res/android"
    android:layout_width="match_parent"
    android:layout_height="match_parent"
    android:background="@color/yellow">

    <Button
        android:id="@ id/sync_button"
        android:layout_width="40dp"
        android:layout_height="match_parent"
        android:background="@color/blue"
        android:layout_alignParentRight="true"
        android:text="" />

    <TextView
        android:id="@ id/desc"
        android:layout_width="80dp"
        android:layout_height="match_parent"
        android:maxLines="1"
        android:text=""
        android:background="@color/pink"
        android:textColor="#fcfcfc"
        android:textSize="13sp"
        android:textStyle="normal" />

</RelativeLayout>

Ce fichier xml est a place dans /res/layout/widget_layout.xml

PS : Ce widget utilise des couleurs définies dans le fichier colors.xml. Cette méthode est décrite dans un de mes précédents posts.

Widget info

La seconde étape est de créer un fichier xml qui décrit notre widget. Ce fichier xml contient les informations générale de notre widget comme sa taille et la fréquence a laquelle on souhaite que l ‘OS l’update. Pour éviter une trop grand utilisation de la batterie Android ne prendra pas en compte les valeurs inférieur a 30 minutes.

Voila le fichier xml :

<?xml version="1.0" encoding="utf-8"?>

<appwidget-provider xmlns:android="http://schemas.android.com/apk/res/android"
    android:initialLayout="@layout/widget_layout"
    android:minHeight="40dp"
    android:minWidth="120dp"
    android:previewImage="@drawable/ic_launcher2"
    android:resizeMode="horizontal|vertical"
    android:updatePeriodMillis="1800000" >
</appwidget-provider>

TODO

AppWidgetProvider

Il s’agit d’une classe qui va se charger de la mise a jour du layout lors de la réception de l’événement “android.appwidget.action.APPWIDGET_UPDATE”. Pour cela la classe hérite de la classe de base android “AppWidgetProvider”.

public class MyAppWidgetProvider extends AppWidgetProvider

Cette classe facilite la création de widget en étendant la classe android générique de réception d’événement “BroadcastReceiver”.

Notre classe “MyAppWidgetProvider” doit donc implémenter la méthode “onUpdate” qui est appele a chaque update de notre widget. Dans cette méthode on va updater la view “remote” du widget. En effet le widget est embarque dans le homescreen et utilise donc une “remote view”.

On définie aussi le comportement du widget lors de l’appuie sur le bouton. Plus exactement on va générer un événement “net.djynet.intent.action.UPDATE_WIDGET” :

Intent intent = new Intent();
intent.setAction("net.djynet.intent.action.UPDATE_WIDGET");
return PendingIntent.getBroadcast(context, 0, intent,PendingIntent.FLAG_UPDATE_CURRENT);

Cet événement sera capture par une autre classe décrite ci-dessous.

BroadcastReceiver

Cette seconde classe sera en charge de gérer l’événement “net.djynet.intent.action.UPDATE_WIDGET” crée lors d’un clique sur le bouton. Pour cela notre classe va également hérité de”BroadcastReceiver” (et non AppWidgetProvider car il ne s’agit pas directement d’un événement standard android pour les widgets)

public class MyBroadcastReceiver extends BroadcastReceiver

La méthode “onreceive” doit être surcharge pour gérer l’événement de clique avec :

public void onReceive(Context context, Intent intent) {
        Log.i(context.getString(R.string.app_name_log), "Entering MyBroadcastReceiver:onReceive");
        if (intent.getAction().equals("net.djynet.intent.action.UPDATE_WIDGET")) {
            updateWidgetPictureAndButtonListener(context);
        }
    }

Tout comme notre “AppWidgetProvider” cette méthode va mettre a jour la vue de notre widget en indiquant le nombre de clique effectue sur le bouton.

private void updateWidgetPictureAndButtonListener(Context context) {
        Log.i(context.getString(R.string.app_name_log), "Entering MyBroadcastReceiver:updateWidgetPictureAndButtonListener");
        RemoteViews remoteViews = new RemoteViews(context.getPackageName(),R.layout.widget_layout);

        // updating view
        remoteViews.setTextViewText(R.id.desc, getDesc(context));

        // re-registering for click listener
        remoteViews.setOnClickPendingIntent(R.id.sync_button, MyAppWidgetProvider.buildButtonPendingIntent(context));

        MyAppWidgetProvider.pushWidgetUpdate(context.getApplicationContext(),remoteViews);
    }

Manifest

Pour rappel le manifest d’une application android permet au système de savoir ce que fait notre application et ses interactions avec le système android.

Dans notre manifest on va créer 2 « receiver » pour notre widget. On utilise le tag « receiver » pour les widget car ils font partis des « boradcast receiver ». Cela signifie qu’ils fonctionne sur la réception d’événements. Pour chaque receiver on indique donc l’événement et la classe qui sera en charge de sa gestion.

  • android.appwidget.action.APPWIDGET_UPDATE : Il s’agit de l’événement trige par le systeme lorsque ce dernier pense qu il est nécessaire d’updater le widget. La classe en charge de la gestion de cet événement est “net.djynet.wifistarter3g_main.MyAppWidgetProvider”
  • net.djynet.intent.action.UPDATE_WIDGET : Il s’agit de l’événement qu on va triger lors d’un appuie sur le bouton du widget. La classe en charge de la gestion de cet événement est “net.djynet.wifistarter3g_main.MyBroadcastReceiver”.

On va également indiquer le fichier de configuration associe a notre widget dans le tag « meta-data ».

Voila notre manifest :

<?xml version="1.0" encoding="utf-8"?>
<manifest xmlns:android="http://schemas.android.com/apk/res/android"
    package="net.djynet.wifistarter3g_main" >

    <application
        android:allowBackup="true"
        android:icon="@drawable/ic_launcher"
        android:label="@string/app_name"
        android:theme="@style/AppTheme" >

        <receiver android:name="net.djynet.wifistarter3g_main.MyAppWidgetProvider"
            android:label="@string/app_name">
            <intent-filter>
                <action android:name="android.appwidget.action.APPWIDGET_UPDATE" />
            </intent-filter>

            <meta-data
                android:name="android.appwidget.provider"
                android:resource="@xml/demo_widget_provider" />
        </receiver>

        <receiver android:name="net.djynet.wifistarter3g_main.MyBroadcastReceiver"
            android:label="@string/app_name" >
            <intent-filter>
                <action android:name="net.djynet.intent.action.UPDATE_WIDGET" />
            </intent-filter>

            <meta-data
                android:name="android.appwidget.provider"
                android:resource="@xml/demo_widget_provider" />
        </receiver>

    </application>

</manifest>

 Resultat

Voila le résultat une fois le widget installe sur le bureau :

WidgetResult1

Les appuies sur le bouton (en bleue a droite du widget) vont augmenter le compteur affiche comme on peut le voir ci dessous.

Widget2

Le résultat n’est pas très jolie mais permet de bien visualise les différents éléments du layout.

L’ensemble du code est disponible sur bitbucket ICI.